UGC Techdocs
  • Introduction
  • Guides
    • Analytics
      • Tracking UGC on Adobe Analytics
      • Tracking Widget interactions with Google Analytics
    • Direct Uploader
      • How to add Custom Data to Direct Uploader
      • How to capture Custom Data on Direct Uploader
      • How to automatically tag data on Direct Uploader
      • How to Customize error messages on Direct Uploader
      • How to Track Direct Uploader form submissions with Google Analytics (Universal & GA 4)
    • Data Templates
      • Creating a Data Template
    • Rights via Registration
      • Capture Custom Data on Rights by Registration Form
      • Styling Rights via Registration Form
    • REST API
      • Caching REST API results for optimization
      • Posting content into Nosto via Tile API
      • Posting images into Nosto via Tile API
    • Onsite Widgets (2.0)
      • Blank Canvas
        • How to Use the Blank Canvas to Create a Twitter Count Widget
        • Creating an Auto-Scrolling Carousel using Blank Canvas
        • Creating Gallery Widget by Using the Blank Canvas Widget
        • Creating a simple Hover effect using Blank Canvas
        • Creating a Word Cloud using Blank Canvas
        • Creating Your Widget by Using the Blank Canvas
      • Bind your own Events
      • Creating a Grid Widget from Waterfall
      • Create a Q&A Widget using Data Templates
      • Displaying a Widget in a Mobile App
      • Dynamically Specify Products to Display in Widget
      • Dynamically specify what Tile to display in a Widget
      • How to add a title / subtitle to a widget
      • How to localize the load more button on widgets
      • How to overlay existing Google Map with the UGC Map Widget
      • How to use Filter and search in a Widget
      • How to change click on inline tile behaviour to redirect to PDP in a Widget
      • Styling cross-sellers on Grid and Carousel Widgets
      • How to Load External JS and CSS into Widgets
      • Profiling Widget Performance
      • Re-targeting with Widgets and Facebook Pixel
      • Render Widget filters dynamically
      • Styling Carousel Widget
      • Styling Grid Widget
      • Styling Masonry Widget
      • Styling Waterfall Widget
      • Styling Widget Expanded Tile
      • Styling Widget Shopspots
      • Using Web Fonts in Widgets
    • Digital Screens
      • Customizing Carousel Event Screen
      • Customizing Mosaic Event Screen
      • Customizing Scrollwall Event Screen
      • Customizing the Mosaic Event Screen to Have 9 Even Tiles
    • Email
      • Adding Location to an Email Tile
      • Styling the Email Widget
    • Integrations
      • DoubleClick
        • UGC Ads with Nosto and Google DoubleClick
      • Zapier
        • Consuming UGC Webhooks via Zapier
      • Mailchimp
        • Bring Social Content into a Mailchimp Campaign
    • Webhooks
      • Trigger notifications when content is in the moderation queue
  • Widgets
  • API Docs
    • JavaScript API
      • Widgets
        • Introduction
        • API Reference for Content Widgets
        • API Reference for Blank Canvas
        • API Reference for Map Widget
      • Digital Screens
        • Introduction
        • API Reference
    • Content API
      • Reference
    • REST API
      • Reference
        • Filters API
        • Moderation Views API
        • Tags API
        • Terms API
        • Tiles API
        • Users API
        • Widgets API
        • Automation Rules API
        • REST API Reference Widgets style and config
      • Best Practices
    • Webhooks
  • Enterprise Tools
    • Automation Rules
      • Triggers
      • Actions
      • Samples
    • Data Templates
    • User Access Control (UAC)
    • Single Sign On (SSO)
    • Enterprise Admin User Interface (EAUI)
    • Zapier
  • Commerce Tools
    • Product Feeds
    • Widget Implementation
    • Reporting
    • Integrations
      • Google Tag Manager
      • Magento
      • SalesForce Commerce Cloud
      • Shopify
      • Shopify Add To Cart
        • Global Variant Mapping for Add to Cart
        • Customise Add to Cart Widget Experience
  • Analytics
    • Google Analytics 4
      • Getting Started
      • Widgets Events
      • E-commerce Events
      • Email Events
  • Terms of Use
Powered by GitBook
On this page
  • Overview
  • Installation
  • Configuration
  • Embed the Embeddable Admin UI
  • Generate Session Token
  • Custom Interaction for Embeddable Admin UI

Was this helpful?

  1. Enterprise Tools

Enterprise Admin User Interface (EAUI)

PreviousSingle Sign On (SSO)NextZapier

Was this helpful?

Overview

The Nosto's UGC Embeddable Admin User Interface (EAUI) enables Nosto's UGC OEM partners to embed components of the Visual UGC Admin User Interface into whitelisted systems.

Key features of the EAUI include:

  • Ability to embed a frameless version of the Nosto Admin Portal into Whitelisted domains.

  • Ability to manage user sessions within the EAUI iFrame, and perform SSO.

  • Ability to apply custom ACL rules to the EAUI iFrame

  • Ability to navigate to pages from outside of the EAUI iFrame

Installation

Configuration

Nosto's UGC EAUI offerings are available as a Plugin for OEM Partners. This plugin can be enabled for partners on their Development Stacks for testing and building integrations.

After a developer has installed the plugin, they will be able to retrieve the OAuth information from Nosto's UGC to reveal the OAuth Access Token.

Before the integration, ensure that you've added the parent page domain to the permitted domain section in the configuration only and use the domain name without the protocol. e.g. awesome.com or stackla.awesome.com (Please do not add the https:// value).
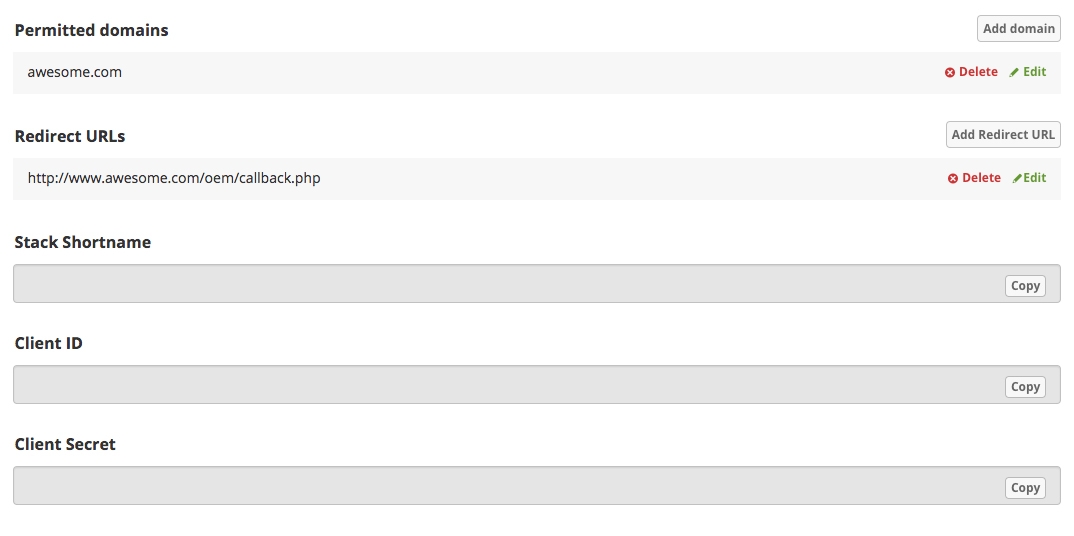
Note: The permitted domain will only be valid for a domain with an SSL certificate (HTTPS)

Embed the Embeddable Admin UI

To embed Nosto's UGC into an existing web portal, please copy the embed code from the configuration page, and add it to the section of your portal where you would like to render the Nosto's UGC page.

An example of the Embed Code is available below:

Generate Session Token

For the Nosto's UGC EAUI to work, it requires an active Session Token. This token is tied to a specific user and should be generated using OAuth.

As per the standard OAuth process, the steps involved in generating a session token are:

  • Generate a Short-term Token

  • Generate Access Token

  • Generate a Session Token

The steps required are listed below.

Generate Short-term Token

Generate the Short Term token by calling the Visual UGC Authenticate API Endpoint and providing the clientId, redirectUrl, and a relevant state

// POST Request
https://api.stackla.com/api/oauth2/authenticate?response_type=code&client_id={:clientId}&redirect_uri={:redirectUrl}&state={:anyState}

Once the OAuth request has been made, a short-term token will be provided in a format similar to below.

// Response
{:providedRedirecUrl}?code=0123456789xxxxxxxx9876543210&state={:anyState}

Generate Access Token

Taking the Short-Term Token, a second request can be made to generate an Access Token. The Short Term token should be added to the code parameter.

// POST Request
https://api.stackla.com/api/oauth2/token?grant_type=authorization_code&code={:code}&client_id={:clientId}&client_secret={:clientSecret}&redirect_uri={:providedRedirectUrl}

Assuming the Exchange is successful, the provided response will contain the following attributes:

// Response
{
    "access_token": "0123456789xxxxxxxxxxx9876543210",
    "refresh_token": "9876543210xxxxxxxxxxx0123456789",
    "token_type": "Bearer",
    "expires_in": 31536000
}

Access Tokens will, by default, expire every 365 days.

Generate Session Token

The final step in the process is now to generate the Session Token. This is done via the Access Token, by making a call to the OEM Session endpoint as per below.

// POST request
https://api.stackla.com/api/oemsession?stack={:stackShortName}&grant_type=exchange_token&client_id={:oauthClientId}&access_token={:accessToken}

If the exchange Session Token is a success the response will contain the valid session token as data (see example below):

// Response
{
    "data": "123456789xxx0987654321",
    "errors": []
}

After obtaining the valid Session Token, a developer will need to add it to the embed code data-session-id (replace [ADD_YOUR_SESSION_TOKEN] with a valid Session Token).

Session tokens are only valid for one use and have a lifespan of 60 seconds.

Note: If there is a requirement to have a different landing page, you can provide the valid URL page in the embed code as the data attribute data-url-redirect.

Custom Interaction for Embeddable Admin UI

Visual UGC's EAUI has a Javascript API allowing for Developers to calls from a menu system or links on the parent page, respective pages within the Visual UGC User Interface.

The Javascript API calls for Navigation are listed below.

Term Management

window.Stackla.EmbeddedAdminUI.navigateTo("/terms");

Curate Content

window.Stackla.EmbeddedAdminUI.navigateTo("/moderation");

Manage Tags

window.Stackla.EmbeddedAdminUI.navigateTo("/tags");

Manage Filters

window.Stackla.EmbeddedAdminUI.navigateTo("/filters");

Manage Widgets

window.Stackla.EmbeddedAdminUI.navigateTo("/widgets");

Manage Event Screens

window.Stackla.EmbeddedAdminUI.navigateTo("/events");

Manage Emails

window.Stackla.EmbeddedAdminUI.navigateTo("/emails");

Asset Manager

window.Stackla.EmbeddedAdminUI.navigateTo("/assets");

Back to top
Back to top
Back to top