The new marketing-permission flag denotes whether the customer has consented to email marketing. If the marketing-permission field is omitted, we assume that the current customer has not given their consent and Nosto will refrain from sending out any personalized triggered emails.
The marketing permission is false by default but if a user has explicitly agreed to receive marketing then you can set it to true manually. In practice, this means reading and mapping the value from opt-in for marketing in your platform e.g. a consumer explicitly subscribed for marketing emails when checking out.
The marketing-permission should be included as a part of the customer tagging and should be rendered on all pages.
Tagging customer reference
The customer-reference can be leveraged to unify sessions across channels such as between online and offline. It is a unique identifier provided by you that is used in conjunction with the Nosto cookie. The customer-reference can also be used to uniquely identify users in lieu of an email address.
The customer-reference should be a long, secure and a non-guessable identifier. For example, use your internal customer-id or the customer's loyalty program identifier and use a secure hash function like an HMAC-SHA256 to hash it.
Adding the Product Tagging
All product pages should contain the product tagging. The product tagging can be the entire metadata or only a small subset of it.
The product tagging is used to pass the context of the current product being viewed which in turn is used to personalize the recommendations e.g. cross-sellers, and commonly also periodically crawled by Nosto to build an index.
Note: The product tagging must be server-side rendered as the Nosto crawler does not execute Javascript.
You can tag your product pages in two different ways:
Tagging all the metadata (Recommended): This approach is the recommended way to tag your product pages. It contains the entirety of the product metadata and leverages the crawler to build a 1:1 replica of your catalog.
This approach entails tagging just the product-id and requires you to leverage an API to build a 1:1 replica of your catalog. This is an advanced use-case and requires that your account-manager disables crawling for your website.
Basic Tagging
In the event that you are unable to expose the entire subset of the product tagging, you can simply tag the product-id.
When the entirety of the product metadata is tagged, Nosto is able to crawl your site and build a 1:1 replica of your product catalog but in this basic example, you will need to use an alternative mechanism for synchronising your catalog with Nosto.
Note: If you do use this approach, your account-manager must disable crawling for your account. Failure to do so will result in a broken catalog replica.
Via an API
In order to keep your product catalog in Nosto up to date, you must leverage the .
Via a Feed
Nosto does not support a product feed and you must leverage the API in order to synchronise your product catalog.
Troubleshooting
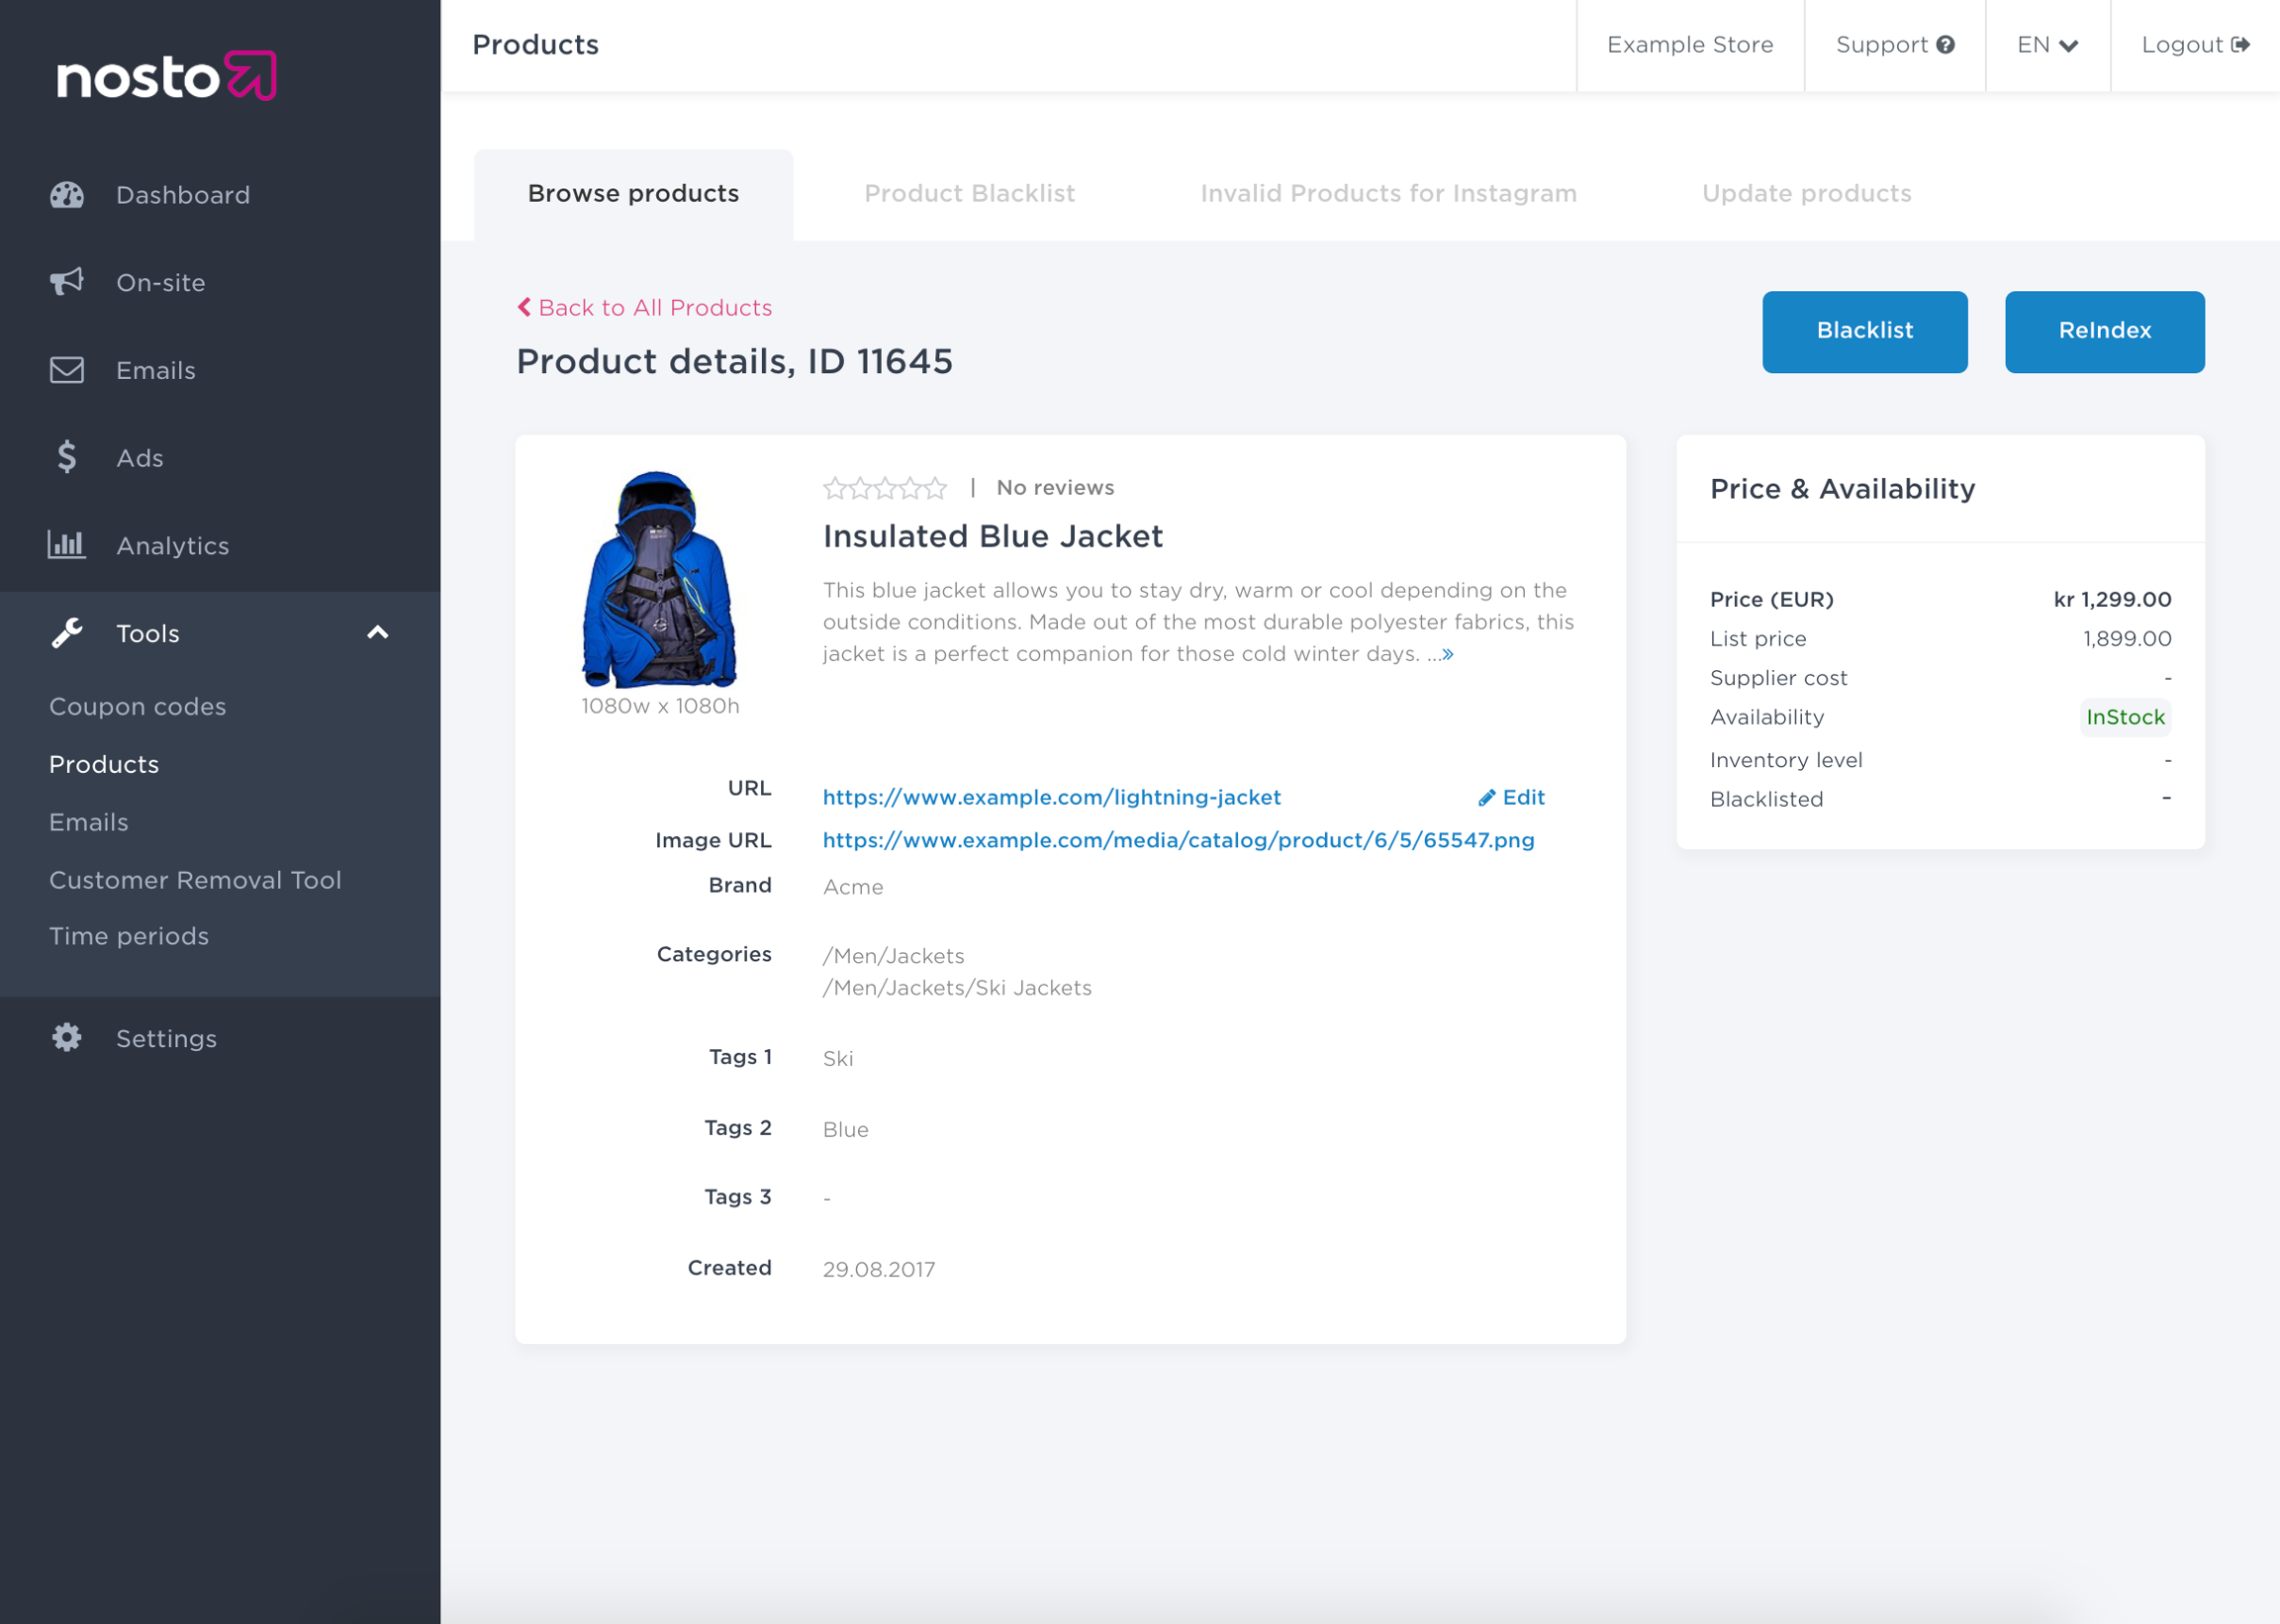
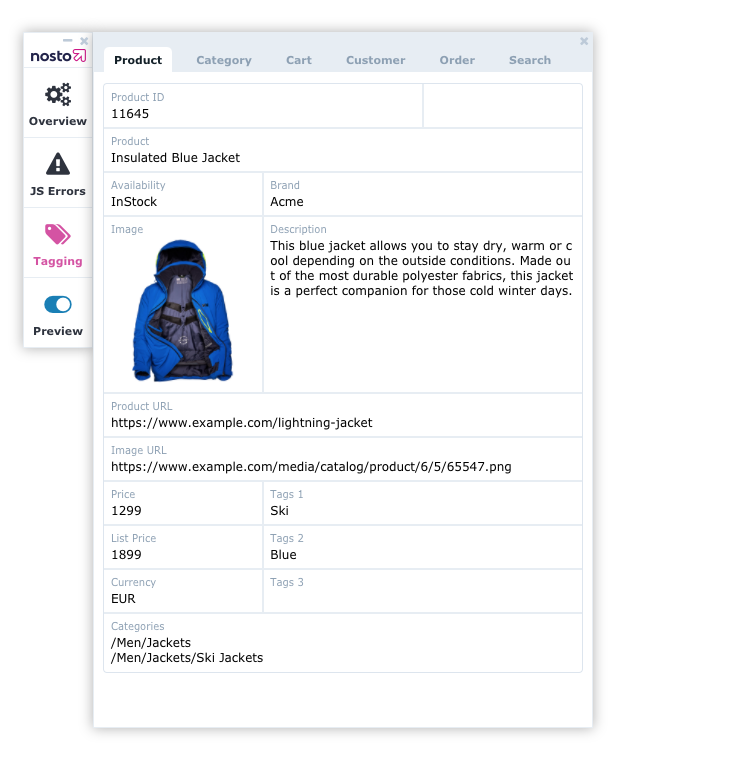
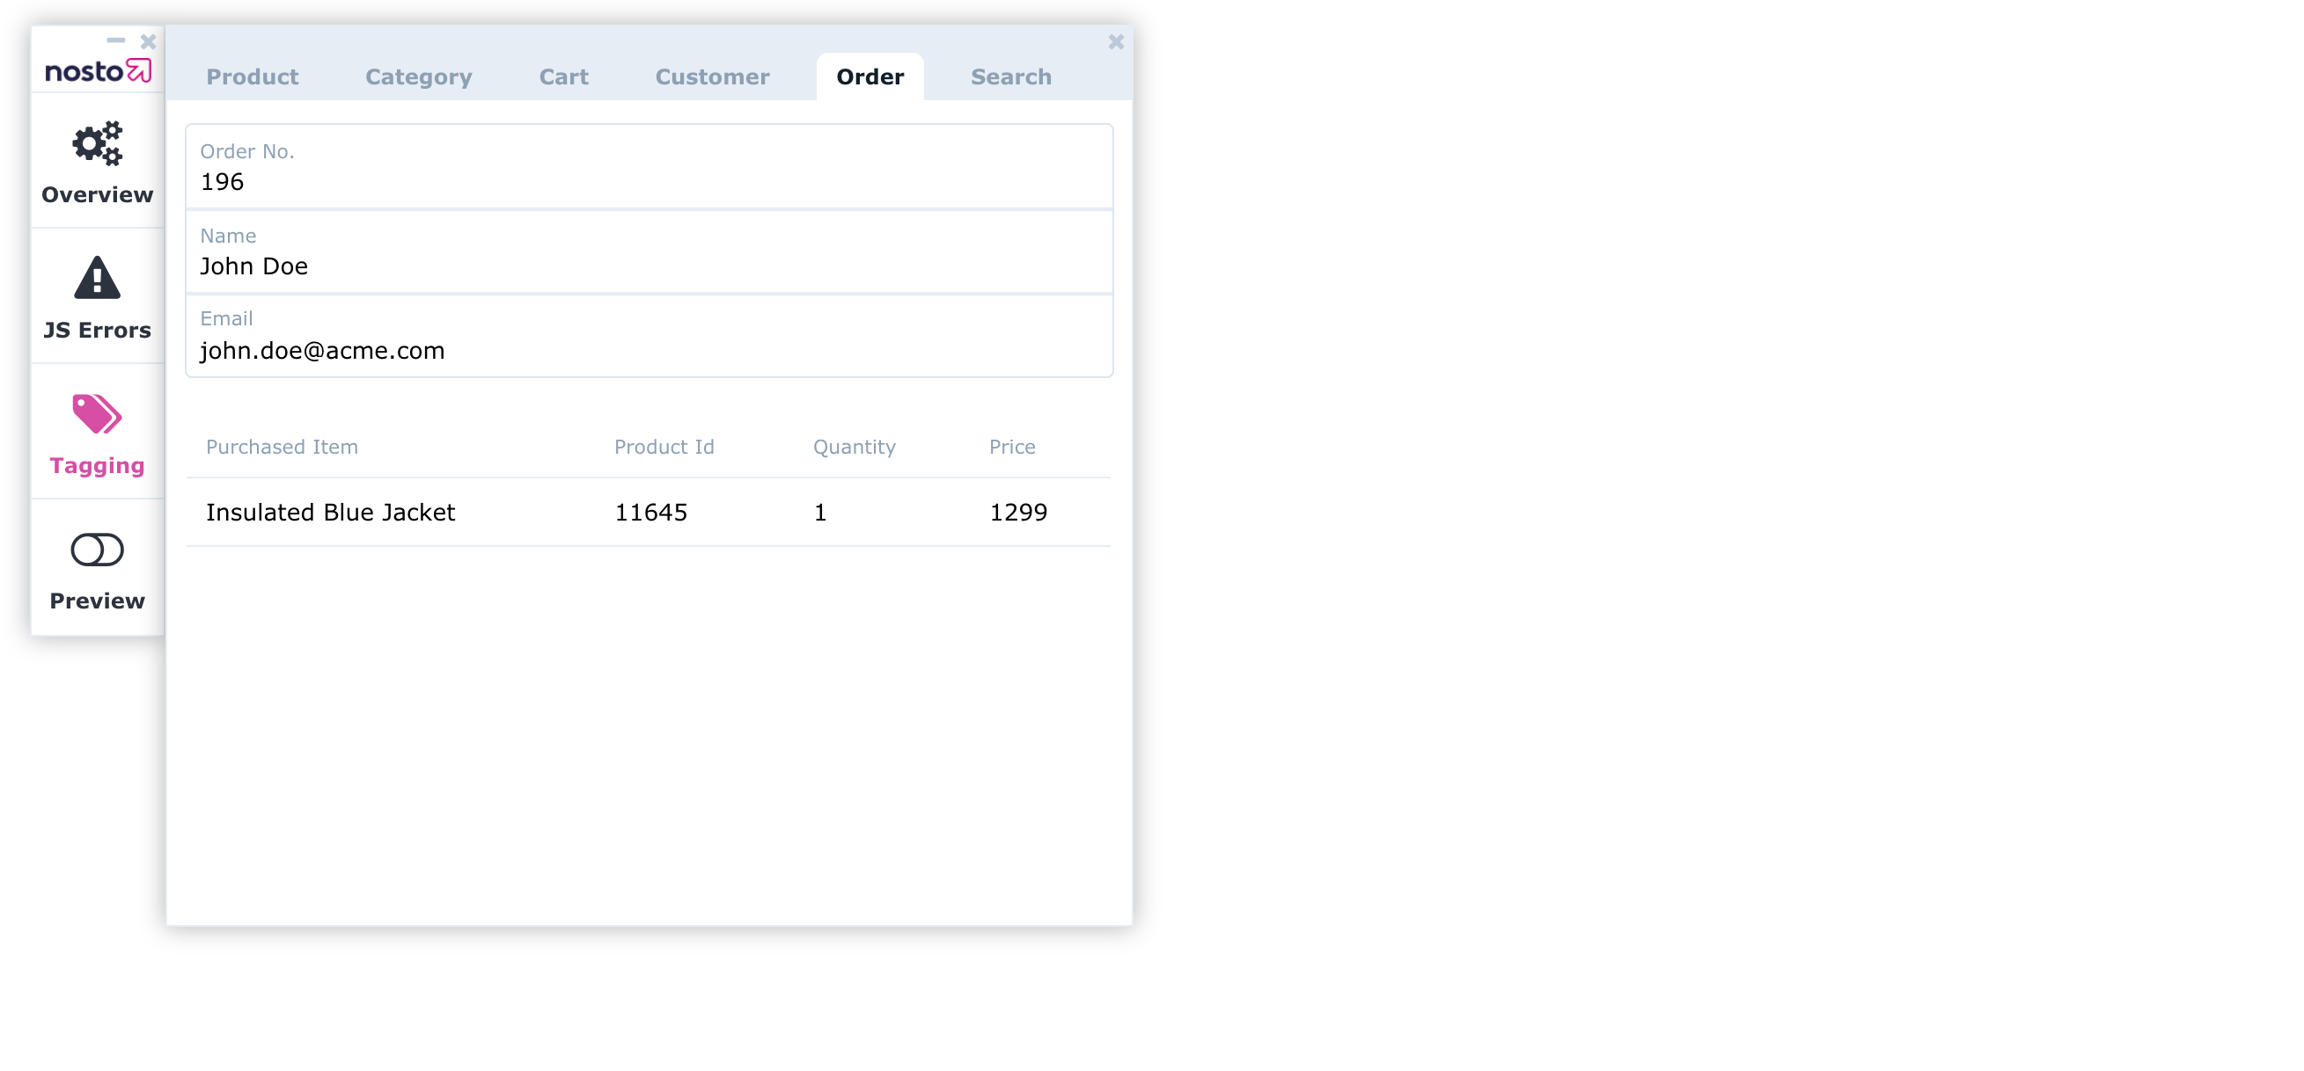
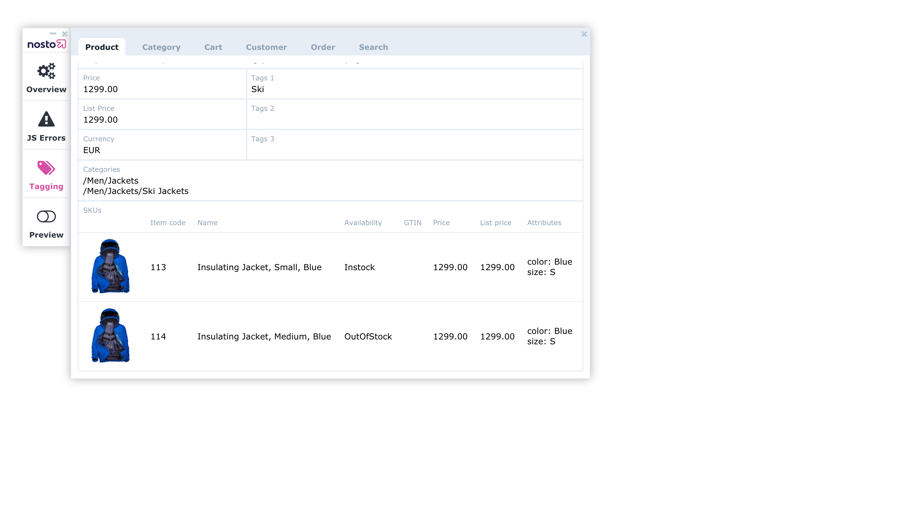
Once included on all pages, you can review if the site is transmitting data using the . If you can see product attributes being picked up under "Tagging" then the product details are correctly set up. You can further verify that products are being indexed to the catalog under the Nosto admin by navigating to Tools → Products:
Translate attribute
The translate attribute is a which specifies whether the value of the element and it's Text node children should be translated. If your tagging elements are being translated by e.g. Google Translator then this is the way to opt out elements being translated by Google and possibly other vendors.
We are glad to have you as a partner and want to help you get running with Nosto as soon as possible while making it as easy as possible for you.
Our material consists of a general introduction to how Nosto works, additional in-depth information and examples for every product with its possible implementation methods as well as comprehensive API references.
We appreciate your professionalism and understanding that we can't document every single use case. We are confident you'll find everything needed to deliver on your requirements. Custom cases need custom solutions and we'll guide you in the right direction.
If you ever feel stuck, something is confusing or misleading, please contact us so we can a) support you and b) update our information.
What Nosto needs
Fundamentally, Nosto needs a replica of the client's product catalog with price and currency information, parent/child relations, categories, custom fields, tags, stock/inventory information, etc..
To achieve the onsite functionalities, Nosto must be able to do these things:
Know on which page the users are.
Know what data is on a page (what product, what category, …).
Know specific things about the current user (on all pages):
Shopping cart content
Name and email (if logged in)
Know about certain events like impressions and clicks.
Write content to the page, either from the client- or server side.
Access your frontend: , you must provide valid product URLs and product images.
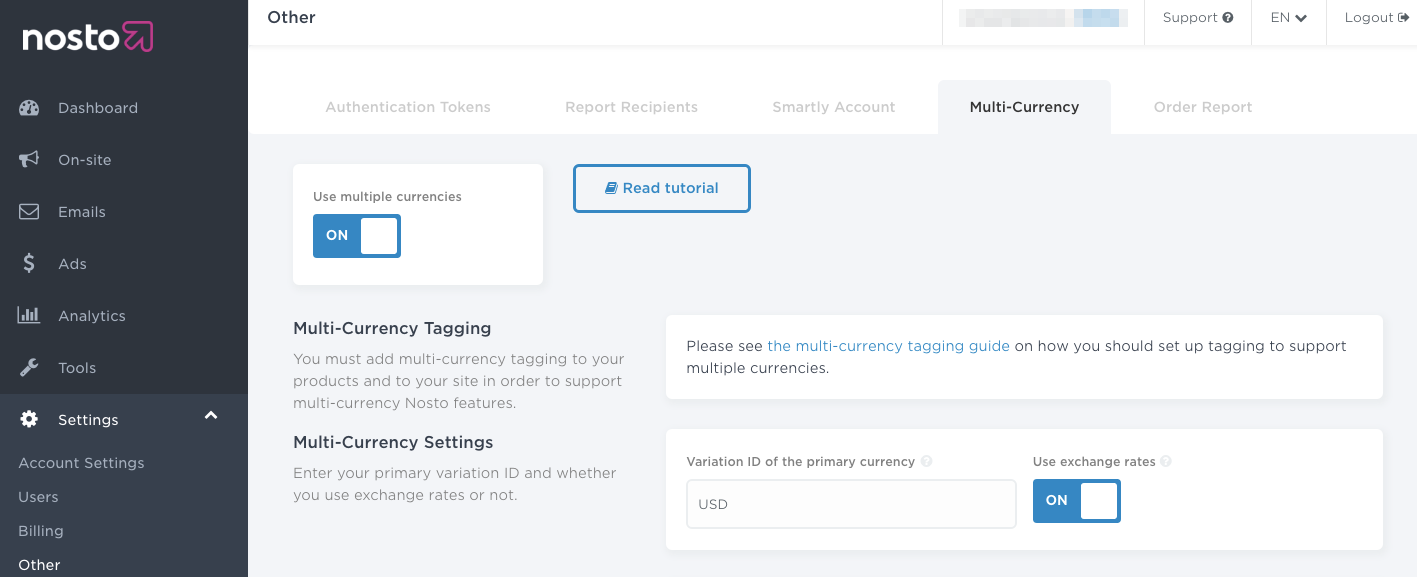
Nosto replicates an eCommerce site’s product catalog (one account per domain/language) as the foundation for all Nosto modules. You might need to adjust the product data structure, so please let us know about your parent/child relationships, customer groups (pricing and visibility) and how you handle translations and multiple currencies (fixed prices or exchange rates).
Nosto then does two basic things onsite:
Profile creation: Track what a user is doing on an eCommerce site (which pages (landing page, product page, category page, …) shoppers look at and what they buy).
This data is sent to the Nosto backend so we can understand and present insights to the client in our dashboard.
Content personalization: Change the content on an eCommerce site per user depending on the data we have collected and which campaigns have been set up by the client.
"Content" is a broad term and ranges:
from a hero/banner image on a home, landing, category or product page
Nosto has several apps/plugins for common platforms like Shopify, Shopware, Magento, ... that give you a head start. Please review the platform-specific documentation at the bottom of this page. The feature set (product and order sync, adding the script and page tagging, ...) can vary and might need to be extended for custom requirements.
How to get the most out of our guides and Nosto
It is tempting to skim the headings of a documentation (we feel you and know you want to get back to coding asap). We also understand that you want to make sure you can cover all the complexity for your client and site.
From our experience, there is always added frustration and costs due to several added feedback loops when we take shortcuts in the beginning. You and your client will get the most out of your time and the Nosto platform when you:
Set aside one hour to read this guide and write down all questions or concerns you might have.
Use our onboarding team to consult and assist you with best practices. We are there to help you with troubleshooting.
Focus on the basics first before addressing the complex use cases (although we know they are more fun).
Use the product as it is intended.This is the most common pitfall: After hours and hours of complex programming it often turns out there already is a functionality inside the platform which is configured with only a few clicks.
Don't just copy & paste the code examples.Yes, it happens. To improve readability, our examples give you an overview with only the most relevant data/parameters. We don't want to clutter your mind, so please refer to the API references for an extensive overview.
We are happy to with any question regarding the details and are confident you will be able to solve 90% of your questions with this guide.
Pro Tip: Let us review your project plan/milestones before you get started.
We can't stress this enough:When the basics are missing, the more advanced features won't work as intended and you will become very frustrated.
Therefore, please make sure to fill up your brand-new car with the right fuel before taking it for a spin around the neighborhood.
Adding the Search Tagging
Nosto utilizes tracks what a customer is searching for by reading the search query from the URL's query parameter or from the page source.
When the search term exists as a part of the URL's query parameters e.g. https://www.example.com?q=searchterm, Nosto can be configured to read the search term and you can skip the search term tagging.
When the search term exists as a part of the URL e.g. https://www.example.com/searchterm, Nosto is unable to read it from the URL and you will need to tag as a part of the page source. When you implement the tagging for the search term, remember that it is untrusted user input added as part of your page html and it should be html-encoded to prevent XSS vulnerabilities on the site.\
or via DOM tagging
Advanced Usage
Nosto also supports some advanced use-cases depending on how your store is currently built. You should first read through the following topics to have an understanding of how Nosto works before moving to the advanced use-cases:
The topics listed below extend the essential tagging with support for SKUs, Multi-currency and Customer group pricing.
Manual Implementation - Advanced
Using Search Templates
Implement Autocomplete using the Nosto Autocomplete library
Nosto Autocomplete library is designed to simplify the implementation of Search Autocomplete functionality by providing:
Autocomplete products, keywords and history visualization.
Automatic bindings to Nosto Search API.
Autocomplete component state management.
Nosto Analytics out of the box, Google Analytics support.
Default Autocomplete components and templates.
Keyboard navigation.
The Nosto Autocomplete library is independent from the Search Templates offering which covers Search, Category Merchandising and Autocomplete.
Search Templates offers a hosted development environment based on Visual Studio Web using Preact components for the development of Search and Category Merchandising result pages, as well as Autocomplete experiences. Nosto Autocomplete covers only the Autocomplete part as an independent NPM package and provides integration into various rendering technologies such as React/Preact, Mustache and Liquid.
Search Templates is no longer actively developed. We recommend using Search Templates Starter instead, which provides modern development tooling, full source code control, and a local development environment. Onboarding assistance is only available for Search Templates Starter.
GraphQL is a query language for APIs. What does this mean for you? Unlike regular SOAP or REST APIs, GraphQL gives you the ultimate flexibility in being able to specify in your API requests specifically what data you need and get back exactly that.
As a query language, it provides you with a lot of flexibility that most normal APIs will not. Without needing to recreate endpoints, you can provide developers with the same functionality as a bulk endpoint. Your queries will be cleaner and easier to understand by combining multiple queries into one request.
What’s the difference between GraphQL API and the regular API?
The regular API is very well structured and specifically defined. The endpoints have their set requests and responses and that’s what you get whether or not that matches your usage pattern. GraphQL lets you control all of this so that the way you consume the data matches exactly what you need.
This is both a pro and a con. If your use case does not require all of the data, GraphQL can speed up your requests as we do less work on the server-side to fulfill those requests. Conversely, if you need all of the data in one request, your requests could slow down as we do more work to fulfill these requests.
Should I use GraphQL over the regular API?
If you would like to access our intelligence engine, you must use GraphQL. The legacy REST APIs are primarily used for sending orders, products and exchange rates.
Limitations
Geo Segments:
Geo segments rely on the ability to determine the geographical location of the end customer. This typically requires a client-side script that can access the user's IP address. In case of a GraphQL only implementation, this should still be possible if the GraphQL calls are made directly from the end user to Nosto. If the calls are being proxied to a backend server and subsequently forwarded to Nosto, this will essentially hide the end-user's IP from the request and instead, send the backend server IP to Nosto, making it impossible to determine the geolocation of the end user.
Implement on native mobile
Implementing Nosto on a native mobile application allows a retailer to collect behavioral events similarly as within a traditional web page. This information will then be merged with Nosto data across other sources, impacting product relationships and real-time statistics across the board.
Due to the nature of the technical environment related to Native Application development, both behavioral and transactional data needs to be sent manually, and consequently all requests for personalization features needs to be tailored within the application as well.
For multi-channel retailers tying the brick-and-mortar stores into Nosto's personalization solution allows retailers to collect all data into one. This information will then be merged with Nosto data across other sources, impacting product relationships and real-time statistics across the board. Retailers who have unified their data, can also start matching customers across different channels, and personalize every aspect of their shopping journey.
Nosto offers different APIs to use and they all mostly offer the same functionality (in some cases you’ll face a classical trade-off battle). That’s why it’s important to not just look at what you want to achieve, but what setup you currently have (and what your client needs).
We want to make the implementation as easy and clean for you as possible. We don’t want you to bloat up your code or you to do unnecessary things.
Therefore, please take a few minutes and write down the answers to the following questions so we can prevent future headaches (and save a lot of time and money):
Is your client’s site running on a major eCommerce platform like Magento 2, Shopify, Shopware, BigCommerce, Prestashop or Salesforce?
Have you decoupled the frontend from the backend/are you running a headless frontend? (incl. Magento 2 Hyvä, React, Next.js or Shopify Hydrogen)
Is the frontend a single-page-application (SPA) or a progressive-web-app (PWA) where the URL never changes when a user browses the site?
Does your client have an international/localized setup with multiple currencies and/or languages?
Does your client have multiple customer groups?
We will ask you for these answers in our kickoff meeting and will craft the mutual project plan accordingly.
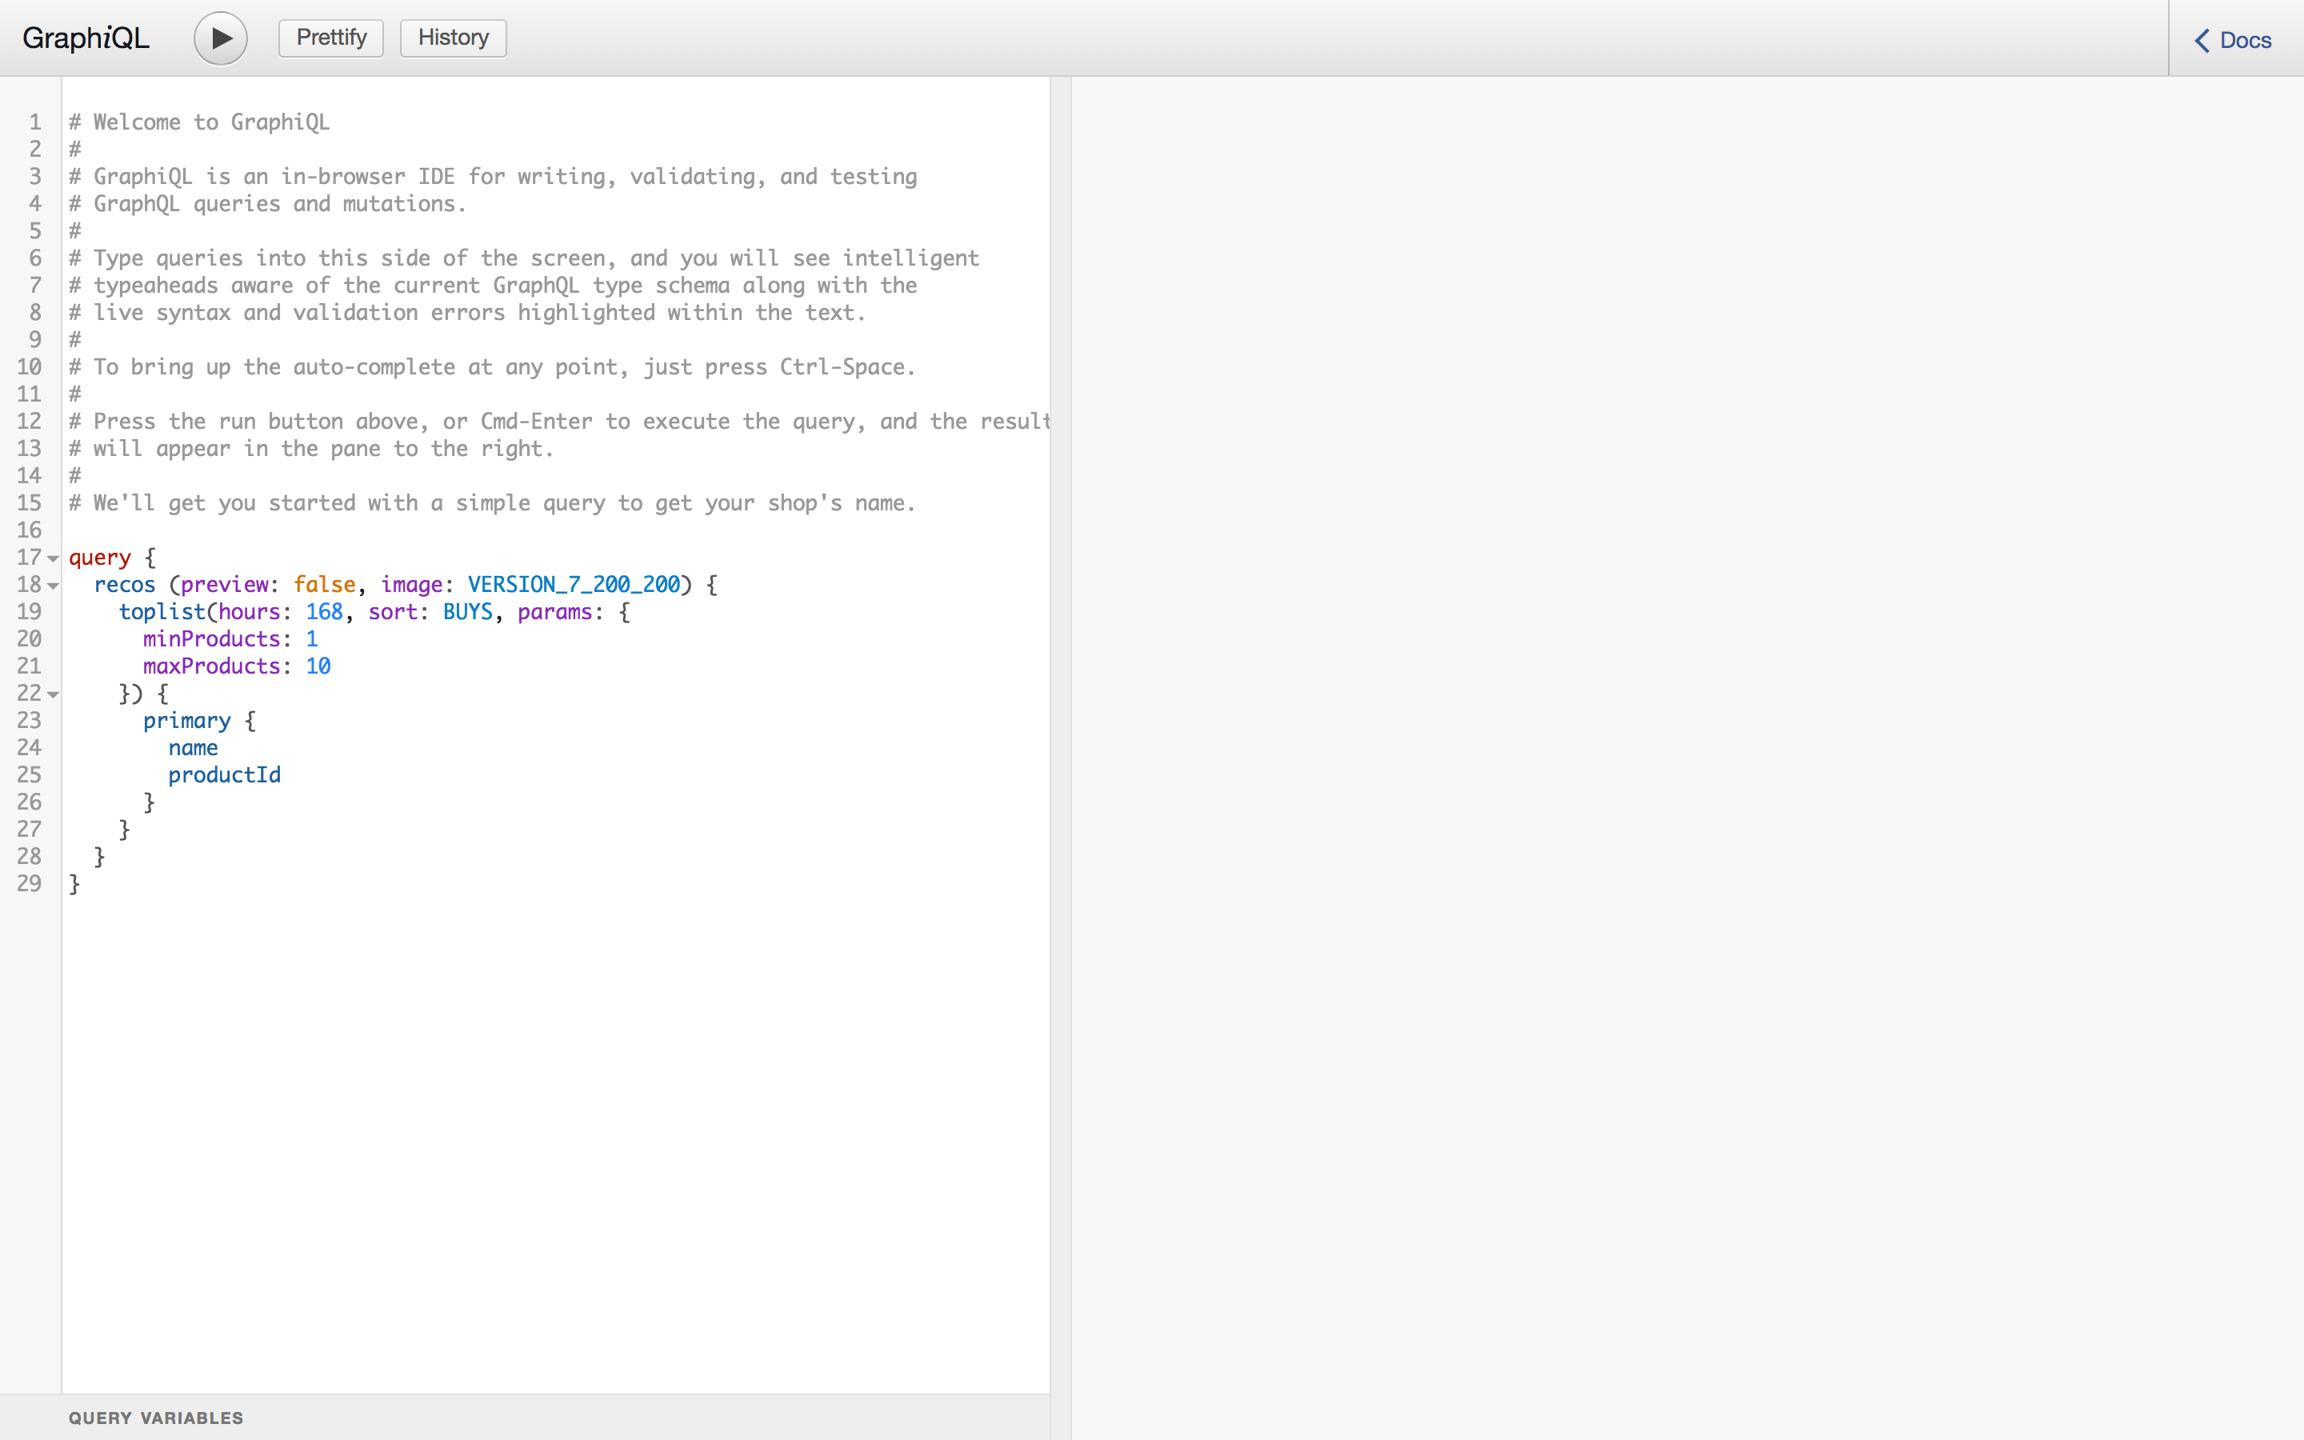
Querying Search
Search GraphQL API uses different API endpoint. For more information see:
The nosto parameter allows Nosto to attribute clicks on content and recommendations. In the event, you'd like to omit the parameter, you'll need to manually send the product-view event. You can do so by executing the following snippet.
You can define placements for Nosto to use in two ways:
Traditional approach: Using native HTML elements with nosto_element class
Web component approach: Using the <nosto-campaign> web component
Both approaches mark locations in your site where Nosto can hook into and expose onsite content.
Traditional div-element approach
You can define placements via native HTML elements with the nosto_element class. Each element marks a location in your site where Nosto can hook into and expose onsite content.
Here is an example of a <div> tag on the site:
The class needs to always reference nosto_element so Nosto understands that this element is available for onsite content placement. However the id frontpage-nosto-1 is flexible but requires that each unique element-id has a matching placement defined in Nosto's admin dashboard in order to expose campaigns.
Here is an example of a page with multiple <div> elements:
Web component approach with <nosto-campaign>
As an alternative to nosto_element divs, you can use the <nosto-campaign> web component. This approach provides cleaner markup integration.
Basic usage
or alternatively
for better compatibility with the scoped styling conventions of Velocity templates
Advanced features
The web component supports additional features like lazy loading, product-specific recommendations, cart synchronization, and embedded Vue templates:
When to choose each approach
Use nosto_element divs when:
Working with existing legacy implementations
You prefer traditional HTML markup patterns
Use <nosto-campaign> web component when:
You need advanced features like lazy loading or cart synchronization
You want better integration with modern web development practices
You need embedded Vue templates for store-side templating
Setup and integration
To use the <nosto-campaign> web component, you need to include the Nosto Web Components library. For detailed setup instructions, see the .
Product Image Configuration
Customizing Product Image Aspect Ratio
You can use CSS custom properties (variables) to define the aspect ratio for specific components. This is useful for components like the autocomplete dropdown where you might want a different aspect ratio than the main product grid.
The project defines a CSS custom property --ns-aspect-ratio for this purpose.
Example: Autocomplete Product Image
The product images within the autocomplete results use this CSS variable.
File to inspect:src/components/Autocomplete/Item/Product.module.css
You can override the value of --ns-aspect-ratio in your theme's CSS file or directly in the component's stylesheet to change the aspect ratio. The value is defined in src/variable.css.
File to edit:src/variable.css
By changing --ns-aspect-ratio to 4 / 3, for instance, any component using this variable will render images with a 4:3 aspect ratio.
Setting up your account
You must use a valid domain for your website. If you are creating a test account and running your store locally, you must use valid TLD as using localhost is not supported.
You cannot use the following domains as they are reserved by the IANA.
.test
We recommend using a valid official TLD that is aliased to localhost for testing purposes. You will need to edit your operating-system dependent hosts file to add an alias for the domain you are using.
Nosto periodically crawls your website to keep the catalog data in sync and therefore if you run your webshop locally, Nosto will be unable to crawl your website. In order to overcome this, you will either need to:
make it publicly available using a service such as or
Use the to keep your catalog in sync
Tagging your page types
The page-type tagging enables Nosto to trigger actions, such as showing popups, depending upon a page type. Tagging the page types is optional but without the page-type tagging, you will not be able to avail the use of page type based triggers.
Here is a list of all the valid page types:
The home page of your store should be tagged as front.
All category pages should be tagged as category.
All product pages should be tagged as product.
The shopping cart page should be tagged as cart .
The checkout page, where order information is filled, should be tagged as checkout.
The order confirmation page should be tagged as order.
The search results page should be tagged as search.
All no-found pages should be tagged as notfound.
Other pages should be tagged as other.
or via DOM tagging
Template customization
This section describes template customization tools and best practices for the following Nosto products:
Product Recommendations
Onsite Content Personalization
Pop-Ups
These three products share the same templating technology and use based templates
which are injected into the page via Nosto's client script.
In addition to Velocity-based server-side templating, we also have templating usage in other products:
Web Components
For template customization we recommend the usage of both our own web component offering and third party tooling such as:
Swiper
A modern touch slider used for creating responsive, mobile-friendly carousels. It offers smooth transitions, extensive configuration options, and high performance. Find more details at .
unpic
A lightweight, on-demand image optimization library that delivers optimized images with lazy loading. It helps improve performance and user experience by automatically adjusting image sizes. Visit the for additional information.
shoelace
A collection of professionally designed, accessible, and customizable web components. It makes it easy to build modern web interfaces with consistent styling. Learn more on the .
Adding the Nosto Script
To start tracking visits and content the Nosto script needs to be active on all pages within the store where the user might navigate. Replace $accountID from the code below with your own account ID and place the code within the <head> section of your sites HTML content. You can find your stores account IDs from the account list within the Nosto admin.
Note: The script and the snippet should be added as high up in the <head> portion of the page so the connection is initialized as soon as possible. As the script is flagged async, the page load isn’t delayed.
Note: This needs to exist on every page.
Alternatively to the script injection Nosto can also be used as a library dependency in your Javascript application via the following utility library
Troubleshooting Nosto script:
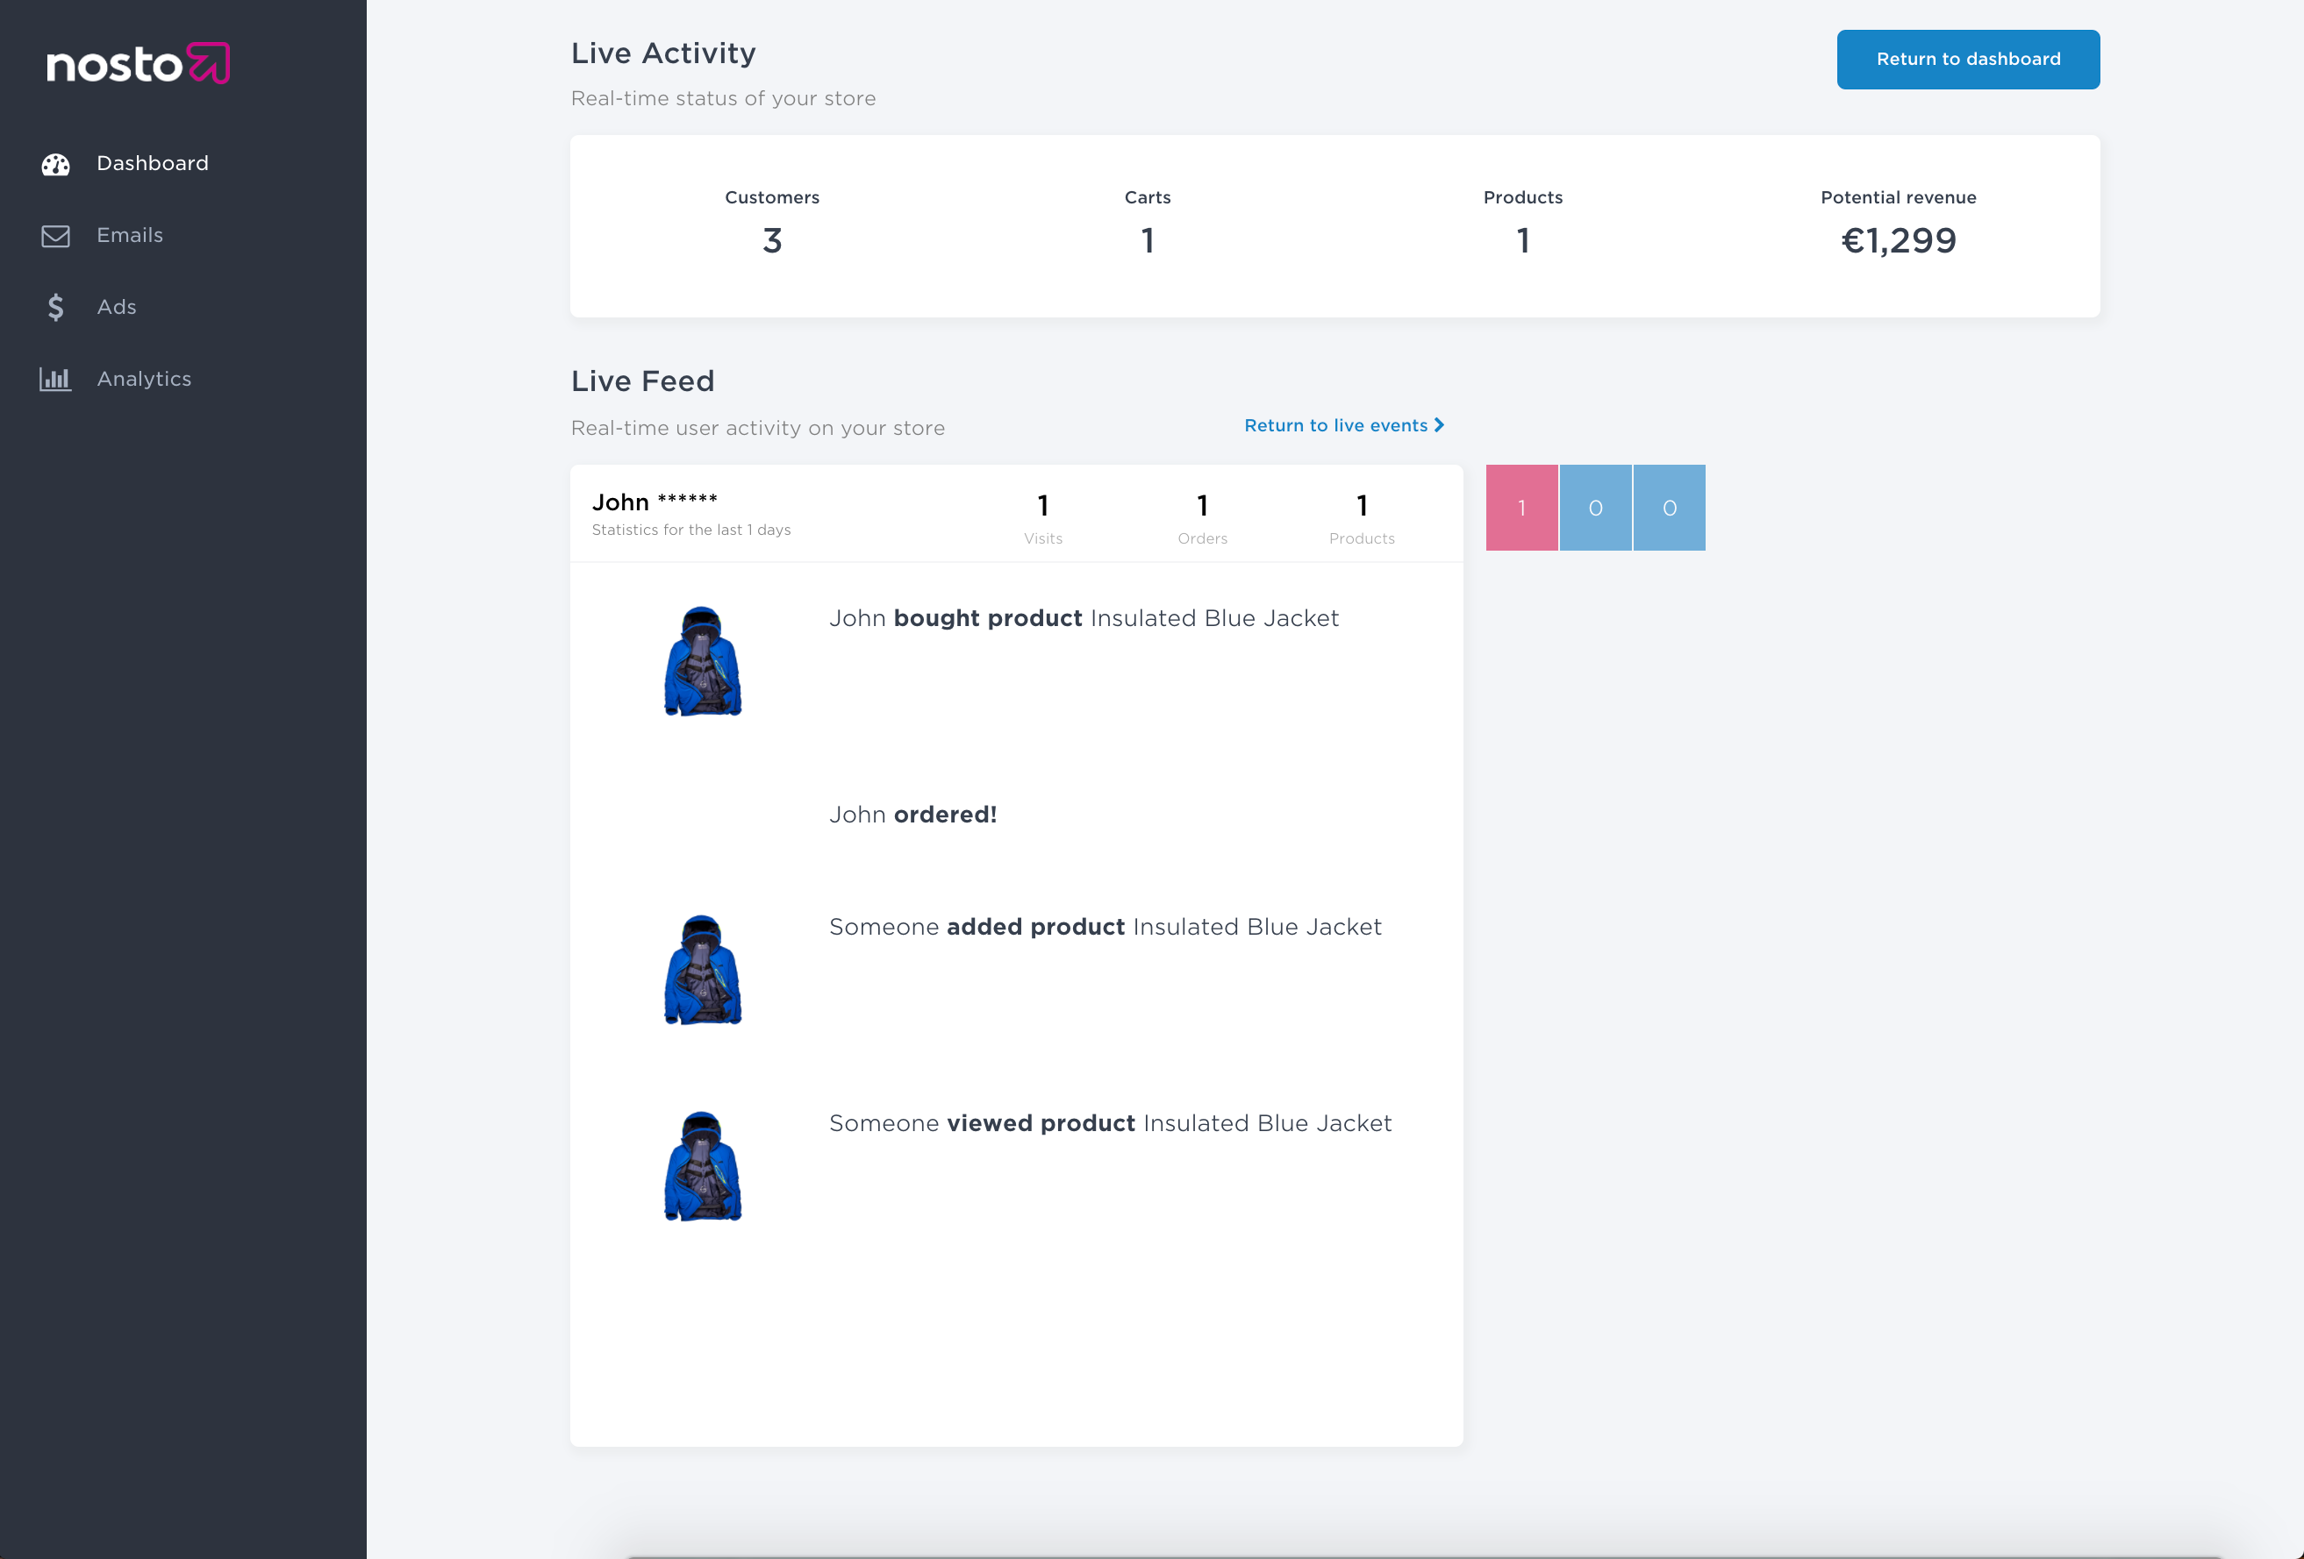
Once included on all pages, you can review if the site is transmitting data using the Nosto Debug Toolbar. If the debug toolbar executes and shows up on the page Nosto can track visits on the page. You can further verify your session in the Nosto admin by using the live feed under https://my.nosto.com/admin/$accountID/liveFeed
URL Mapping
Search Results Page URL Management
When a search is performed (either by submitting the search form or clicking a non-redirect keyword), the user is taken to the search results page. The state of the search (query, filters, pagination, etc.) is reflected in the URL's query parameters.
URL Structure
The search results page URL is managed by a set of utility functions in src/mapping/url/. The URL is constructed with the following parameters:
q: The search query.
p: The current page number (omitted for the first page).
size: The number of results per page.
How It Works
State Management: The SearchQueryHandler component (src/components/SearchQueryHandler/SearchQueryHandler.tsx) is responsible for synchronizing the application's search state with the URL.
URL Updates: It uses the updateUrl function (src/mapping/url/updateUrl.ts) to serialize the current search state into URL parameters and update the browser's history using window.history.replaceState.
Example
A search for "shoes" on the second page with a filter for the brand "Nike" would result in a URL like this:
/search?q=shoes&p=2&filter.brand=Nike
Search page redirects
Autocomplete Search Submission and Redirects
This document explains how submitting a search from the autocomplete component navigates the user to the Search Engine Results Page (SERP).
Submit search
When submitting Search results through Autocomplete, submit callback is called on these events:
Enter key press.
Submit button
Custom logic
If you want to attach stateful logic as event handlers to your template elements, is a useful tool. petite-vue is an alternative distribution of Vue optimized for progressive enhancement. It provides the same template syntax and reactivity mental model as standard Vue. However, it is specifically optimized for "sprinkling" a small amount of interactions on an existing HTML page rendered by a server framework.
Some rules/constraints to consider:
Leave the HTML rendering primarily to Velocity
Maintain minimal state in the Vue context, enough to satisfy your use case
Deploying
When you finished working on search implementation & carefully tested everything using , it's time to deploy everything.
Production Deployment
The Nosto CLI only handles preview deployments. To promote your changes to production:
Test thoroughly
Testing
How to use debug toolbar to preview search
With the , you can see all the changes made to your website right away. To enable this feature, simply turn on the preview mode. After saving any changes in the code editor, you will be able to see them directly on your website.
How to use preview:
Autocomplete features
Enabling Autocomplete Features
This document explains how to enable and configure various features for the autocomplete component, including category suggestions and trending searches.
To enable these features, you only need to modify the withAutocompleteDefaults function in src/config.ts to request the necessary data. The UI components in src/components/Autocomplete/Results/ are already set up to render this data once it's fetched.
FAQ
Search returns up to 10000 documents
Due to performance optimization, the search function will calculate the total count up to 10,000. In this case the search page should display a count of 10,000+ to indicate that more than 10,000 products were found.
Filters and sorting operations are executed on all found products, even if there are more than this limit. Therefore, it's still possible to find other products if you filter or sort them. This should not affect the user experience in any way because it's unlikely that someone would actually view more than 10,000 products with a single search.
Product cards
Nosto recommends using shop-provided resources for rendering product cards in Nosto templates. Doing so offers:
Faster onboarding
Easier maintenance
Consistent styling and behavior
Starting points
Each new Nosto account comes with three base recommendation templates to customize.
Default
The Default template has the following features:
Testing and Debugging
The GraphQL endpoints provide functionality to make it easier to test against a real account.
Ignoring Test Requests
Every operation made against the GraphQL endpoints cause your website's data to be mutated. When doing performance testing or an equivalent, it is often necessary to exclude test traffic so as to not pollute your live account.
Using the header X-Nosto-Ignore: True will cause any traffic from being recorded. Queries and Mutations will work normally but any API calls containing this header will not be archived or accrue towards the statistics.
Querying Orders
You can query orders using the GraphQL orders endpoint. So long as you are able to specify the order number or an external order reference, you will be able to query the order.
Updating Identities
Mutations can be used to update the email identities in Nosto. An "identity" is the personal information associated with an email address.
Upserting Identities
The upsertIdentity mutation allows you to upsert the details of an identity. The given example updates the customer attributes for the email [email protected] and requests the details of all the attributes of the identity.
If the identity for [email protected] does not exist, a new identity will be created.
Querying Identities
You can query identities using the GraphQL Identities endpoint. An "identity" is the personal information associated with an email address.
So long as you are able to specify the email address, you will be able to query the identity, its associated customer affinity and the personalized recommendations for that identity.
What can identity attributes be used for?
The attributes associated with an identity can be used to segment users. This works similarly to how the attributes can be leveraged .
For iOS & Android
GraphQL is a query language for the APIs for getting your data. It is an alternative for the REST APIs. It is not specific to a single platform and works for all type of clients including Android, iOS or the web. It stands between your server and client and helps you to query your data in a more optimized way.
Building for Android
If you would like to leverage Nosto's intelligence engine in your Android app, please see our example app and the docs.
Installation
You can install the Nosto Autocomplete library via npm:
The Nosto Autocomplete library can be imported and used in various ways, depending on your preferred framework or template language. Some of the supported import methods include:
Framework
Import Statement
The Playground
Start exploring Nosto's GraphQL API on your account. GraphiQL is an in-browser IDE for exploring GraphQL. You don't need any access for using the GraphiQL Explorer.
Toy around, use the API and when you'd like API access to the endpoint for use through a library such as Apollo, please contact support.
Use the embedded GraphiQL explorer below to run queries. The GraphiQL Explorer is accessible at https://my.nosto.com/\[account-id]/graphql (please add your account ID).
Initial State: On page load, the getCurrentUrlState function (src/mapping/url/getCurrentUrlState.ts) deserializes the parameters from the URL to initialize the search state. This ensures that a user can share a URL, and it will load the same search results.
Below are the recommended approaches.
Custom Web Components
If your shop themes use web components, we suggest leveraging them in your Nosto templates as well. This avoids duplicating markup and logic between your shop and Nosto templates. For building web components efficiently, consider using Lit or similar high-level frameworks.
Nosto Web Components
Nosto offers several web components designed to simplify product card integration:
DynamicCard
Renders product cards entirely on the Shopify side.
&#xNAN;Requires alternate product card templates to be available within Shopify themes. Choose this approach if the shop already uses product card markup in Liquid templates and you want to reuse that markup in Nosto campaign rendering. Detailed instructions on how to set this up in your Shopify store are provided here
Product
Enhances static product card markup with interactive features such as:
Swatch selection
Add-to-cart interactions
Dynamic product image updates based on swatch and SKU selections
If web components aren’t an option, we advise duplicating only the markup for product cards within Nosto templates while applying shop-side CSS rules to maintain consistent styling.
Recommended products in a grid
Alternate image on hover
Ribbons for new, most viewed, and top-selling products
Highlighting of discounts
Add to cart functionality
Carousel
The Carousel template extends the base template with a Swiper-based carousel to cycle between the recommended products.
The library dependency is loaded via a script module, but a locally available version of the library can be used as well.
Carousel implementation via Swiper
Swiper is loaded via CDN URL into script module scope
Swiper default styles are injected into the DOM
Navigation module is loaded, and navigation buttons are provided in the DOM
Basic mobile breakpoints are provided
Swatches
The Swatches template extends the base template with SKU selection-aware product cards with swatches for color and size selection.
Color and size swatch rendering
Product and SkuOptions web components to maintain swatch selection state and abstract the add-to-cart logic away
Web components library is loaded via CDN URL into script module scope
Product image is updated based on color swatch selection
Add to cart button becomes visible when color and size values have been chosen
Every operation made against our GraphQL endpoint returns a unique request identifier contained in an X-Request-Id response header.
While we ensure that the APIs are as robust as possible if you do encounter an HTTP 5XX response from the endpoint, simply log the request identifier along with the error as the unique request identifier allows our engineers to troubleshoot the issue swiftly.
By default, up to 250 products can be retrieved at once (in a single request). Paginate to access results past 250 products.
Products in category listings are in a different order as soon as I deliver results from Nosto API
As soon as you use the results delivered by Nosto API, you will see that the listings in categories have a different order than listings delivered by your native shop-system, even if you didn't set up any merchandising rules. The products are mainly delivered as indexed during the data sync, but there is no defined behavior for this. We recommend to always set up at least one global rule before going live with Nosto category merchandising to create product listings matching your business strategies.
Additionally, please refer to our help pages for further useful information!
Important: Always test your changes thoroughly in preview mode before promoting to production, as this affects all your store visitors. It can take up to 15 minutes for deployment to be visible.
Deployment Safety
Preview First: All CLI uploads go to preview mode initially
Admin Control: Production deployments require manual approval in the Admin UI
Rollback Available: Previous versions can be restored from the Admin UI if needed
Rollback previous deployment
If the most recent update doesn't work properly, you have the option to revert to any previous update. Reverting won't alter the source, which means you can deploy the latest changes again simply by clicking on the main deployment button.
How to revert deployment
Navigate to the Nosto Admin UI > Search > Templates
Click on the desired deployment, click on ... and then on Redeploy
Disable Templates
If your latest update doesn't work and you don't have a previous working version to go back to, or if you want to completely remove the search function, you can turn off the search templates for a temporary period.
Reverting won't alter the source, which means you can deploy the latest changes again simply by clicking on the main deployment button.
How to disable templates?
Navigate to the Nosto Admin UI > Search > Templates
When a user selects a suggestion or submits a query from the autocomplete dropdown, the application's behavior depends on the user's current location. The goal is to ensure the user always ends up on the main SERP to see the full results.
This logic is primarily handled within the onSubmit function in the Search component.
File to inspect:src/components/Search/Search.tsx
How It Works
The onSubmit function checks the current page's URL (window.location.pathname) to decide whether to perform an in-place search update or a full-page redirect.
Scenario 1: User is Already on the SERP
If the user is already on a page that includes /search in its path, submitting a new search will not cause a full-page redirect.
The newSearch({ query }) action is dispatched.
@nosto/search-js fetches the new results.
The components on the SERP update in place to display the new results.
This provides a fast and smooth experience when refining a search.
Scenario 2: User is on Another Page (e.g., Homepage)
If the user performs a search from any page that is not the SERP (e.g., the homepage, a content page), the application will perform a full-page redirect to the SERP.
The browser is redirected to /search?q=<your-query>.
The SERP then loads, reads the q parameter from the URL, and automatically fetches and displays the results for that query.
This ensures a consistent experience, where a search always leads the user to the dedicated, fully-featured search results page.
Implementation Example
Here is a simplified look at the logic inside src/components/Search/Search.tsx:
Use a single Vue app context for the whole template
Make sure that the recommendation template renders correctly without the Vue layer
These rules will guide you to use petite-vue within it's intended use cases, for Progressive Enhancement, and not like Vue, a SPA framework.
Some use cases where petite-vue is useful are listed below
Event handlers to call external APIs and libraries
This example is stateless and show cases how functions can be exposed to template
Usage from template
Product selection for bundle creation and related total
In this case the selection state is kept in petite-vue and hooked into the template
You can enhance the autocomplete experience by including category suggestions alongside product and keyword results.
Configuration
To enable this feature, add a categories object to the query returned by the withAutocompleteDefaults function.
File to edit:src/config.ts
How It Works
By adding the categories object to the query, you are instructing @nosto/search-js to fetch category suggestions. The useResponse hook within the Results component (src/components/Autocomplete/Results/Results.tsx) will then receive this data.
The Results component, in turn, passes the category data to the Categories component (src/components/Autocomplete/Results/Categories.tsx), which is responsible for rendering the suggestions. No additional rendering configuration is needed.
Enabling Popular Searches
Displaying popular searches can help guide users and improve product discovery. This feature shows suggestions based on what other shoppers are searching for.
Configuration
To enable this feature, add a popularSearches object to the query returned by the withAutocompleteDefaults function.
File to edit:src/config.ts
How It Works
Similar to category suggestions, adding the popularSearches object to the query will cause the data to be fetched. The useResponse hook in the Results component will receive the data and pass it to the PopularSearches component (src/components/Autocomplete/Results/PopularSearches.tsx), which handles the rendering automatically.
Note: If a specified attribute already exists on that identity, it will be overwritten.
What can identity attributes be used for?
The attributes associated with an identity can be used to segment users. This works similarly to how the attributes can be leveraged when importing them via a CSV.
// Three separate <divs> after another on a page
<div class="nosto_element" id="frontpage-nosto-1" translate="no"></div>
<div class="nosto_element" id="frontpage-nosto-2" translate="no"></div>
<div class="nosto_element" id="frontpage-nosto-3" translate="no"></div>
// You can also add the class and id to an element you are already using for other purposes
<div class="sidebar nosto_element" id="nosto-sidebar" translate="no">
<h1>Hello World!</h1>
<h2>This is the sidebar</h2>
// You can also nest nosto elements within other wrapper elements
<div class="nosto_element" id="nosto-sidebar-nested-1"></div>
</div>
// src/components/Search/Search.tsx
export default function Search() {
const { newSearch } = useActions();
const onSubmit = (query: string) => {
// If we are already on the search page, just update the results
if (window.location.pathname.includes("/search")) {
newSearch({ query });
} else {
// Otherwise, redirect to the main search page
window.location.href = `/search?q=${encodeURIComponent(query)}`;
}
};
// ... component JSX that uses onSubmit
}
<script type="module">
import { createApp } from "https://unpkg.com/petite-vue?module"
createApp({
addToCart(productId) {
// call platform specific add to cart API
}
}).mount("#$divId")
</script>
<span @click="addToCart('$product.productId')">Add to cart</span>
<div class="product-grid">
#foreach($product in $!products)
<div class="product" @click="toggle("$product.productId")">
...
</div>
#end
</div>
<div>Total: {{ total }}
// src/config.ts
function withAutocompleteDefaults(query: SearchQuery) {
return {
...query,
// ... other properties
categories: {
fields: ["name", "url"],
size: 3 // The maximum number of category suggestions to fetch
}
} satisfies SearchQuery
}
// src/config.ts
function withAutocompleteDefaults(query: SearchQuery) {
return {
...query,
// ... other properties
popularSearches: {
fields: ["query"],
size: 3 // The maximum number of trending searches to fetch
}
} satisfies SearchQuery
}
By default submit checks if query/keyword length satisfies minQueryLength, sends Search Submit event to Nosto Analytics, and sends Search request to the Nosto Search API.
In the usual scenario, you want to render Search Results on submit, so you should override submit function:
To disable submit pass undefined value.
\
📊 Nosto Analytics (enabled by default)
Setting nostoAnalytics: true will enable Nosto Analytics tracking. Tracking results can be seen in the Nosto Dashboard under Search & Categories -> Analytics page.
📈 Google Analytics (enabled by default)
By default, we send pageview events to existing GA tag, found in shop site. To send pageview events with correct search information, a minimal configuration is needed in googleAnalytics property.
serpPath - Search query url parameter name
queryParamName - Search query url parameter name
enabled - Enable Google Analytics
For example, if search results URL is https://examplenostoshop.com/search-results?query=shoes, then configuration should be:
To disable Google Analytics, set googleAnalytics: false.
submit: async (query, config, options) => {
if (
query.length >= config.minQueryLength
) {
const response = await search(
{
query,
},
{
redirect: true,
track: config.nostoAnalytics ? "serp" : undefined,
...options
}
)
// Do something with response. For example, update Search Engine Results Page products state.
}
},
Note: You should additionally add click events on your search results page according to with type: serp || category according to the results page type.
Documentation
Documentation is a first-class citizen of GraphQL, and GraphiQL leverages it. The right-hand pane exists for you to explore the possible queries, mutations, fields, their types (if they’re required), the works. Even if your server doesn’t implement human-composed descriptions, you will always be able to explore the graph of possibilities.
Debugging
You don’t even have to read the documentation to discover our API. GraphiQL supports debugging as-you-type, giving hints and pointing out errors.
JSON Viewer
GraphiQL comes with a JSON viewer with all the niceties you’d expect: code folding, automatic indentation, copy support, and read-only so you won’t accidentally delete or edit.
To implement Nosto manually you will need to go through the following steps to ensure that the store data is captured by Nosto. The following steps will allow Nosto to gather product, cart and order data, and analyze how individual customers are interacting with this data. The implementation steps listed here are necessary for both functionalities based on crowd logic and 1-1 behavioral personalization.
If you are running a headless frontend or SPA (Single Page Application), you will follow the same approach using the Nosto Session API. Please read more on the introduction, managing the session and event tracking (instead of page tagging).
If the store is built on explicitly supported platforms like Magento, Magento 2, Shopify, Prestashop or Shopware you should go through their platform specific guides instead.
The tagging context can be provided in two ways
programmatically via tagging providers
as dedicated Nosto elements in page markup
We recommend to utilize tagging providers due to the following benefits
tagging can be dynamically changed in JS without writing to the DOM
tagging context can be provided much earlier, since script tags can also be placed in head element
It is possible to mix DOM based tagging and tagging providers in case the main tagging is provided as HTML elements, but individual parts should be managed via Javascript code dynamically. Also both DOM and tagging provider based tagging are treated in the same way in the client script and debug toolbar.
Scripting
The content of this page only applies to templates used within:
Product Recommendations
Onsite Content Personalization
Nosto campaign templates support two ways to define JavaScript script elements as part of the templates.
In the legacy mode, the script contents are evaluated in the scope of the nosto iframe and can refer to the main window via the global _targetWindow variable.
To support ES module loading in placement and popup script elements, the client script supports the usage of script[type='module'] elements in both of these contexts. This newer module mode is evaluated in the main window but uses module scope for sandboxing. To write variables to the global scope, you will need to do so explicitly by declaring fields in the window object.
For new accounts, we recommend the use of ES module scripts. For older accounts with existing templates, the legacy script mode works as well, but interaction with the main window is a bit more verbose.
The differences between the two modes are summarized here:
Legacy scripts
Syntax: <script>...</script>
Loaded into the nosto iframe sandbox
Access to the site window happens via the _targetWindow variable
Module scripts
Syntax: <script type="module">...</script>
Loaded as sandboxed modules into the site window
Site window contents are directly available, e.g., jQuery
Examples
becomes
Additionally, module scripts support:
Import syntax
Top-level await
Lightweight sandboxing
Further reading
Styling
The content of this page only applies to templates used within:
Product Recommendations
Onsite Content Personalization
Styling the recommendations is generally quite straightforward. Just add a style block to the template and use CSS to style the recommendation elements as you would style any HTML content.
Encapsulating styles
While the basic styling of the recommendations works great, it can be problematic if there are multiple recommendation elements on the same page. If styles from different recommendations share the same class names, the last element on the page will override the styles of the previous recommendations.
You can use the $divId variable to print out the current placement ID in the template. Using the variable, you can form CSS selectors that start with the ID of the placement, which limits the scope of the CSS to only the current campaign. You can also target styles to the campaign directly by using the ID selector.
Nested CSS
We recommend the use of Nested CSS for scoped styling of campaign templates due to its more compact syntax and wide browser support.
As most of the recommendation template styles should be scoped to a specific slot, it is common to see scoping structures like this:
which can be expressed like this using nested CSS:
To make CSS Nesting in placement and popup templates also available for older browsers that don’t support this feature, the client script provides a polyfill for this. To use the nesting polyfill, you will need to provide the attribute nested on a style element.
Example conversion:
becomes the following with divId as nosto-product1:
The transpilation will be applied in debug mode for all browsers and in normal mode for browsers that don’t support CSS Nesting.
Further reading
Implement on your website
Choosing the implementation method
Most customers implement Nosto by installing a Nosto extension to their e-commerce platform. The extension provides a working out of the box implementation for majority of websites handling installing tagging and product updates. However, for customized PWA/SPA environments, you should follow the additional SPA/PWA guides.
Implementing by a Nosto Extension
When implementing in SPA and PWA environments, product updates must be done via . In case you are using some of the platforms that Nosto has extension for the extension takes care of the product updates.
SPA / PWA on top of a platform that Nosto has extension for
If you have implemented SPA / PWA on top a platform that Nosto has extension for you will still need to implement the frontend part using Session API. The extension will take care of the product updates, order confirmations, exchange rates and other background processes but displaying the recommendations, popups, etc. must be done using Session API.
When dynamic functionality is needed / no page reload
In case your website implement some dynamic functionality, you can use the . Note that you cannot mix Session API and Page Tagging.
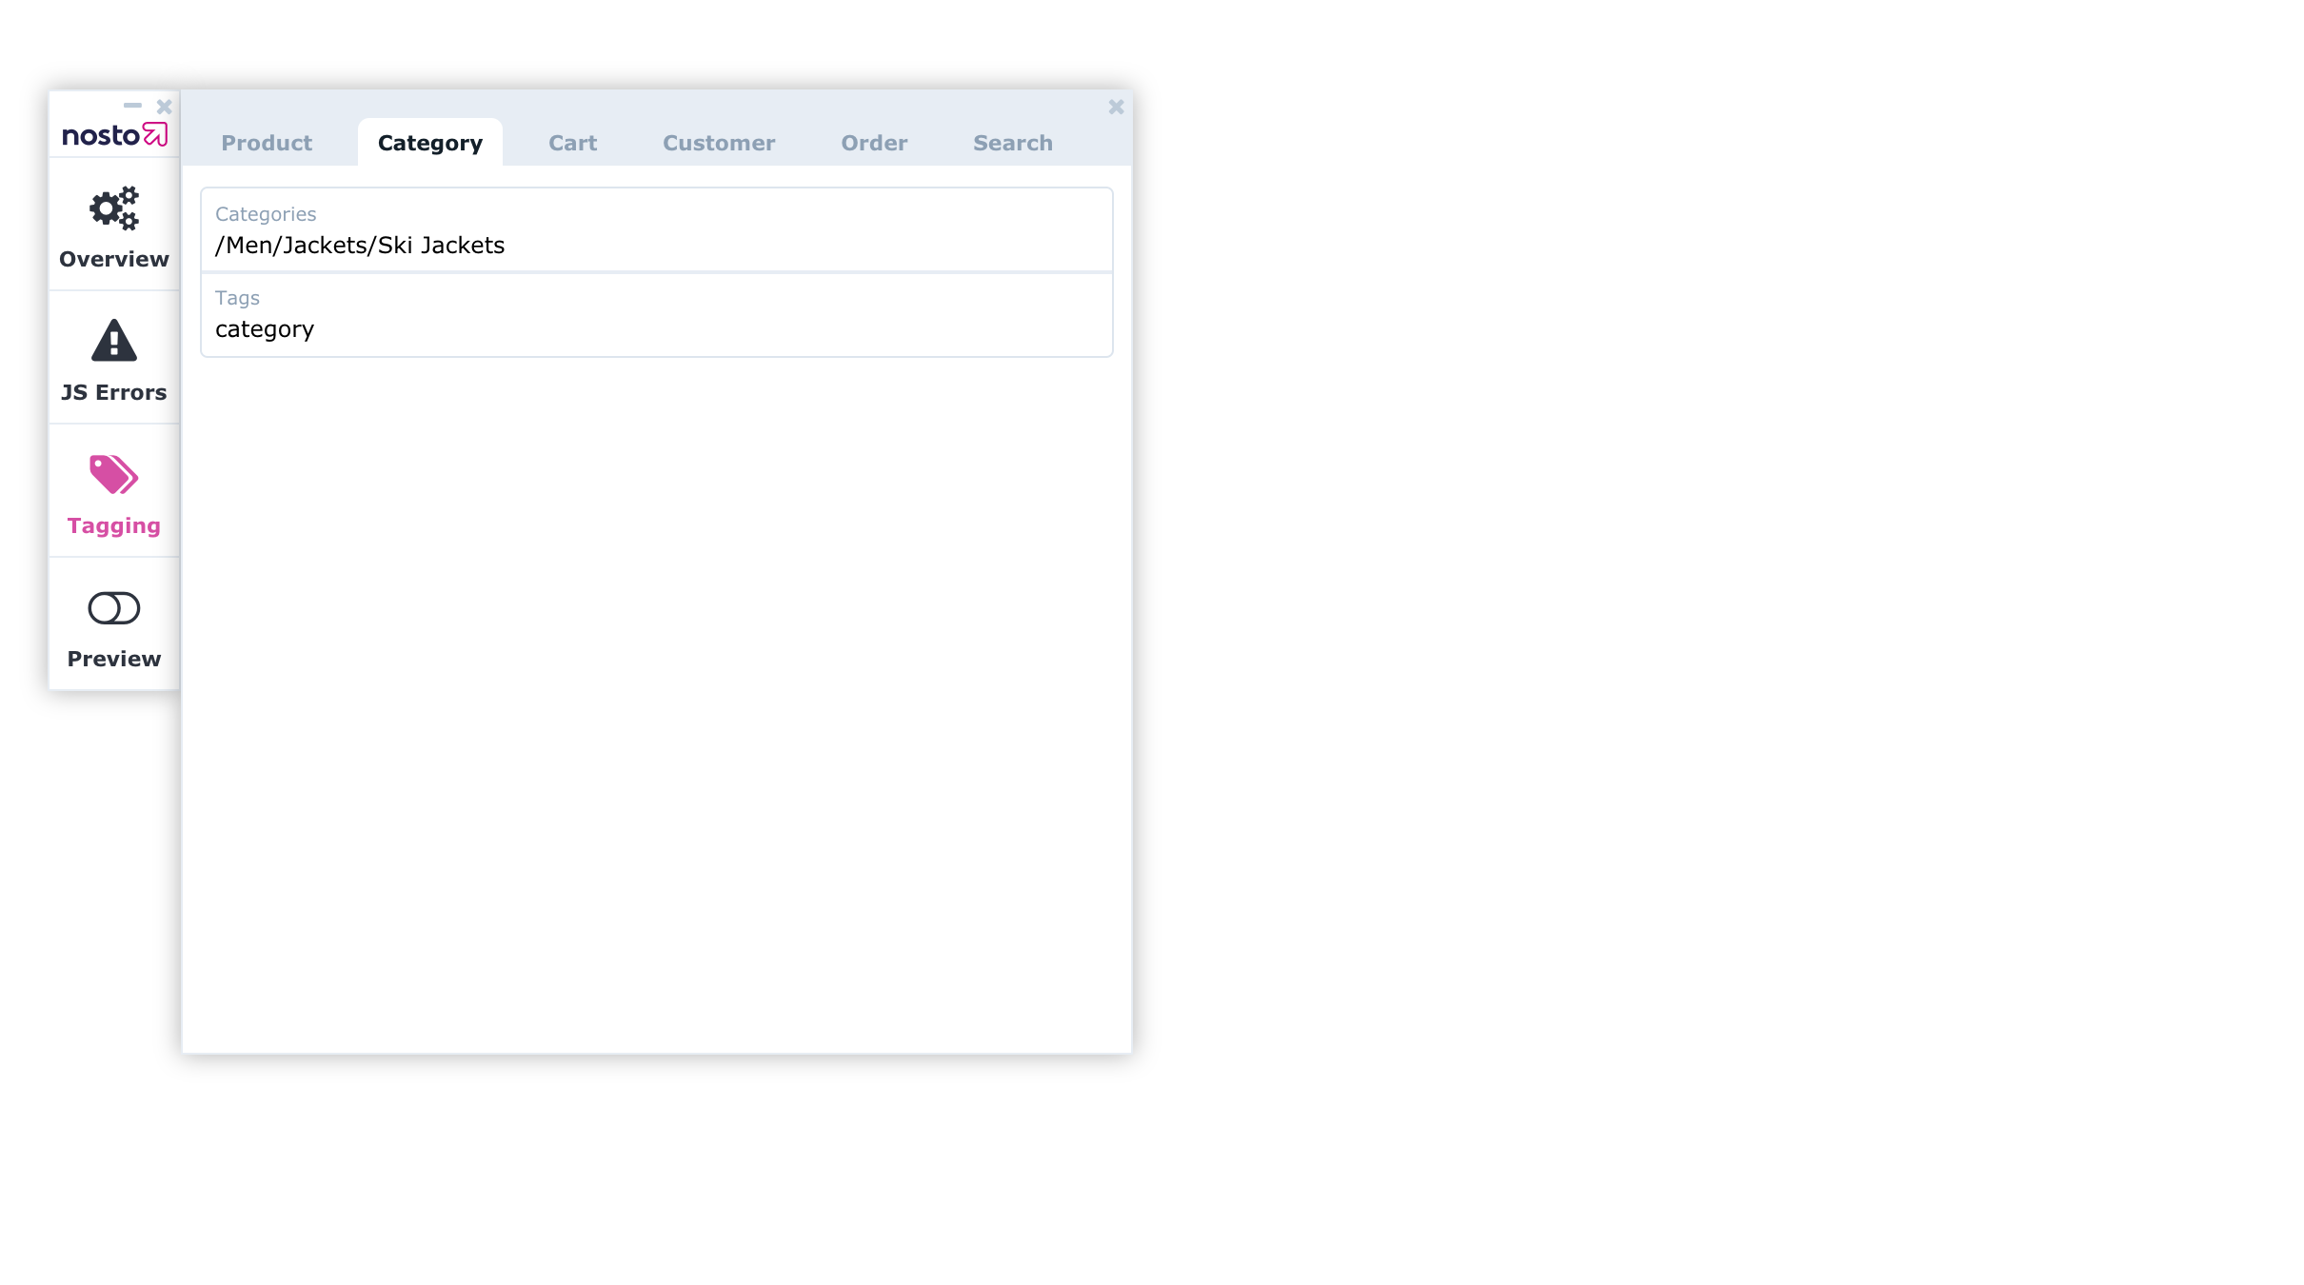
Adding the Category/Brand Tagging
Nosto utilizes meta tags to track what category or brand a certain visitor is viewing or what page type the currently viewed page is. These values are then used for dynamic filtering for categories and brands applied through the Nosto admin UI or exposure of certain pop-up campaigns for page types.
The category tagging should be exposed whenever a user is viewing a certain category.
To learn more about the api.setTaggingProvider usage, please refer to the .
Tagging the categories
Categories must always be delimited by a slash. For example, /Home/Accessories is a valid category while Home > Accessories is not.
Faceting by other attributes
With Nosto you can also expose other attributes that should be used for category/brand page filtering. For example when a user clicks on a certain color, only products with that certain color attribute should be exposed by both the category list, and Nosto Onsite Recommendations. Available values correspond to custom fields tagged as part of the .
or via DOM tagging
Tagging the current page type
Page type tagging should be exposed whenever a user is interacting with a page so Nosto understands what kind of page this is.
or via DOM tagging
Page type is optional and used mainly for triggering popups and also to understand what kind of page the user is currently interacting with. The page type must always be lowercase and the accepted values for page type are: front, category, produc, cart, order, search and notfound.
Troubleshooting
Once included on all pages, you can review if the site is transmitting data using the Nosto Debug Toolbar. If you can see order contents being picked up under "Tagging" → "Category" then the category and page type tagging are correctly set up in the source code.
Translate attribute
The translate attribute is a which specifies whether the value of the element and it's Text node children should be translated. If your tagging elements are being translated by e.g. Google Translator then this is the way to opt out elements being translated by Google and possibly other vendors.
Querying Products
List Products
Querying products gives access to Nosto's product catalogs current state. It can be useful for backend integration and verification purposes. It is not meant for online use purposes as it doesn't include any concepts related to user sessions or attribution, for those refer to GraphQL For Headless
The maximum number of products that can be paged over is capped at 10000. If you need to get around this limitation, we recommend adding more restrictive filters to narrow down the result set.
Query by Product ID
Updating Categories
Mutations can be used to update the category listing in Nosto. The upsertCategories mutation allows you to update one or more category at one go. If the category doesn't already exist, a new one is created.
A category can have the following fields:
id The category identifier. If a category with this id doesn't already exist, a new one is created.
name The displayed name for the category.
urlPath The path that can be used to generate the URL of the category listing.
available If the category is visible on the store. This can be set to false to soft delete the category in an upsert.
Some stores support hierarchical categories i.e. a category may have parent and child categories. The following fields can be used for hierarchical categories:
parentId The identifier of the parent category.
fullName The name of every category in the hierarchy.
Using Search Templates
Search Templates is no longer actively developed. We recommend using instead, which provides modern development tooling, full source code control, and a local development environment. Onboarding assistance is only available for Search Templates Starter.
Why use Search Templates?
Search Templates allow you to add a search function to your website quickly and easily without the need to use an API. You can customize the design of your search pages and autocomplete boxes to match your brand's look and feel. This saves you a lot of time compared to implementing search functionality through an API.
Get Started
To get started with Search Templates on your website, navigate to the Search tab under 'On-site' within the Nosto UI. This is where everything for Search can be configured and controlled, including designing the templates for search pages and autocomplete dropdowns, as well as search analytics, merchandising rules and other settings. Synonyms for search queries can also be configured here.
If you prefer to develop the template in your local IDE of choice, we recommend you also take a look at . The CLI tool set allows you to develop the template on your machine with your own tools, and upload the build artifacts directly to Nosto.
To begin implementing Search, navigate to the Templates tab under Search, and Click on “Open Code Editor”.
You will then be redirected to the Code Editor window, where you can see and edit all project files.
Search Templates ship with a library called @nosto/preact that contains functionality to interact with the Nosto Search product. API documentation for the library is available
Project structure
Project structure has the following requirements:
index.js - this is application entry point that is used when building project. When building project it will recursively scan this file for imports.
build/ - this directory stores build output that will be used when deploying project.
Saving, testing & deploying
After saving changes (CTRL + S) build should be triggered and bundled code should be uploaded to CDN. You can preview final result on your website and deploy it when ready.
Default Product Tagging
Basic tagging
The full schema for product tagging is defined
or via DOM tagging
Nosto also supports multiple optional values which may enrich the usage of the service, but are not required. These span elements should be inserted into the "nosto_product" parent container.
Tagging attribute extension
Parameterless Attribution
By default Nosto tracks campaign attribution without additional url parameters. The tracking happens by registering click listeners to the campaign elements that detect product url clicks and associate them with the attribution metadata of the rendered campaign. The pair of url and campaign attribution is stored in the local storage of the Browser.
In most cases this will work out of the box, but in certain scenarios adjustments need to be made. For a comprehensive overview, please read our .
Capturing clicks
The following tracking modes are supported:
Adding the Cart Tagging
On every page load, the cart content must be tagged. The cart contents are the 1:1 representation of the user's mini-cart.
The cart information is used by the Nosto to tailor the recommendations, dispatch abandoned cart emails and fire Facebook pixel events for retargeting purposes.
The full schema for cart tagging is defined
or via DOM tagging
Note: The product ID of the product tagging, cart tagging and order tagging must match. Failure to do so will lead to a mismatch in both attribution and statistics across the Nosto product.
Using Search Templates Starter
The Search Templates Starter is a Preact-based starter template that provides a complete development environment for building custom search experiences with Nosto.
Prerequisites
Search Templates Starter is aimed at developers comfortable with:
TypeScript
Using Mutations
The mutation methods allow you to change the session on Nosto's end and request personalized recommendations. Each mutation operation allows you to update the cart and customer information, all while giving you access to recommendations for the sessions.
Any mobile experience built atop Nosto's GraphQL API should use the mutation operation as it feeds data into to the recommender systems while providing personalization data.
_The given example updates the customer's information and his current shopping cart contents sends an event that the customer is currently viewing product number 400 and requests the personalized recommendations associated with a given product for him aliased as front_page_1.
Updating Products
Mutations can be used to update the product catalog in Nosto. The updateProducts mutation allows you to update one or more products at a go.
Any validation errors in the product data are accessible in the response. The entire product object is accessible in the response too. In the event that a product validation error led to the product to not be updated, the response would contain the errors as well as the invalid product data.
The given example updates the product #101 and requests the details of the updated products and any associated errors.
The given example updates the price of #101 and requests the details of the updated products and any associated errors.
Attributions are tracked based on the id of the clicked product supplied in the data-nosto-product attribute, triggering an immediate network call to Nosto
Useful for any interaction that doesn't trigger a navigation to a PDP page, e.g. ATC dialogs, modals etc.
In case the product urls used in Nosto campaigns have HTTP level redirects applied the HTML should link back to the canonical url used in Nosto campaign via link[refl="canonical"] elements in the head element. Nosto uses both the current location and the canonical page url as lookup keys for the attribution metadata.
Session API based usage
When combined with Session API based requests and HTML based campaign results it is advisable to let the Nosto API handle the campaign injection by enabling campaign injection on the session level:
Parameterless attribution became the default attribution mechanism on May 26th 2025. If your setup relies on the legacy nosto parameters being present you can enable the legacy behavior in your main account settings page.
JS API based usage: JSON Rendering Attribution
Attribution in custom element based Nosto campaign rendeirng
Below is an example of a custom element that fetches JSON results based on the placement attribute, renders them and register parameterless attribution for product link clicks:
Rendering of campaign markup in non-managed placement elements
In case the campaign markup is rendered into a non-placement element the element will need to be registered with parameterless attribution handling via api.attributeProductClicksInCampaign:
export class NostoRenderer extends HTMLElement {
async connectedCallback() {
const api = await new Promise(nostojs)
const placement = this.getAttribute("placement")
if (placement) {
const results = await api
.createRecommendationRequest({ includeTagging: true })
.setElements([placement])
.setResponseMode("JSON_ORIGINAL")
.load()
if (results.recommendations[placement]) {
const rec = results.recommendations[placement]
const container = document.getElementById(placement)
// TODO: Define your own method to render products
renderProductsToContainer(container, recommendation)
api.attributeProductClicksInCampaign(this, rec)
}
}
}
}
if (!customElements.get("nosto-renderer")) {
customElements.define("nosto-renderer", NostoRenderer)
}
const placementId = "frontpage-nosto-1"
const response = await api
.createRecommendationRequest({ includeTagging: true })
.setResponseMode("JSON_ORIGINAL")
.setElements([placementId])
.load()
const recommendation = response.recommendations[placementId]
const container = document.getElementById(placementId)
if (recommendation && container) {
// TODO: Define your own method to render products
renderProductsToContainer(container, recommendation)
api.attributeProductClicksInCampaign(container, recommendation)
}
Tagging the prices
Prices must always be denoted in a simple numerical form using dot as the decimal separator. For example, 1.234,45 is invalid while 1234.45 is valid.
Tagging the categories
Categories must always be delimited by a slash. For example, /Home/Accessories is a valid category while Home > Accessories is not.
Tagging the currencies
Currencies should always be represented in the ISO-4471 three-letter format. For example, use the code USD instead of $ to represent the United States Dollar.
Tagging the availability
The availability of a product is represented by InStock or http://schema.org/InStock for products that are in stock and saleable. For products that are out of stock or you don't want to be recommended, you can use OutOfStock or http://schema.org/OutOfStock
The rating of a product must be represented as a number between 0.0 and 5.0. For example, a product cannot be rated 9.1. You must normalize your rating value to fit our specified range.
Tagging the Tags and/or Custom fields
The three tag fields, tags1, tags2 and tags3 are simply labels that can be used to annotate tags like discounted, limited collection or other use cases where you might want to filter your Nosto recommendations by certain product groupings.
Custom fields accept a key:value pair where the class of the attribute is the key. Common use cases are material, color or other similar unique identifiers.
Tagging the currently viewed sku
It is possible to tag also the currently viewed product sku. Typically, this would be done on a product detail page when the user chooses a specific color or size and you would like to update recommendations to highlight other products with similar attributes. Most common approach would be to implement it by calling the Session API or the JS API from a click-listener to send the sku information and update the recommendations. If, however, the preference is to use tagging to specify the selected sku instead, that can be done through tagging by adding a span under product with the class name selected_sku_id, for example: <span class="selected_sku_id">40822930473153</span>
Fields that are not exposable in tagging
Nosto also supports two attributes that are not crawlable through tagging. This is due to the sensitive nature of the attributes. Those are: supplier_cost and inventory_level. To send these two values to Nosto you will need to use the Products API.
Adding support for advanced use cases
Many e-commerce stores utilize SKU:s or "child" products that are sorted under the same "parent" product. To extend the above example with SKU support refer to this article
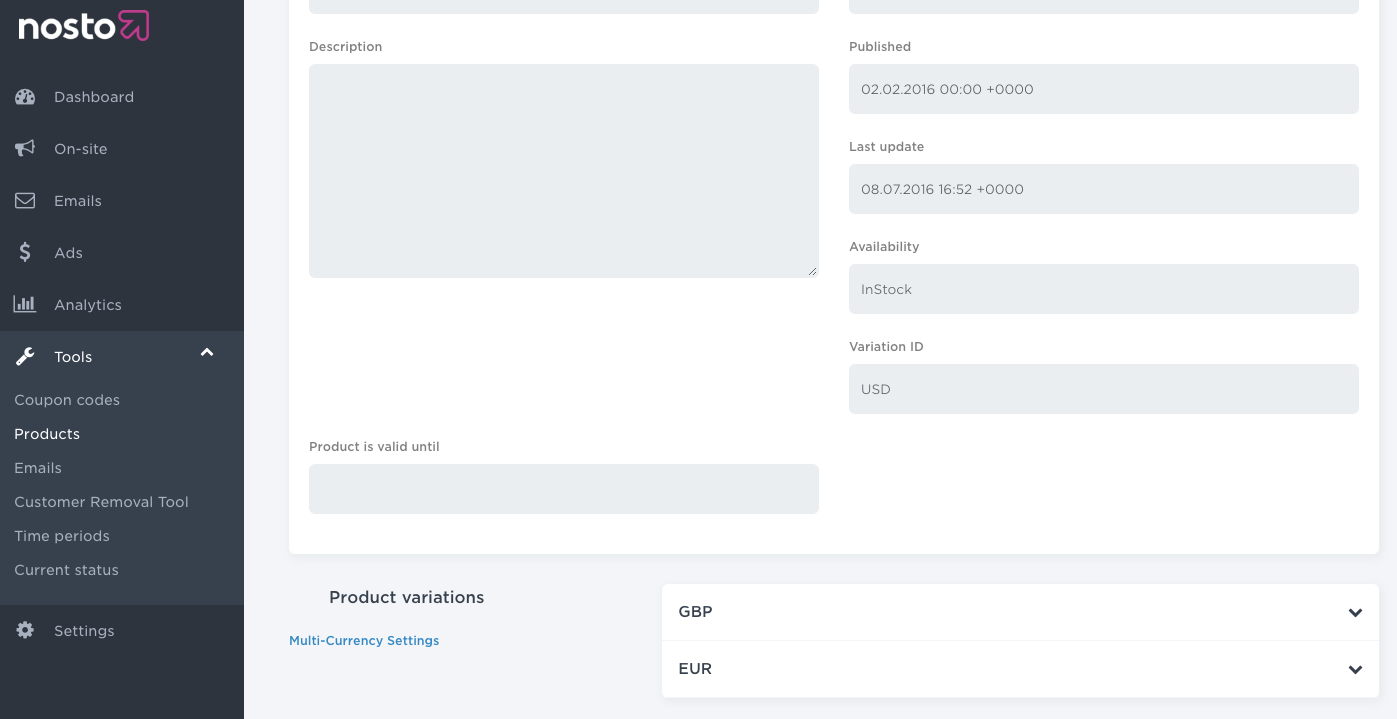
In cases where a product might have multiple prices in differing currencies, you can also add support for multi-currency. Refer to this article
Supplier Cost / Margin Filter
If you want to use Nosto’s margin filter, you need to send supplier cost via API since it's a sensitive data that you might not want to expose in the product tagging.
Troubleshooting
Once included on all pages, you can review if the site is transmitting data using the Nosto Debug Toolbar. If you can see product attributes being picked up under "Tagging" then the product details are correctly set up. You can further verify that products are being indexed to the catalog under the Nosto admin by navigating to the Catalog Explorer: https://my.nosto.com/admin/$accountID/products
Nosto debug toolbar / products
The UI of the Catalog Explorer (CE)
Translate attribute
The translate attribute is a HTML5 standard attribute which specifies whether the value of the element and it's Text node children should be translated. If your tagging elements are being translated by e.g. Google Translator then this is the way to opt out elements being translated by Google and possibly other vendors.
Cart content changes should be reflected to Nosto by either calling api.setTaggingProvider("cart", data) with updated cart contents or updating the cart tagging in the DOM.
Adding support for advanced use cases
Many e-commerce stores utilize SKU:s or "child" products that are sorted under the same "parent" product. To extend the above example with SKU support refer to this article
In cases where a product might have multiple prices in differing currencies, you can also add support for multi-currency. Refer to this article
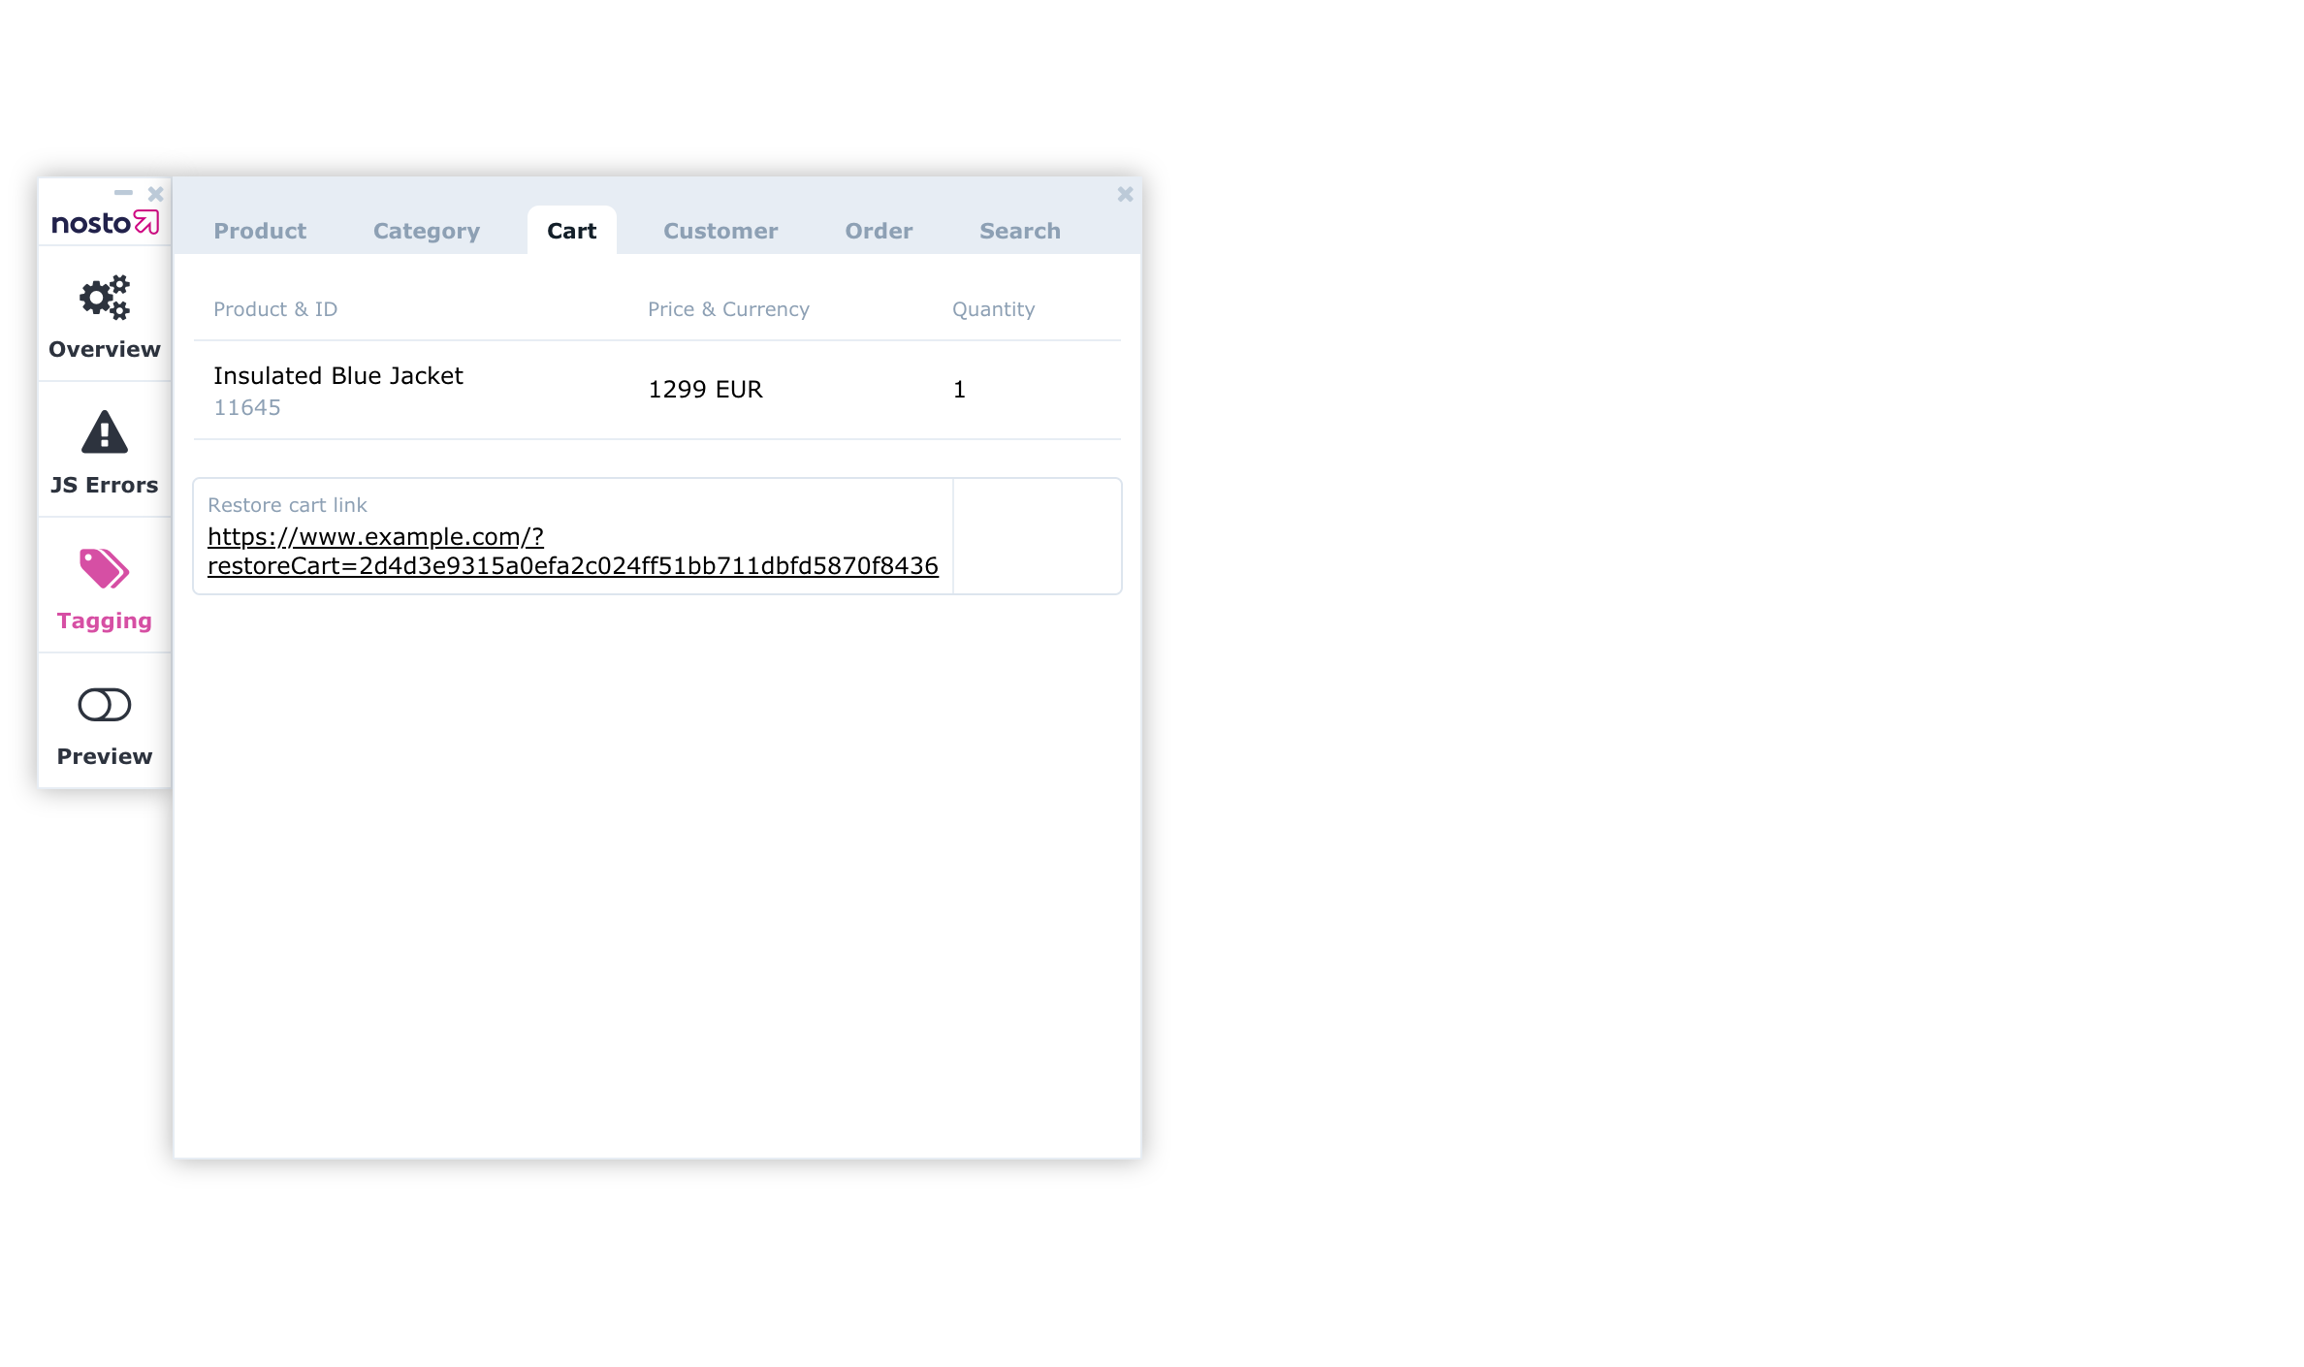
Tagging the cart restore link
If the platform itself has support for persistent shopping cart or other technologies that remember the users cart contents you do not need to worry about filling out the cart when a user returns to the site. If your platform generates a restore cart link you can also send that to Nosto by adding it as a new attribute within the parent container "nosto_cart".
The following piece of code is just a rough example on how a restore cart could look like. The idea of the example is to document how this is tagged to Nosto.
or via DOM tagging
Troubleshooting
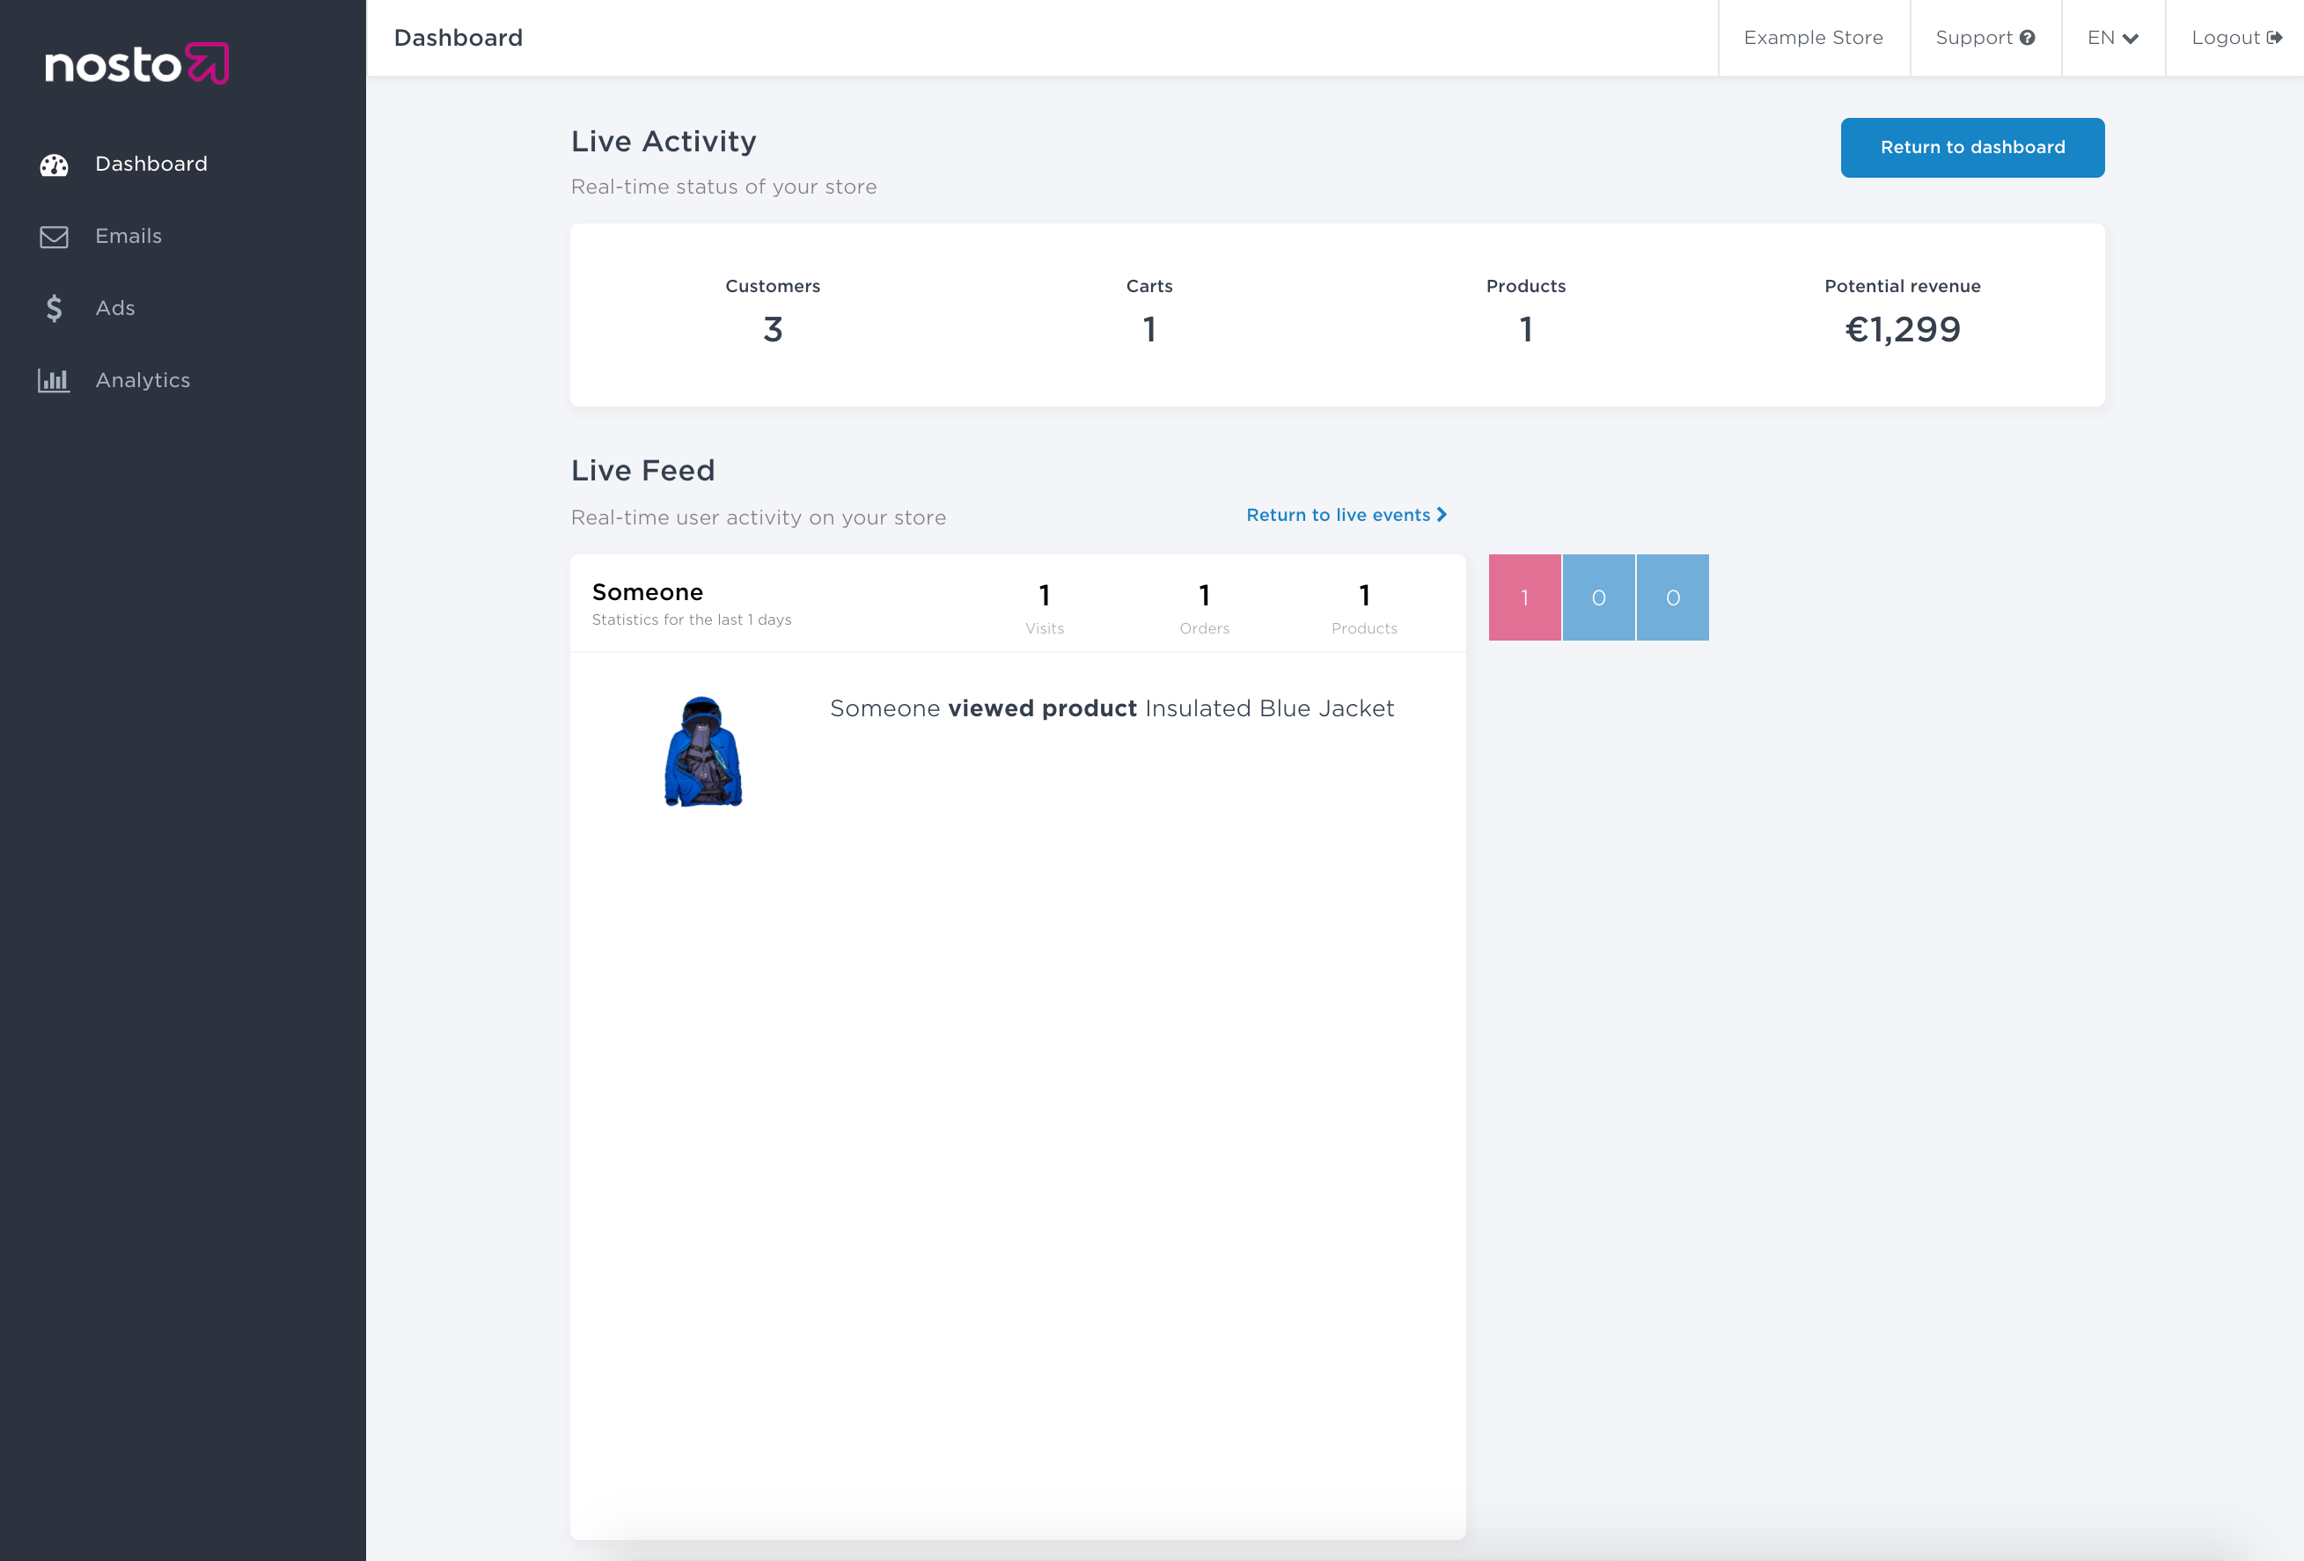
Once included on all pages, you can review if the site is transmitting data using the Nosto Debug Toolbar. If you can see cart contents being picked up under "Tagging" → "Cart" then the cart details are correctly set up in the source code. You can further verify your session in the Nosto admin by using the live feed under https://my.nosto.com/admin/$accountID/liveFeed to see if Nosto correctly picks up product view → product carted events.
Nosto debug toolbar cart
live-feed-product-cart
Translate attribute
The translate attribute is a HTML5 standard attribute which specifies whether the value of the element and it's Text node children should be translated. If your tagging elements are being translated by e.g. Google Translator then this is the way to opt out elements being translated by Google and possibly other vendors.
NPM-based tooling — dependency management, scripts, local dev servers
React or Preact — components follow standard React patterns
Agentic coding (using LLM tools such as Copilot, Codex or Claude) is optional but particularly useful here. Unlike the legacy VSCode web-based Search Templates, the Search Templates Starter is built with an assumption that AI tools are a staple of modern development. We recommend relying on LLMs to give you a better starting point before finalizing the feature development manually. For example, if you want to convert the starter to a different styling approach such as Tailwind, or swap out individual components for ones that better fit your stack, an LLM is useful. See LLM Examples for practical guidance.
Why use Search Templates Starter?
Search Templates Starter allows you to build fully custom search implementations with modern development practices. You get:
Full source code control with Git version management
Modern development tooling including TypeScript, Vitest, and Storybook
Local development environment with hot reloading and debugging
Component library with pre-built, customizable search components
Complete flexibility to modify any aspect of the search experience
For any serious development work, Search Templates Starter is the recommended choice. It gives you the tools and workflow you would expect from a modern frontend project, and it is the approach Nosto actively develops and supports.
How it works (new to Nosto?)
If you have not worked with Nosto Search before, here is what you need to know about how Search Templates Starter fits into your stack.
Templates are hosted by Nosto
You do not need to host the built bundle yourself. When you build and push your templates using nosto-cli, the artifacts are uploaded to Nosto's infrastructure and served to your store visitors automatically — no CDN setup or server configuration required. Self-hosting is supported if you need it, but for most use cases Nosto's hosting is all you need.
The bundle is injected via the Nosto script
Your store already includes the Nosto script tag. That script is responsible for loading and injecting the search templates into your page. As long as:
Search Templates are enabled for your account
You have built and pushed your templates with nosto-cli
Your src/config.ts includes the correct CSS selectors to target your page's DOM elements
…the templates will appear on your site out of the box. There is nothing extra to wire up on the frontend.
Preview changes without going live
The development workflow separates preview from production deployment. During development, nosto-cli provides a watch mode (nosto st dev) that automatically builds and pushes your artifacts to Nosto as you save files — only the built artifacts are uploaded, not your entire repository. Your changes go to preview mode first and are not visible to real visitors yet. To see them yourself:
Navigate to your store and append ?nostodebug=true to the URL
Log in to the Nosto debug toolbar that appears
Toggle Preview mode on
Your latest changes will now be visible as you browse the store
When you are happy with the result, you can deploy to production either from the Nosto Admin UI or directly using the CLI. This is the same workflow as the legacy Search Templates — the difference is only in how you develop and push your code locally.
Next steps
To start developing with Search Templates Starter, you'll need Node.js 24+ and familiarity with React/Preact. Here is the typical workflow end to end:
Getting started — Clone the repository, install dependencies, and configure your merchant ID and CSS selectors
Authenticate — Run nosto login to connect the CLI to your Nosto account
Develop — Use npm run dev for fast component iteration in isolation, or nosto st dev to push changes and test them on your real store
Preview — Enable the Nosto debug toolbar on your store (?nostodebug=true) and toggle Preview mode to review your changes before they go live
— When ready, deploy from the CLI or from the Nosto Admin UI
Best practices
Use separate branches for production and development
Maintain at least two long-lived branches in your repository — for example main for the current production state and dev for ongoing development. When you need to apply an urgent fix to the live store, you can branch off main, apply and deploy the patch, and merge back — without disrupting work in progress on dev. This is the same branching model you would use in any professional frontend project, and it maps naturally onto Nosto's preview/production deployment model.
Large Language Models (LLMs) like GitHub Copilot, ChatGPT, Codex and Claude can significantly accelerate development with the Search Templates Starter. This guide provides proven prompts and strategies for common development tasks.
Why use LLMs with Search Templates Starter?
The Search Templates Starter's well-structured codebase and modern tooling make it ideal for AI assistance:
TypeScript support - Type information provides better AI suggestions and error detection
Component-based architecture - Clear boundaries make it easier to generate focused code
Effective Prompting Strategies
Follow Standard Development Patterns
The Search Templates Starter includes standard development patterns and documentation that LLMs can leverage:
AGENTS.md Standard - Follows the standardized pattern for providing AI coding agents with project-specific context, build commands, code style guidelines, and testing instructions
Copilot Instructions - Pre-configured GitHub Copilot instructions are included in the repository and should be customized for your specific use case
README patterns - Follow the established documentation structure for consistency
Tip: Consider modifying the AGENTS.md file in your project root to align with your project's custom conventions. Following the standard ensures that all AI coding tools can consistently adjust their contributions to match your guidelines.
Common Development Tasks
Component Modifications
Example: Replace FilterSidebar with FilterTopbar
Example: Replace Pills with Checkboxes in Filters
Styling Changes
Example: Replace CSS Modules with Tailwind
or for a full conversion
Search Functionality
Example: Replace Infinite Scroll with Load More Button
Best Practices for LLM-Assisted Development
Code Review
Always review LLM-generated code for:
Adherence to project patterns and conventions
TypeScript type safety
Security considerations
Performance implications
Iterative Refinement
Start with basic prompts and refine:
Get a working implementation
Ask for improvements and optimizations
Add error handling and edge cases
Enhance with additional features
Combine with Human Expertise
Use LLMs to:
Generate boilerplate code quickly
Explore different implementation approaches
Create comprehensive test suites
Document complex functionality
But rely on human judgment for:
Architecture decisions
Security considerations
Performance trade-offs
User experience design
Troubleshooting LLM Issues
Common Problems
Generated code doesn't follow project patterns:
Include more specific context about existing patterns
Reference specific files as examples
Provide the project structure in your prompt
TypeScript errors in generated code:
Ask the LLM to review and fix TypeScript errors
Provide the exact error messages for targeted fixes
Include relevant type definitions in your prompt
Tests fail or are incomplete:
Request test coverage for specific scenarios
Ask for tests that follow existing test patterns
Include example test files for reference
Generated code lacks optimization:
Ask specifically for performance considerations
Request code review focusing on optimization
Include performance requirements in your initial prompt
By following these patterns and examples, you can significantly accelerate your development workflow while maintaining code quality and project consistency.
Event API: Listening to Bus Events with api.listen
Overview
Registers a listener for Nosto JS API events. Use this to react to specific lifecycle or user events dispatched by the Nosto client.
The following table lists all event types supported by the listen API. See for API documentation on each of these event types and it's associated payload
Lifecycle Events
Event Name
Description
Popup Events
Event Name
Description
Tagging Events
Event Name
Description
Unregistering listener
Use the unlisten method to remove a previously registered event handler for a specific event type, using the listen API method. Check out the API documentation for .
Example usage
Note:
If the callback was not previously registered for the event, calling unlisten has no effect.
Implementing Category pages
Category pages can be rendered using search templates over existing category pages.
Configuration
To render the category page, provide additional configuration parameters to the init function in the index.js entry point file. Default configurations for categoryQuery and isCategoryPage are already provided. Custom configuration is necessary only if the default settings are not suitable for your application.
The default isCategoryPage function checks for the presence of an element in the DOM and determines if the page should be considered a category page based on its content.
Category query parameter as function
In the example above, we supply autocomplete query parameters as an object. Additionally, the categoryQuery parameter can also be supplied as a function. The function flavor can be used for building complex query parameters and provides access to other pre-defined configuration parameters. Section below shows an example of categoryQuery supplied as a function which provides the product variationId by accessing the pre-defined categoryId and categoryPath methods from the default configuration.
Handling native results
Nosto will attempt to display the original category page products in case Nosto service is unavailable or can't be reached. In addition, the original products are made available for the SEO crawlers, improving the page's ranking in the search engines. To make it possible, it's recommended to hide the original category page products instead of removing or blocking them.
The best approach is to add ns-content-hidden class name to the same element you are targeting with contentCssSelector or categoryCssSelector. This class name will be stripped away by Nosto automatically as soon as the script is initialized.
In addition, you should define CSS to hide the target element:
Detect search page
The isCategoryPage function should detect whether the current page is a category page. Its result should not be cached, as it needs to dynamically detect the page type since it can change during the app's execution. For example, if the user navigates from a category page to a search page, the function should reflect that change in page type.
Category query
The categoryQuery should generate a category page query based on the current page. It must return either categoryPath (identical to the categories field filter) or categoryId to select the current category. The default implementation extracts the categoryId and categoryPath fields from the DOM.
Category component
The category component should also be implemented. In most cases, it is the same component as the search page component, except that the search query should not be displayed.
Other features & implementation
The category page shares a lot of similarities with the search page, so please refer to the search page documentation:
Analytics
Search automatically tracks to Google Analytics & Nosto Analytics when using the SerpElement component.
Headless and SPA (Single Page Application) implementation methods
The following gives a quick overview of page tagging/event tracking (coupled with handling Nosto product recommendations and banners) for headless and SPA (Single Page Application) builds. You can find more details in the personalization implementation guide, but this page will already give you a general understanding of the concept.
Search and Category Merchandising is separate from the personalization guide and covered at the end of this page.
If you are using Shopify Hydrogen or Magento Hyvä, you can use Nosto's dedicated and the .
Page Tagging and Event Tracking + Requesting Nosto Content for rendering with your Templates
On every page visit, you need to send a request to Nosto using our Session API about the page type the user is browsing and what exactly they're looking at (e.g. type = product, ID = 123).
You can , the concept is the same every time.
Nosto then returns a response with two types of content:
Product Recommendations -> with an array of
Onsite Content Personalization (OCP, e.g. banners or text) ->
Nosto Content via Session API
You take the response and pass it to your rendering function, building the HTML template and injecting it into your theme.
This is done via (empty divs on every page that can be populated from the backend, e.g. pdp-top, pdp-mid, home-1, home-2, ...) and you pass all the placement-IDs that are on the current page to Nosto. Nosto then returns the data of the campaigns that are inside of those placements.
Using placements gives the eCom-team a high degree of flexibility since they can control what to show where and they can run A/B tests within Nosto.
Nosto offers you several helper functions to simplify injecting your campaigns and setting up click attribution. If you want to read more on DOM injection and click attribution .
Nosto Content via GraphQL
The event tracking can also be done via GraphQL.
The concept is the same: and .
Please beware of the following drawbacks:
You request the campaigns for a specific product ID or category (without placements) and will receive the Recommendation campaign IDs directly and therefore can't use Nosto built-in A/B testing. You need an alternative, full page A/B testing like Omniconvert in this case.
is not possible via GraphQL. We highly recommend to go with the Session API and use .
Nosto OCP (like personalized banners or other HTML content) can not be retrieved via GraphQL.
Choosing the right Implementation Method
The Nosto team is happy to support you finding the method that matches your tech stack, requirements and preferences. We highly recommend reading our , but if you're in a hurry, take a look at our .
Implementation Methods for Nosto Search/Category Merchandising (CM)
Here you can find an .
The differences between the GraphQL API and JS Library (wrapping the GraphQL API) are:
Queries done with the JS Library are automatically tracked, (when a user clicks on a product that was returned by a Nosto-powered search overlay, SERP or PLP)
Nosto A/B testing is automatically included with the JS Library and
to get the current session params from the browser and pass it to the GraphQL request
The endpoints and requests are very similar, you either pass a search query or a category and Nosto returns all products and associated facets. Here are .
Create Autocomplete template
Attributes
The following data-* attributes are required by the library to handle attributions (click events) for products/keywords/history items rendered in the autocomplete result:
data-ns-hit
This attribute should be used on clickable keyword, product, history list elements. This attribute handles submit keyword/history as search, redirect to product, analytics (if enabled) request.
Following table shows value for this attribute depending on the rendering context.
Context
Value
data-ns-remove-history
This attribute should be used to delete history entries in the autocomplete
To make an element delete a single history entry when clicked, add data-ns-remove-history={hit.item} to an element. In order to delete all history entries, add data-ns-remove-history="all" to clear button.
Starter templates
This section provides links to default startup templates for different rendering frameworks. These templates can be copied and customized as needed.
, , ,
Dynamic product cards
For Shopify stores, dynamic cards offer a powerful way to display products. Instead of building product cards from individual pieces of data (like a product's name and price), you can load the complete, ready-made product card directly from your theme.
This is the recommended approach when:
Your product cards have complex logic, such as variant selectors, color swatches, or add-to-cart forms.
You want to maintain a single source of truth for your product card templates within your Shopify theme.
You need to display rich product information that may not be available as individual fields in the search API response.
How It Works
The starter template uses a decorator to extract a product's handle from its URL. This handle is then passed as a prop to the DynamicCard Preact component, which in turn sets the handle attribute on the nosto-dynamic-card web component.
The key props you will work with are:
handle: This is derived automatically by the handleDecorator from the product.url. You typically do not need to manage this manually.
section: The ID of the section to render from your product template.
Note: To render a dynamic card, you must provide the handle prop along with either the section or template prop.
The nosto-dynamic-card web component leverages Shopify's built-in support for these features. When you provide a section or template prop, the component constructs the appropriate URL to fetch the pre-rendered HTML from your Shopify store.
Note: The template prop usage is currently being deprecated and we recommend the section prop usage as it is recommended by Shopify and proven to be more robust.
Read more about the .
Configuration
1. Configure the DynamicCardProduct Component
The template provides DynamicCardProduct components for both the search results page (SERP) and the autocomplete dropdown. You need to ensure the template prop matches a template available in your backend.
For example, to change the template name for the search results page:
2. Enable Dynamic Rendering in the Product Grid
The search results page (Products.tsx) can be configured to use either the static Product.tsx component (client-side rendering) or the DynamicCardProduct.tsx component (server-side rendering).
To use dynamic cards, ensure the component is imported from DynamicCardProduct.tsx.
Visually Testing Dynamic Product Cards
When using dynamic product cards, the HTML for the cards is fetched directly from the merchant's website. This means that the styling for these cards is not included in the starter template's CSS.
To visually test the dynamic product cards in your local development environment, you need to include your store's CSS. You can do this by adding a <link> tag to the <head> of the index.html file in the root of the project.
For example:
Replace https://your-store.com/store.css with the actual URL to your store's main stylesheet. This will allow you to see the correctly styled product cards when running the development server.
Product images
This article covers how Nosto provides product images in on-site recommendations and helps you how to change the image settings if these look unsharp or otherwise bad to you. On the contrary, if recommendation images load slowly the article covers also how to adjust settings to speed up image load times and other common errors with the images.
Introduction
The implementation of Nosto on a web-site maps out an original product image used on a product detail page (PDP) to Nosto automatically. In the background, an automated service fetches the default product image and creates eight different image versions out of the image, which are stored at Nosto and made available in our Content Delivery Network (CDN).
Some image versions are processed slightly by resizing, cropping and zooming the image a bit. Applicable image versions in Nosto’s CDN are:
Version
Dimensions
These are the the available image sizes via Nosto's CDN. Alternatively you can use original image , but in this case an image is loaded from your servers possibly affecting site load times, entirely depending on how images are hosted on your servers. Use following variable to use the original image.
The Nosto CDN thumbnails are accessible via
where size is a number between 1-7 basd on the version mapping above.
Custom thumbnail sizes
For Shopify and Bigcommerce Nosto supports also direct access to Shopify and Bigcommerce CDN thumbnails.
These are accessed via the following pattern:
To access the first alternate image scaled down to a 300x300 image use
The custom thumbnails are served without any cropping.
It is also possible to leave width or height undefined to define only a limit for one of the dimensions:
This would scale down the image to have a max width of 300 pixels.
Troubleshooting Common Issues
Product Images Don’t Appear
If a product image doesn’t appear or if the image link is broken this usually due to error in image url tagging, erroneous url mapping or a temporarily error while fetching the images from your site to Nosto’s CDN. If you very recently implemented Nosto occasionally errors might occur and re-indexation of images is needed.
In any case, please review markup-example in tagging guide and then use the Nosto debug-toolbar and check that the image url mapped to Nosto is correct.
If image tagging is correct, there might have been an unusual error with Nosto’s image processing. In this case a manual reindex of product details is required which is launched from the Nosto admin.
In case Nosto is implemented on a site unaccessible from the Internet, this is expected behavior. Read about implementing Nosto on test environments.
New Product Image Doesn’t Update
If you update a new image version for an old product, preferably save the image with a new file name, which typically generates a new image url for the product image as well.
Nosto doesn’t recognize images by file size or image content but by URL, hence if a url for an image is unaltered, Nosto doesn’t update image version in it’s index and uses older version of the product image in recommendations. On the contrary, new products and product images are automatically fetched and processed and no manual input is needed.
Manual re-index for an image version can be launched by enabling debug-mode and clicking Send Product Update Request-button on a product page.
For a full re-index, log in to Nosto’s admin and navigate to Tools > Products > Update products.
Unsharp Images
Typically when an image in a recommendation looks unsharp it’s simply because a small image version is upscaled to a bigger physical area in the template. Applying a bigger image version in a recommendation template will fix the issue, so essentially you simply need to adjust the styling slightly and use a bigger image version stored in Nosto’s CDN
When creating a recommendation template on Nosto Admin Panel, you can choose which image size you would like to use. Nosto doesn’t improve or manipulate pictures, however image versions 1-6 are cropped into squares, sharpened a bit, and zoomed slightly closer to details. Two versions, seven and eight, are original versions, but with aspect limitations of 200px (7) and 400px (8) respectively.
Increased Load Time or Page Size
In the event of slow recommendation load time or increased page size, most likely a Nosto recommendation either uses an original product image or too big image version, which are downscaled to fit a smaller physical area in a browser, making it an opposite scenario to the unsharp images, with different consequences.
Debug by reviewing that the template uses a suitable image version and not an original product image as high-resolution image versions can often exceed size of 1M, consequently slowing down the recommendation load time if multiple products are displayed in a recommendation.
Vertical and Horizontal Product Images
Nosto doesn’t recognize details or tell the difference between horizontal and vertical images, so be sure that most of the details of a product are in the center of the picture. Alternatively you might need to adjust the implementation slightly so that you would consistently map either horizontal or vertical version.
Getting started
Before you begin, ensure you have the following installed on your system:
Node.js (v24 or higher) -
npm (comes with Node.js) or yarn as your package manager
Extending tagging with SKUs
Nosto supports individual product SKUs under parent products. If you have not set up you should start there and extend the tagging if needed.
The SKU attributes should be listed on the last row of the nosto_product block that you have already implemented on the product pages.
What is a SKU?
Many e-commerce stores have a parent product with individual child products. The parent product is usually something along the lines of "Ski Jacket" whereas the SKUs would then be "Ski Jacket, Blue, Small", "Ski Jacket, Red, Medium". If your store uses SKUs you should add the following attributes to extend your product tagging.
or via DOM tagging
Adding support for customer group pricing
In this article, you will learn how to implement multi-variants in Nosto. When the implementation is complete, you will be able to display different products at different prices to different customer groups.
Edge cases
If either of the following cases applies to you, we recommend either an API implementation or fetching the prices via the frontend API of your platform instead of sending the price variations to Nosto. Shopify for example has the and our Shopware plugin has an that you can extend. Please or your Nosto onboarding manager for additional consultation.
FAQ
Share search templates code between multiple accounts
The functionality enables the sharing of a single instance of search templates across multiple dashboard accounts through linking. This feature proves particularly advantageous in scenarios where there are multiple websites with identical or similar characteristics that necessitate the creation of multiple dashboard accounts (such as supporting multiple languages or environments).
Implement Category pages
Nosto provides functionality to retrieve all products for a specific category. This is useful when you want to implement category merchandising using the same API as for Search.
API Requests
Adding the Order Tagging
All thank-you and order-confirmation pages must have the conversion tracking markup.
The conversion metadata is used for sending personalized order-followup emails, personalize the recommendations e.g. order-related, for segmentation insights and conversion statistics.
The full schema for order tagging is defined
or via DOM tagging
Note: The product ID of the product tagging, cart tagging and order tagging must match. Failure to do so will lead to a mismatch in both attribution and statistics across the Nosto product.
GraphQL: Placing Orders
When a user places an order onsite or offsite, you must send the conversion tracking information to Nosto.
Orders can be associated with a customer either by or by customer id. The customer id matches the Nosto cookie (this cookie is typically called 2c.cId).
Tracking orders by customer id looks like the following:
Working with recommendations
Nosto MCP Server (beta)
This MCP server provides a comprehensive set of GraphQL tools for integrating Nosto's personalization and recommendation engine into commerce applications.
What is an MCP Server?
MCP (Model Context Protocol) is a standardized protocol that allows AI assistants like Claude to connect to external tools, databases and services. Think of it as a bridge that extends AI assistants capabilities with specialized functionality.
The query methods allow you to fetch basic recommender data and does not require any sessions. Query operations are light and do not give you the benefit of personalization but can be used to fulfill simple use cases e.g. an in-store display that always shows the top 10 viewed products.
_The given example simply fetches products related to a given search term aliased as q_related and also fetches the most viewed products within the last week.
Click the Use this template button to create your own repository, or click Code and select Download ZIP or Open with GitHub Desktop
If using the template feature, clone your new repository; if downloading, extract the ZIP file
Option 2: Command Line
2. Install dependencies
Install the required npm packages:
This will install all necessary dependencies for the project.
Configuration
Environment Setup
For local development, the Search Templates Starter requires your Nosto merchant ID to connect to your search data. This is not required for production builds. You can provide this in two ways:
Option 1: Environment File (Recommended) Create a .env file in the root of the project:
For Shopify merchants, you may also want to configure your store URL:
Option 2: Environment Variable
Finding your Merchant ID: You can find your merchant ID in the Nosto Admin UI under Account Settings, or it's typically in the format platform-storeid (e.g., shopify-12345678).
Development Configuration
The starter includes a configuration file at src/config.ts where you can customize:
CSS selectors for integration with your site — these define which DOM elements the search components are injected into via React Portals. They should match elements that exist on your store's search results page, category pages, and wherever your autocomplete input lives. If the selectors don't match anything on the page, the components won't appear.
Search behavior and settings
Component rendering options
Customized queries for SERP, category pages, and autocomplete
Connecting to Nosto CLI
Before you can push templates to your store, authenticate with the Nosto CLI:
This opens a browser window. If you already have a valid Nosto session, you are logged in automatically for the rest of the working day. Once authenticated, configure the CLI for your merchant:
This creates a .nosto.json configuration file in your project root. See Nosto CLI for full details on the CLI workflow.
Local Development
Development approaches
There are two ways to develop with Search Templates Starter. Choose based on what you need at a given moment — most developers use both during a project.
npm run dev — Vite dev server
Starts a local Vite dev server at http://localhost:8000. The page is a small mock store that mounts your components with your real Nosto data, but without your shop's styles or layout. Changes are reflected instantly in the browser via hot reload. This is the fastest way to work on component logic and appearance.
nosto st dev — watch mode on your real store
Watches your files, rebuilds on save, and pushes the artifacts to Nosto's infrastructure. Your changes become available in preview mode on your actual store — visit it with ?nostodebug=true and enable Preview in the debug toolbar, then refresh the page to see the update. This shows the templates exactly as they will appear when deployed, injected into your real store's pages.
Note:nosto st dev pushes to a shared S3 bucket tied to the merchant account. If multiple developers run it simultaneously against the same merchant, they will overwrite each other's uploads. Coordinate with your team to avoid conflicts — or use npm run dev for local iteration and only switch to nosto st dev when you need to verify on the real store.
Use npm run dev when iterating quickly on components. Use nosto st dev when you want to verify the result in context — with your real theme, real CSS, and real page structure.
Understanding Modes
Search Templates Starter may operate in three modes: Injected, Native and Mocked. For a typical store setup, you will most likely be using the Injected mode, as it is designed to integrate with any store page. Native mode is useful if you want to develop your store from the ground up using Search Templates Starter, and Mocked is primarily used for development and Storybook.
Injected Mode (Default)
In this mode, the components are rendered into the page using React Portals, targeting the elements you define with CSS selectors in src/config.ts. Note that without correct selectors, the components will not appear in the page at all. After the injection step, the rest of the application behaves nearly the same as it would in native mode.
Entry point:src/entries/injected.tsx
Configure CSS selectors in src/config.ts to match your store's elements. To test the injected result on your actual store, use nosto st dev instead of the Vite dev server.
Native Mode
In this mode, the Starter behaves like a standard React/Preact app but still uses React Portals with a single injection point (#app). It creates the component tree and renders both search and results components together based on the page type (search results or category page). This is useful for:
Developing your store from the ground up using Search Templates Starter
Testing search functionality without existing page constraints
Rapid prototyping of new features
Entry point:src/entries/native.tsx
Mocked Mode
Used automatically in Storybook and testing environments where components render with mock data for consistent development and testing.
Development Tools
Storybook for Component Development
Storybook is a powerful tool for developing, testing, and documenting UI components in isolation. It's a workbench for your components, allowing you to work on them without needing to run the entire application.
To start Storybook, run:
This opens Storybook in your browser, where you can explore the component library.
Why Use Storybook?
Focused Development: Concentrate on one component at a time.
Visual Testing: See how components look with different properties and states.
Rapid Prototyping: Quickly build and iterate on new components.
Component Library: Storybook acts as living documentation for your UI.
No merchant ID is required for Storybook, as all components are displayed with mock data.
AI and LLM Assistant Usage
Storybook is also a key tool for AI and LLM assistants. It allows automated agents to:
Visually test components they create or modify.
Understand the available components and their props.
Work on UI tasks in a simplified, sandboxed environment.
Essential Development Commands
Here are the key commands for your development workflow:
Testing
Code Quality
Building
Next Steps
Once you have the development environment running, you can:
Use the Nosto CLI - See Nosto CLI for deployment workflows
Leverage AI assistance - See LLM Examples for development productivity tips
Troubleshooting
Common Issues
Port already in use: If port 8000 is already in use, Vite will automatically try the next available port. You can also specify a custom port:
Missing merchant ID: Ensure your VITE_MERCHANT_ID environment variable is set correctly. The application cannot connect to Nosto's search API without it.
Build errors: Run npm run typecheck to identify TypeScript errors that might be causing build issues.
How to implement some differences between websites?
Even if multiple websites share the same search templates code, we can easily have different logic based on website host or language (or other criteria).
Different CSS between websites
Since it's not possible to target CSS rules by domain, it's recommended to add a special class to the page body and use it to target CSS rules.
Example JS
Example CSS:
Show specific SKU when searching by SKU color or ID
By default, the search indexes all SKUs as a single product. Therefore, even when searching by a specific SKU attribute (like SKU color or ID), the search will return the main product along with all SKUs.
However, because the search returns all SKUs, SKU selection logic can be implemented on the frontend side. This is achieved by checking each SKU to see if it contains text from the search query.
Implementation
These is an example on how to implement SKU selection:
Use more than 100 facet values
By default, the search API returns 100 values for each facet, and it's not possible to control that limit in the dashboard. However, it is possible to override the facet configuration directly from the code.
Get facet ID from the dashboard
The first step is to know the facet ID of the facet you want to overwrite. The facet ID is stored in the dashboard URL. For example, if you open the facet in the facet manager, the URL should be https://my.nosto.com/admin/shopify-123/search/settings/facetManager/6406df867f8beb629fc0dfb9. This means the facet ID is 6406df867f8beb629fc0dfb9.
Override facet settings
Once the ID is known, it's possible to override any facet setting by specifying overwrite properties in the customFacets parameter:
SEO
Although search engines can understand some JavaScript-rendered code, they often miss search templates. The reason for this is that the rendering of search templates is delayed in order not to hinder the page loading speed.
However, it's still possible to achieve great SEO results while using the code editor:
Category pages - Ensure that the category page already returns the correct meta tags and page title according to SEO recommendations, they bring the biggest impact to the SEO. In category page search templates render only products, so it doesn't significantly impact SEO. Most search engines support structured data (the category page backend should generate these tags using original products). However it does not have any big impact to the SEO. Furthermore, search engines may not favor the discrepancy between structured data and the actual rendered products (cause search engine will see either empty page with loader or nosto search results that are different compared to original).
Search pages - Most search engines don't index search pages, so no optimizations are needed.
If you still have concerns regarding SEO, please consider using API integration.
Since Search Templates utilize the Search API under the hood, please also check the Search API FAQ
To link multiple accounts contact support!
On the Order-Confirmation Page
To fetch the recommendations for the order-confirmation page, simply use the GraphQL field called forOrderPage to fetch all the recommendations for the order-confirmation page.
Replace the existing FilterSidebar component with a FilterTopbar component that displays filters horizontally at the top of the search results.
Update the layout in Serp component to render FilterTopbar above the products grid instead of FilterSidebar in the sidebar. Maintain all existing filter functionality while adapting the responsive design for horizontal layout.
Replace the Pill components used in FilterSidebar with checkbox inputs for better accessibility and mobile usability.
Update the filter display to show checkboxes with labels instead of pill-style buttons, while maintaining the same filter state management and visual feedback for selected filters.
Convert the Button component from CSS modules to Tailwind CSS classes.
Replace the current Button.module.css imports and className usage with Tailwind utility classes, maintaining the same visual appearance and hover states.
Convert the CSS module based styling with Tailwind using standard Tailwind build pipelines.
Replace the current pagination in search results with a "Load More" button that appends new results to the existing list.
Update the Pagination component to show a centered button instead of page numbers, and modify the search state to accumulate results rather than replace them.
// src/components/Product/DynamicCardProduct.tsx
import { DynamicCard, SerpElement } from "@/elements";
import type { Product } from "@nosto/search-js-sdk";
export default function DynamicCardProduct({ product }: { product: Product }) {
return (
<SerpElement product={product}>
{/* Change this template name to match your backend template */}
<DynamicCard handle={product.handle!} template="your-product-card-template" />
</SerpElement>
);
}
// src/components/Products/Products.tsx
// For dynamic, server-rendered cards:
import Product from "@/components/Product/DynamicCardProduct";
// For static, client-rendered cards, you would use:
// import Product from "@/components/Product/Product";
// ... rest of the component
<!-- index.html -->
<!doctype html>
<html lang="en">
<head>
<!-- Add a link to your store's CSS file -->
<link rel="stylesheet" href="https://your-store.com/store.css" />
...
</head>
</html>
$!product.imageUrl
$!product.thumb(size)
$!product.image.getThumb(300, 300)
$!product.alternateImages[0].getThumb(300, 300)
$!product.image.getThumb(300, null)
git clone https://github.com/nosto/search-templates-starter.git
cd search-templates-starter
# Run unit and integration tests
npm run test
# Run tests in watch mode during development
npm run test:watch
# Run end-to-end tests with Playwright
npm run test:e2e
# Check for linting errors and style issues
npm run lint
# Automatically fix linting issues where possible
npm run lint:fix
# Check for TypeScript compilation errors
npm run typecheck
# Create a production build
npm run build
# Preview the production build locally
npm run preview
npm run dev -- --port 3000
function detectWebsite() {
if (location.hostname === 'de.website.com') {
return 'de'
} else if (document.documentElement.lang === 'de') {
return 'de'
}
return 'en'
}
const helloText = {
de: 'Hallo',
en: 'Hello'
}[detectWebsite()]
After receiving recommendation response and the recommendations are rendered. Payload is the response data from the recommendation request, all placement - campaign markup mapping that will be injected (unFilledElements) and all placement -campaign markup mapping that's injected (filledElements). Refer to our API documentation on .
taggingresent
When tagging data is resent. Associated with (a.k.a resendAllTagging) API. Payload is the tagging data from the store page. Refer to our API documentation on .
carttaggingresent
When cart contents are resent to Nosto either using the or API. Payload is the cart items extracted from tagging (resendCartTagging) or the cart items from the supplied cart object (resendCartContent). Refer to our API documentation on .
customertaggingresent
When customer info is resent to Nosto from page tagging. Associated with the API. Payload is the customer info extracted from the page tagging. Refer to our API documentation on .
emailgiven
When customer info is sent to Nosto either using the API or using the discount popup. Payload is the customer object which is being sent to Nosto. Refer to our API documentation on .
When a popup is closed in the page. Refer to our API documentation on .
popupribbonshown
When a popup ribbon is activated on page load or when popup is minimized. Refer to our API documentation on .
nostojs(api => {
api.listen('taggingsent', (response) => {
// 'response' from recommendation request
// consume response if necessary
console.log('Tagging data was sent to Nosto');
});
});
prerequest
Before a recommendation request is sent to Nosto. Payload is the data that's sent in the recommendation request. Refer to our API documentation on prerequest.
prerender
After receiving response from the recommendation request but before recommendations are rendered. Refer to our API documentation on prerender.
postrender
**Only For HTML response mode.
After recommendations are rendered/injected on the page. Refer to our API documentation on postrender.
popupopened
When a discount popup is opened and displayed on the store page. Payload is the campaign ID associated with the popup and the trigger that caused the popup to display. Refer to our API documentation on popupopened.
popupmaximized
When a popup is maximized from ribbon mode. Payload is the campaign ID associated with the popup. Refer to our API documentation on popupmaximized.
popupminimized
When a popup is minimized into a ribbon. Payload is the campaign ID associated with the popup. Refer to our API documentation on popupminimized.
cartupdated
**Only for Shopify merchants.
Whenever the a product is added or removed from cart. Refer to our API documentation on cartupdated.
// Register a listener
api.listen('taggingsent', onTaggingSent);
// Unregister the listener
api.unlisten('taggingsent', onTaggingSent);
function onTaggingSent(response) {
console.log('Tagging sent:', response);
}
A Nosto recommendation request is sent to the /ev1 endpoint and returns the product recommendation(s) for placements injected on the page.
A recommendation response is the response returned from the /ev1 endpoint.
can contain whatever unique information for individual SKUs that you can consider helpful. Frequently used attributes would be size, color, material.
Extending the cart tagging with SKU metadata
When tagging the cart contents as outlined here, you can also tag information of the actual SKU that was added to cart.
or via DOM tagging
Notice the extra <span class="sku_id"> attribute.
Extending the order tagging with SKU metadata
When tagging the order contents as outlined here, you can also tag information of the actual SKU that was added to cart.
or via DOM tagging
Notice the extra <span class="sku_id"> attribute inside each of the purchased_items.
Validating
Once included you can review if the SKUs are picked up by using the Nosto Debug Toolbar. If you can see individual SKUs being picked up below the original product details then this is correctly set up.
Do I need to view events for when an SKU is viewed?
No, Nosto does no recommend individual SKUs. While this is something on our roadmap, at the moment, you do not need to send any events when an SKU is selected.
For example, assume you had a product page selling a shoe. In this case, the product tagging would always point to the id of the shoe. No events should be dispatched when the customer selects a particular size such as S, M, L.
To learn more about the api.setTaggingProvider usage, please refer to the .
You can only change the pricing and the availabilities using this feature.
You cannot use SKUs with this feature at the time of writing.
You cannot use Nosto multi currency with this feature.
Ideal use cases
You will need to implement the multi-variate tagging if you have any such scenarios:
Your store has different prices for B2B and B2C customers
Your store has different prices for logged-in and logged-out customers
Your store has different prices for loyalty customers
Your store has different prices and availabilities for different locations
Prior to the multi-variate implementation, ensure that the Nosto tagging is correctly in place. Some of the tagging must be slightly amended to support multi-variants.
Changes to the product tagging
The product page tagging must be amended to denote the primary variation code of the product.
For example, a retailer who has different prices for normal and loyal customers would have GENERAL as the default variation id and LOYAL as an extra variation.
or using DOM tagging
Ensure that a span element with the class variation_id is added as a child of the nosto_product element within the product page tagging.
Note: The code in the variation_id element must remain static, regardless of the current context. For example, if a loyal customer is logged in, the variation_id field would still GENERAL and not change.
What about the prices in the cart and the order tagging?
The cart and order tagging can be left as-is but the prices must be in the customer's currently active currency. For example, a customer shopping in Swiss Francs (CHF) should have all the cart items tagged in Swiss Francs (CHF). Failure to do so will result in incorrect prices in any triggered emails such as abandoned cart or order followup.
Specifying the active variation
Once you have amended the product tagging, an additional DIV element must be added to all the other pages (including the product page itself). The tag should not be encapsulated in the nosto_product DIV tag. The information sent in the tag refers to the segment of the customer.
or via DOM tagging
For example, on the site of a retailer, who has different prices for normal (GENERAL) and loyal (LOYAL) customers, if the customer is a logged in customer and is a known loyalty customer, the nosto_variation element should show LOYAL. If the customer logs out or a new customer visits, and there is no way to identify him as a loyal customer, the nosto_variation element should show GENERAL.
Integration with search/category merchandising (universal)
The search/category merchandising (universal) API supports specifying the variation ID in requests using the variationId property of the products object.
If specified, the selected variation's specific properties automatically replace the corresponding values in the top-level product. All features (e.g., merchandising rules, facets, filters, sorting) work with the selected variation's values automatically when the variation ID is provided.
Once the tagging changes have been done and the API implemented, you need to configure and enable it from your admin panel under Settings > Other > Multi-Currency. Toggle the Use Multiple Currencies switch on and Use Exchange Rates switch off and set the variation ID of the primary currency via the input field and toggle on the exchange rates switch.
Note: Ensure that the Variation ID of the primary currency matches the value sent via the variation_id element in the product tagging.
Note: Multi-variants cannot be used in conjunction with exchange-rates based multi-currency feature. You must keep the Use Exchange Rates switch off.
You will also need to configure the price formatting for your primary and secondary currencies.
Reviewing your changes
Once you enabled multi-variants you can preview the product prices for different groups by navigating to Tools > Products and choosing a product.
You will see one or more dropdowns that contain the prices and the availability for that group.
When you have reviewed your set-up, you’re all set and ready to go live with our features. Nosto will automatically handle the different customer groups across its feature set.
Provide the categoryId API parameter to fetch all products associated with that category. Additionally categoryPath should be provided for better analytics data.
Query
Using only category path
Provide the categoryPath API parameter to fetch all products associated with that category. This parameter is the same as the categories product field.
Query
Child category handling
Depending on your configuration, fetching a parent category will also include products from the child categories. For example, fetching products for the category Pants would also include products from the categories Pants -> Shorts and Pants -> Khakis.
This is an admin-only setting. Please contact your Nosto representative to adjust this setting.
Using custom filters
In some rare cases categoryId or categoryPath is not enough. In these cases custom filters can be used to build any query for category & landing pages.
Query
Other features & implementation
The category page shares a lot of similarities with the search page, so please refer to the search page documentation:
Analytics
Nosto Analytics
To analyze user behavior you need to implement tracking. This can be achieved in two different ways, depending on the integration environment:
JavaScript library (recommended - more convenient, but requires a JavaScript environment).
You can omit the buyer tagging either partially, or completely if you do not want Nosto to crawl this information. The user details are stored for possible marketing purposes and mainly observed email address is used in this context. Marketing permission is false by default but if this user has explicitly agreed to receive marketing then you can set it to true manually.
Tagging the currencies
Currencies should always be represented in the ISO-4471 three-letter format. For example, use the code USD instead of $ to represent the United States Dollar.
Tagging the payment provider
Payment provider is the payment method or provider used by a shopper to pay the purchase. Omit the payment provider detail if you do not want Nosto to crawl this information.
Tagging the order status code
Status code will be used to track the order state. Different payment providers may use different status codes.
Adding support for advanced use cases
Many ecommerce stores utilize SKU:s or "child" products that are sorted under the same "parent" product. To extend the above example with SKU support refer to this article
In cases where a product might have multiple prices in differing currencies you can also add support for multi-currency. Refer to this article
Troubleshooting order tagging:
Once included on all pages, you can review if the site is transmitting data using the Nosto Debug Toolbar. If you can see order contents being picked up under "Tagging" → "Order" then the order details are correctly set up in the source code.
You can further verify your session in the Nosto admin by using the live feed under: https://my.nosto.com/admin/$accountID/liveFeed to see if Nosto correctly picks up product view → product carted → product bought events. You can export all the order history from the store under Settings → Other → Order report under https://my.nosto.com/admin/$account/account/orders/report
Nosto debug toolbar order
live-feed-product-order
Translate attribute
The translate attribute is a HTML5 standard attribute which specifies whether the value of the element and it's Text node children should be translated. If your tagging elements are being translated by e.g. Google Translator then this is the way to opt out elements being translated by Google and possibly other vendors.
Multi-framework support (React, Next Js, Shopify Hydrogen, etc.)
Production-ready code generation
Best practives enforcement
Complete workflow documantation
Technical documentation from
How to use Nosto MCP Server
Quick Start with Claude Code
Step 1
Configure MCP
Add the Nosto MCP server to your Claude Code configuration:
Step 2
Verify Connection
Test the connection by asking Claude:
Claude should respond with the 7 GraphQL specific tools and 2 (RAG) documentation tools.
Step 3
Start Building
Now you can request complete integrations:
Claude will automatically use the MCP tools to generate complete, production-ready code, including the creation of Nosto specific service, creating a newSession request, storing the sessionId, and calling updateSession and retrieve recommendations.
Reasons to use MCP Server
MCP server is aware of the step by step workflow of how Nosto should be implemented and how graphQL mutations should look.
This means that asking AI assistant such as:\
Will look through multiple tools exposed by the Nosto MCP Server
And will generate the Nosto service code which is aware of creating a new session, storing sessionId in the cookie, and using the sessionId for update session mutations and getting recommendations.
End result is visible Nosto recommendations on home and product pages within minutes.
Available GraphQL Integration Patterns
The MCP server provides 7 specialized graphql tools that can be combined. to create complete e-commerce solutions.
Common usage patters:
Homepage integration
"Add Nosto Recommendation to my React homepage" -> Uses generate_nosto_service + generate_complete_workflow tools
Product page setup
"Set up Nosto on my Shopify Hydrogen product page" -> Uses generate_nosto_service + generate_complete_workflow tools + Includes Shopify GID handling
Explanation of the Nosto
"Explain how Nosto can be integrated on my store" -> Uses generate_complete_workflow + concept_explainer
Feedback
If you have found MCP server useful, or if you found some issues or would like MCP server to support more use-cases please don't hesitate to contact us at [email protected]
\
Nosto MCP Server is in Beta state, and any generated code should be reviewed.
This is specific to cases where no template language like liquid/handlebars is used and the content is rendered using plain HTML.
Make sure to HTML encode content passed to this attribute. Bacause JSON.stringify may produce result that can't be directly used in HTML especially when the content includes special characters.
For example, consider the below example
{
"keyword": "new year's eve",
"_highlight": { "keyword": "new year's eve" }
}
can be encoded as
Mustache helpers
Mustache is based on logic-less templates which can be enhanced with helpers, e.g toJson, imagePlaceholder, showListPrice in example template.
import { fromMustacheTemplate } from '@nosto/autocomplete/mustache'
fromMustacheTemplate(template, {
helpers: {
toJson: function () {
return JSON.stringify(this)
},
},
})
Nosto Search uses product and user behavior data from the Nosto Platform, so if you are implementing Nosto Search, first of all, you need to implement Nosto Platform to your website.
Your search engine will be ready after the Nosto representative enables the Search module for your account. Then you will need to integrate Nosto Search to the website.
Implementation methods
Search Templates Starter
For developers who prefer a modern, local development workflow, the Search Templates Starter provides a complete Preact-based project. This approach offers full source code control with Git, a local development environment with hot reloading, and a component library with pre-built, customizable search components. It's ideal for teams that want maximum flexibility and integration with their existing development practices.
Search Templates
By using a pre-built template that can be customized to fully match a website's design using built-in code editor directly in . In the code editor, you can fully customize the pre-built template's JavaScript, HTML, and CSS code. Changes to the template can be implemented either by client’s developers or Nosto team. Frontend integration uses Preact and JSX templates and renders search results page dynamically in website’s frontend, so no additional integration is needed to the backend. When using Nosto services, no development is needed from the client.
API
API integration - a robust Search GraphQL API allows to implement Nosto Search into any website or app and gives complete flexibility for developers to build frontend and backend features.
JavaScript Library
For frontend integrations you can also use our JavaScript library. This library wraps the Search GraphQL API and provides its functionality in a programmatic way.
Compare implementations
Search Templates Starter
Search Templates
API
JavaScript Library
Search Templates vs. Search Templates Starter
Feature
Search Templates
Search Templates Starter
If you are a developer who prefers a modern, local development workflow with full version control (Git), we strongly recommend using the Search Templates Starter. It offers the most flexibility and integrates seamlessly with professional development practices.
If you are looking for a faster, more straightforward setup and are comfortable using an in-browser code editor, Search Templates are a great alternative.
For use cases that require deep backend integration, or if you're building for a non-web platform (e.g., native mobile apps), the API or JavaScript Library integrations provide the necessary control and access to the raw search data.
Building your implementation plan
Nosto provides plugins for the most common eCommerce platforms like Shopify, Magento 2, Shopware 6, BigCommerce and Prestashop.
The plugins have implemented the Nosto backend APIs so in most cases 90% of the product catalog sync is already handled.
If your client has custom use cases, you likely will have to extend the Nosto plugin, change the data structure within your platform or make use of one of the Nosto backend APIs to ensure all the needed product data is in Nosto.
Depending on your platform, a Nosto plugin (like for Shopware or Magento 2) extends the default theme (like Dawn, Storefront, Luma or Hyvä) and implements the frontend mechanisms that are explained in the following.
Some platform plugins only include a very basic frontend component like adding the Nosto script and the page tagging.
If your client has a custom frontend (running headless or a SPA*), you will need to implement the frontend mechanisms one by one.
*This guide focuses on classic web applications that work with full page reloads. For SPAs/PWAs like React, the same principles apply but they are handled differently. We encourage you to first read through the guiding principles and in a next step make yourself familiar with the implementation within a Single Page Application.
Components of a stable Nosto Implementation
Sending/updating the Product Catalog via GraphQL API (or REST API) to Nosto regularly.
For custom platforms (without Nosto plugin), you must use one of the APIs and build the product sync yourself (no CSV or feed option). If you’re working with PHP, you can use the Nosto PHP-SDK.
Page tagging via JavaScript or hidden HTML on all pages
Resources to evaluate and choose the Implementation Methods
Nosto provides like Shopify, Magento 2, Shopware 6, BigCommerce and Prestashop.
We recommend using our plugins as a base since they follow platform- and Nosto-specific best practices, save you lots of development time and have been tested in hundreds of eCommerce sites.
Nosto Module Types and Frontend Implementation Methods
Every Nosto module falls into one of two module types which have their own set of possible implementation methods:
Campaign Widgets: Product Recommendations, Dynamic Bundles and Onsite Content Personalization (via placements, see previous section, points 3 and 4)
Listings: Search and Category Merchandising (replacing native content (Autocomplete/Search Preview, SERPs, PLPs), see previous section, point 5)
Project Plan Checklist
All of the following questions can be answered with our general and platform-specific documentation. For custom builds and advanced implementations you find additional playbooks below. Our onboarding team is happy to assist you with the evaluation and planning.
Headless Builds, SPAs (Single Page Applications) and Custom Platforms
We have prepared dedicated playbooks for advanced setups.
In these cases you might be able to use parts of the Nosto plugins (e.g. for a Shopify headless frontend you can use our app for the data sync but need to implement the frontend components yourself).
We're happy to help you find the ideal approach for your particular tech stack. Please read the matching playbook prior to our conversation:
Headless and SPA (Single Page Application) Frontend:
Shopify Hydrogen:
Magento Hyvä:
Custom Platform/Use Case: Product Data Sync
Comparison Tables for Nosto Modules and Implementation Methods
Depending on which Nosto modules your client has purchased, you need to determine how to implement each of those types. You can weigh the different methods and find the best approach for your tech stack, preferences and client needs with the resources below.
Campaign Widgets:
Listings:
Adding support for multi-currency
In this article, you will learn how to implement multi-currency in Nosto. When the implementation is complete, you will be able to display product prices (in any feature) in different currencies.
Prior to the multi-currency implementation, ensure that the Nosto tagging is correctly in place. Some of the tagging must be slightly amended to support multi-currency.
Shopify Multi-Currency
For instructions on integrating with Shopify's multi-currency, please go here.
Changes to the product tagging
The product page tagging must be amended to denote the primary currency code of the product. Typically, most retailers have a primary currency which is the default currency of the inventory.
For example, a US-based retailer who sells in Euros (EUR) and Sterling Pounds (GBP) would have US Dollar (USD) as the primary currency while Euro (EUR) and Sterling Pounds (GBP) would be secondary currencies whose exchange rates would need to be sent via an API.
or via DOM tagging
Ensure that a span element with the class variation_id is added as a child of the nosto_product element within the product page tagging.
Note: The code in the variation_id element must remain static, regardless of the currency active on-site. This is the primary currency of your catalog. Although variation_id element often has the same currency code as in the price_currency_code element and may seem redundant, they support different use cases and both need to be tagged.
Do child-products (SKUs) support multi-currency?
Yes. Prices for all SKUs will automatically be converted using the same logic. As long as your SKUs are tagged, no additional changes are needed.
What about the prices in the cart and the order tagging?
The cart and order tagging can be left as-is but the prices must be in the customer's currently active currency. For example, a customer shopping in Swiss Francs (CHF) should have all the cart items tagged in Swiss Francs (CHF). Failure to do so will result in incorrect prices in any triggered mails such as abandoned cart or order followup.
Specifying the active currency
Once you have amended the product tagging, an additional DIV element must be added to all the other pages (including the product page itself). The tag should not be encapsulated in the nosto_product DIV tag. The information sent in the tag refers to the currency active of the customer.
or via DOM tagging
For example, on the site of a US-based retailer who sells in Euros (EUR) and Sterling Pounds (GBP), if the customer changes the currency to Sterling Pounds (GBP), the nosto_variation element should show GBP. If the customer changes the currency to Euros (EUR), the nosto_variation element should show EUR.
Sending the exchange-rates
In order to send the exchange rate multipliers to Nosto, you will need to use . Below is a small snippet of what the payload looks like.
In the example above, 0.77 is the exchange rate from US Dollars (USD) to British Pounds (GBP) and 0.91 is the exchange rate from US Dollars (USD) to Euros (EUR).
The valid_until entry defines the expiration date. When the expiration date is reached, the exchange rates won't be applied anymore and prices will be hidden for all the secondary currencies to prevent displaying outdated prices.
When recommendations are served, then exchange rates are dynamically applied to the product prices to reflect the active currency.
Enabling multi-currency from the admin
Once the tagging changed have been done and the API implemented, you need to configure and enable it from your admin panel under Settings > Other > Multi-Currency. Toggle the Use Multiple Currencies and Use Exchange Rates switches on and set the variation ID of the primary currency via the input field and toggle on the exchange rates switch.
Note: Ensure that the Variation ID of the primary currency matches the value sent via the variation_id element in the product tagging.
You will also need to configure the price formatting for your primary and secondary currencies.
Integration with search/category merchandising (universal)
The search/category merchandising (universal) API supports specifying the variation ID in requests using the variationId property of the .
If specified, the selected variation's specific properties automatically replace the corresponding values in the top-level product. All features (e.g., merchandising rules, facets, filters, sorting) work with the selected variation's values automatically when the variation ID is provided.
For Nosto code editor integrations, please refer to a .
Reviewing your changes
Once you enabled multi-currency and made an API call, you can review the exchange rates received by Nosto by navigating to Settings > Other > Multi-currency.
You can also preview the product prices for different currencies by navigating to Tools > Products and choosing a product.
You will see one or more dropdowns that contain the prices and price calculation for the currency.
When you have reviewed your set-up, Nosto updates in real-time product prices for all the currencies and display the appropriate currency to the right target groups of users. You’re all set and ready to go live with our features.
See also
To learn more about the api.setTaggingProvider usage, please refer to the .
Implement Autocomplete
Autocomplete provides keyword suggestions to assist users in completing their queries, supplemented by a selection of the most relevant products with the ability to see all products on the search results page. The feature also supports category and popular search suggestions. Please contact Nosto Support to have them enabled for your account.
Check out .
Requirements
Some autocomplete features are available conditionally.
Nosto CLI
The Nosto CLI is a command-line tool that streamlines the development workflow for modern and legacy Nosto Search Templates.
Why use the Nosto CLI?
If you prefer to develop the search templates on your own machine, using your own tooling such as git or eslint, you may prefer to utilize the tool, .
The primary purpose of the tool is to fetch and upload the sources and build artifacts of your search templates for local development, simplifying the process and minimizing friction. It supports local builds that do not rely on the VSCode Web extension, and it includes convenient development mode which automates build-and-upload loop you would have to perform manually through VSCode Web otherwise.
Since October 2025, the Nosto CLI is the recommended way to work with Search Templates.
Initialization
After installation, you can import and use the library in your JavaScript or TypeScript files. Library attaches to existing search input element. Once a search input is loaded, autocomplete function can initialize event listeners for the Search Autocomplete.
Quick setup and users comfortable with an online editor
Developers wanting a modern, local workflow
Can be implemented by Nosto team
Yes
Yes
No
No
Development Environment
In-browser code editor in the Nosto Admin UI
Local development with your preferred IDE
Version Control
Managed within the Nosto platform
Full source code control with Git
* This estimation is based on the merchant's team building the templates. When Nosto's frontend team builds templates via the Code Editor, this can take longer due to overall bandwidth from the team.
** Matching merchandising rules are applied automatically based on requested search queries, categories, and segments, without the need to request them in API requests.
*** Full functionality is only possible as a hybrid solution in combination with the JavaScript library for affinity retrieval.
**** Using search templates with SPAs comes with challenges related to routing and dynamic content injection that tend to be solvable, but are more technically involved. We highly recommend using the JavaScript library instead.
There are several page types, so please make sure they are covered in your QA checklist. (You can use ours as a blueprint.)
The current cart content and logged in user information need to be available on all pages.
Placements (empty divs) where Nosto content can be injected.
These placements should be added into the HTML, most Nosto plugins offer CMS blocks for easier use.
Injecting personalized content into the placements of the current page (banners, product recommendation carousels/grids, ...)
This involves a simple request/response pattern: Tell Nosto which placements are on the current page and you’ll receive the content as JSON or HTML.
Replacing native platform features like product listings (PLPs and SERPs) with facets, pagination and sorting options.
Attribution and recording of certain events when a user interacts with a Nosto module, for example:
Impressions: Products returned from a search query
Clicks/Showing interest in a product by clicking "view more" on a PLP or SERP, from the search overlay or from a product recommendations carousel:
Can be a redirect to a PDP or
When a popup/modal (quick view) is triggered
A client that defines merchandising rules, fine-tunes the search functionality, creates recommendation campaigns, A/B tests etc. and does not need to interact with your code.
Order Data Sync: How do you send Nosto the placed orders?
Google Analytics configuration. Set to false to disable
hitDecorators
No
N/A
Decorate each search hit before rendering
Safety Notice
If you have concerns about running Nosto CLI on your machine, you can examine the open source code on GitHub to ensure it meets your security requirements.
Legacy Search Templates
Historically, Search Templates have been developed using a VSCode Web Extension as part of Nosto Admin UI. This introduced a number of limitations - such as inability to integrate TypeScript, ESLint or LLM tools - and Nosto is moving away from the web extension in favor of Nosto CLI and local development workflows.
Search Templates built with the web extension are now referred to as Legacy Search Templates. Their counterparts are Modern Search Templates, built with Search Templates Starter.
Nosto CLI fully supports both modes for local development.
Installation and Setup
Nosto CLI aims to be as user-friendly as command line tools get. You should be able to get up and running by utilizing the built-in nosto help and nosto setup commands, but a quick-start guide is also provided here.
Installation Options
If your template is based on the Search Templates Starter project, the Nosto CLI is already included as a dependency. In this case, you can run it directly using npx:
Note: All the command examples in this article will omit npx, but you will need to add it every time unless you opt for a global install.
For legacy templates or if you prefer to avoid npx, you may install it globally:
Authentication
The Nosto CLI supports two authentication methods - your Nosto user account or an API key.
User Account Authentication
This opens a browser window for secure authentication. Requires 2FA enabled on your Nosto account and stores credentials in your system's home folder for 8 hours. This method works across all merchant accounts you have access to.
API Key Authentication
Alternatively, you can use a private Search API key in your project configuration. Public API keys are not supported as the CLI requires read-write access. You can provide your API key as part of the configuration described below. The API keys are scoped to a single merchant, but they never expire.
Project Configuration
For each merchant account you're working with, create a new folder and set it as the current working directory.
Create a .nosto.json configuration file in your project root:
This creates a minimal configuration file. You can also create it manually:
Required Configuration:
merchant - Your Nosto merchant ID (e.g., shopify-12345678)
Optional Configuration:
apiUrl - API endpoint, defaults to production
Production URL: https://api.nosto.com
Staging URL: https://api.staging.nosto.com
Nosto internal development URL: https://my.dev.nos.to/api
apiKey - Private API key for authentication (if not using user login)
Note: Refer to nosto setup for a full list of configuration options available in your version.
Environment Variables: You can also use environment variables. If provided, they take precedence over the config file:
NOSTO_MERCHANT
NOSTO_API_URL
NOSTO_API_KEY
Development Workflow
Once configured, your development workflow typically looks like:
Preview Mode Setup
To see your changes on your live store:
Enable Debug Toolbar: Add ?nostodebug=true to your store URL
Enable Preview: Toggle the "Preview" button in the debug toolbar
See Changes: Refresh your page to see updates as you save files locally
Development Commands
Status Check
Shows the current status of your templates and configuration.
Pull Remote State
Fetches the remote state from the Nosto cloud storage locally. Primarily intended for merchants that do not rely on git for version control.
Development Mode
Watches files for changes and automatically uploads builds for preview. Essential for active development. Note that this does notupload the source code to speed up the development, only the minimal required set of files to see your changes live. After finishing your development for the day, you may want to run nosto st push as well.
Push Sources (Upload)
Builds and uploads the current state of the project to Nosto cloud storage. This includes both built artifacts and source files.
Note: Refer to nosto --help and nosto st --help for more information about the commands available in your version.
Production Deployments
At the moment, Nosto CLI does not support production deployments. You may still use the Admin UI to create deployments as usual.
Nosto CLI and Git
The CLI tool is intended to be used in combination with Git. We recommend you create a git repository per merchant you develop for, and use that as the source of truth for your development. Then, you can use Nosto CLI to build and upload the sources and build artifacts to Nosto's cloud storage, making them immediately available on your store.
In addition, Nosto CLI automatically takes the contents of your .gitignore file into account when deciding which files should be uploaded to the cloud, respecting the patterns you expect it to ignore.
Troubleshooting
Common Issues
Authentication Expired:
Re-authenticate if you see permission errors.
Wrong Merchant ID: Check your .nosto.json file or NOSTO_MERCHANT environment variable.
Upload Failures:
Ensure you have internet connectivity
Verify your API credentials are valid
Check that the merchant ID is correct
Preview Not Showing:
Confirm debug toolbar is enabled (?nostodebug=true)
Ensure preview mode is toggled on
Try refreshing the page
Getting Help
CLI Help: Run nosto --help for command information
# Ensure you're logged in
nosto login
# Start development mode with auto-upload
nosto st dev
# Open your store and enable Nosto Debug Toolbar preview mode
# Your changes will appear automatically as you save files and reload the page
nosto status
nosto st pull
nosto st dev
nosto st push
nosto login
Keyword suggestions require searchable fields to be marked for autocomplete.
Popular searches require a function Nosto tracking integration for searches.
Category suggestions depend on available categories (including URLs) being sent to Nosto.
The Shopify integration sends categories to Nosto out-of-the-box, with no extra work required.
The Shopware 6 plugin automatically sends categories to Nosto without requiring extra work from version 5.1.4.
For other platforms and custom integrations, send categories to Nosto via .
API Requests
Example
Query
Response
Empty query
To retrieve results for an empty query, you must explicitly set emptyQueryMatchesAll: true in your request. By default, emptyQueryMatchesAll is false and the API does not return any results when the query is empty. Setting it to true enables the API to return default suggestions. This behavior applies to all suggestion types — keywords, categories, and popular searches.
Example query for default popular search suggestions
The query below returns the most popular search terms for the specified account.
Highlight
API can return highlights indicating which parts of a keyword match the search query. This HTML can be used to render and emphasize the matching sections during display.
Redirects
Redirects are configured in the search dashboard and can be used to forward users to specific pages depending on what they type into the search field. For example, users searching for "shipping" could be directed to https://example.com/shipping.html.
Analytics
Nosto Analytics
To analyze user behavior you need to implement tracking. This can be achieved in two different ways, depending on the integration environment:
JavaScript library (recommended - more convenient, but requires a JavaScript environment).
Each autocomplete product click should be tracked as a search page virtual viewto ensure that the Google Analytics search feature displays the correct conversion rate. For example, if you click any product when the typed query is phone it should track a virtual page view with the URL /search?q=phone (adjust the search path and query parameter to match your search page).
Since a product link click would redirect to a new page, to ensure that Google Analytics has time to send the tracking request, it's recommended to save the search query to local storage and track it on page load.
When integrating autocomplete you have the option to directly access the API, or you can use our existing Autocomplete JavaScript library that provides most of the required functionality out of the box.
Load the debug toolbar by appending nostodebug=true to your store's URL e.g. https://example.com?nostodebug=true
Click the login link and navigate to the session view.
View Category
Navigate to a category page and verify that the View Category event is tracked with the following details:
Target matches the viewed category.
If the category doesn't appear in the session, these pages might help
View Product
Navigate to a product page and verify that the View Product event is tracked with the following details:
Target matches the viewed product ID.
If the product doesn't appear in the session, these pages might help:
View a Recommended Product
Click on a product recommendation and verify that the View Product event is tracked with the following details:
Target matches the viewed product ID.
Ref matches the previously viewed recommendation slot ID.
If the product id and recommendation slot id don't appear in the session, these pages might help:
Cart
Add the product to cart and verify that the cart’s contents are correct. Ensure that the product details in the cart match the product that was previously viewed.
Product ID
Price & Currency
Quantity
If the cart doesn't correctly show in the session view, these pages might help:
Order
Purchase the product and verify that the Buy Product event is tracked with the following details:
Ref matches the recommendation slot id
Target matches the product id
Wait 30 minutes for the session to expire and then verify that the order shows up in the orders page of the Nosto admin UI.
If the order doesn't correctly show in the session view, these pages might help:
Measuring Performance
We’ve integrated with the to be able to show some performance measurements of our client script. The supported measurements are:
nosto.get_dynamic_placements Parse the DOM and find placements on the page. Performed before a recommendations request is sent.
nosto.load_recommendations Send the recommendations request and handle the recommendation result. This encompasses measuring the recommendations request and nosto.inject_campaigns.
Lighthouse
Chrome's tool can be opened by doing the following:
Right click and select Inspect.
Navigate to the Lighthouse tab.
Ensure the Performance category is enabled.
Once the report is generated, you can expand the “User Timing marks and measures” section under the Diagnostics section to see some basic information like how long after the page started to load the measurements start and how long each measurement took.
You can scroll back up and click the View Original Trace button to view a timeline of the measurements. You may need to expand the Timings section to view the client script’s recorded measurements. You can zoom in an out of this graph and swipe side to side to get a better view of things.
Using the API
In order to use the GraphQL endpoints, you'll need to authenticate yourself. You will need a Appstoken to access this endpoint. Only a subset of the endpoints can be accessed with a public token. This makes it possible to access functionality like querying product recommendations in an environment where it's not possible to protect the token, for example in a web browser. Each publicly accessible endpoint is denoted in the embedded documentation inside the playground.
Note: Nosto does not rate-limit the API usage but follows a fair-use policy. Nosto reserves the right to revoke API access for any abusive API usage patterns.
Sending JSON GraphQL queries
You can send your GraphQL requests as JSON to our API and have it correctly interpolate variables passed into it. To do so, set the Content-Type header to application/json.
Authentication
Token
Method
Endpoint
Sending raw GraphQL queries
If you want to send raw GraphQL queries to the API, you can still do so but you must set the Content-Type header to application/graphql.
Note: If you do not set the correct Content-Type header, the request will be interpreted as JSON and will fail.
Authentication
Token
Method
Endpoint
Using Fetch
You can use the browser's fetch API to request data from GraphQL. You will need to authenticate yourself and set the appropriate content-type headers.
Sending JSON GraphQL queries
You can send your GraphQL requests as JSON to our API and have it correctly interpolate variables passed into it. To do so, set the Content-Type header to application/json.
Sending raw GraphQL queries
If you want to send raw GraphQL queries to the API, you can still do so but you must set the Content-Type header to application/graphql.
**NOTE:**If you do not set the correct Content-Type header, the request will be interpreted as JSON and will fail.
Render results
Once the autocomplete component binds to input via inputSelector and dropdownSelector, it then renders autocomplete provided in a render function. It is called on input focus and change events, and renders a dropdown element with the current search result state:
if input is empty and history entries exist, it renders dropdown with history list,
Querying Category Merchandising Products (CM 1.0)
This documentation is only for the implementation of CM 1.0 and most likely this doc shouldn't be used anymore. If you'd like to implement CM 2.0, please check this. If you're not sure which version you'd like to implement, please contact your technical solutions manager or our support.
Nosto's category merchandising APIs are meant to be used for resorting your existing product listing pages. It has support for listing the products in the order defined within Nosto for different categories, including paging and filtering support. It doesn't support taking over the product listing pages fully as it doesn't include support for creating category specific filters and calculating their facet counts. The expected implementation leveraging these APIs would keep on using their current solution for building most of the product list pages, but swap the shown products with the information retrieved from this APIs results.
nosto.inject_campaigns Inject both dynamic and static campaigns into the DOM. This encompasses both nosto.inject_static_campaigns and nosto.inject_dynamic_campaigns.
nosto.inject_static_campaigns Inject static campaigns into the DOM.
nosto.inject_dynamic_campaigns Inject dynamic campaigns into the DOM.
nosto.evaluate_js Extract and evaluate embedded JavaScript from recommendation templates.
Click Generate Report
If it’s not possible to perform a test order, the Nosto admin UI's orders page can be used to review that orders link to known products in the catalog and that some items have click attribution towards the visible recommendations.
After logging in, the session tab should be visible on the left-hand side
Viewing the "Bags" category
Viewing product 784735895612
Viewing product 789528674364 from recommendation slot productpage-nosto-14-high-upsell
Buy product 789528674364 from recommendation slot productpage-nosto-14-high-upsell.
Basic
API_APPS
POST
https://api.nosto.com/v1/graphql
Basic
API_APPS
POST
https://api.nosto.com/v1/graphql
if input is not empty and it passes minQueryLength rule, it render dropdown with keywords and products.
Render can be adjusted to the desired framework. Moreover, the library provides helpers for Mustache/Liquid template languages.
Examples
Suppose index.html is
List of autocomplete initialization examples:
Liquid
Example below uses fromLiquidTemplate helper which renders string template. Library provides default autocomplete template via defaultLiquidTemplate and default css for default template:
The template also can be loaded from a file. The library includes a default template, equivalent to string template in above example:
Mustache
Mustache template is rendered similarly as Liquid template in the above example:
Or from a file:
React/Preact
One way to initialize autocomplete in a React app, is to call autocomplete from the useEffect on component mount, using default <Autocomplete /> component and styles:
The Preact solution does not differ from React a lot:
In order to be able to provide personalized results, we will need to look up a session either by id or by reference. You read more about managing sessions on our onsite sessions wiki page.
Attribution
Automatic Attribution
Setting the addAttributionParameters parameter to true, causes attribution parameters to be automatically rendered in product URLs. For example, the url https://example.com/product becomes https://example.com/product?nosto_source=cmp&nosto=5e5e09f060b232790cbbccbf. These parameters allow our client script to track the performance of Category Merchandising results.
Manual Attribution
If you wish to handle attribution parameters manually, the addAttributionParameters parameter can either be set to false or can be omitted.
Product views resulting from clicking products of a category listing need to contain the required attribution parameters:
type: VIEWED_PRODUCT
target: (product id)
ref: (resultId from the category merchandising response)
refType: CATEGORY_MERCHANDISING
For example, given the following category merchandising response:
If a customer clicks on Cool Kicks, the following GraphQL query should be sent to fetch the product's details and to attribute the product view to the category merchandising result:
Event handling
Graphql calls using Category Merchandising methods are treated as a category view by default. This behavior can be changed by including skipVCEvent: true into the graphql request. All product URLs on a category page must be appended with #nosto\_cmp fragment. An example of such a product URL would be www.test-store.com/product1#nosto\_cmp where #nosto\_cmp is the added fragment.
Pagination
The batchToken can be used the next batch of results. This is useful if you only wish to fetch the first 10 products when there may be thousands of results. To fetch the next batch, use the batchToken in the next query like in the example below:
If you wish to skip the first number of pages, you can use the skipPages parameter instead of the batchToken. A page size is calculated from the maxProducts parameter.
Filtering Results
Results can be filtered by specifying the include and exclude parameters. You can explore more parameters in the GraphQL Playground
To enable autocomplete, additional configuration should be passed to init function.
Autocomplete query parameter as function
In the example above, we supply autocomplete query parameters as an object. Additionally, the autocompleteQuery parameter can also be supplied as a function. The function flavor can be used for building complex query parameters and provides access to other pre-defined configuration parameters.
Using variationId for price variations
When you have price variations in use, provide the product variation ID by accessing the pre-defined variationId method from the default configuration:
Using currency for exchange rates
When you use exchange rates for multi-currency support, use the currency parameter instead:
Customizing dropdown position
When the autocomplete component is injected, by default it will become the next sibling of the input field. It is possible to override that behavior by specifying the dropdownCssSelector value. If this selector is specified, the dropdown will be injected as the last child of the specified element.
It can also be set to be the first child of the element by using the object selector syntax.
The full list of Configuration options is documented
Autocomplete component
Voice to text search
To implement voice to text search in search templates, additional configuration params need to be provided:
Configuration parameters:
speechToTextComponent – The component that renders the voice search button.
speechToTextEnabled – A flag to enable the voice search feature, disabled by default
The voice search button will be injected adjacent to the search input field, positioned as an overlay on the right end of the input.
Within the button component, the useSpeechToText hook is used to toggle voice input on and off.
The @nosto/preact package exports two useful utilities:
useSpeechToText – A hook to control the voice-to-text functionality.
speechToTextSupported – A variable indicating whether the current environment supports the feature.
Element selection
Wrap each keywords and product to AutocompleteElement element - it will allow clicking or selecting the element directly with keyboard.
Search submit
To submit a search directly from the autocomplete, use the <button type="submit"> element. This will submit the search form.
History component
History component renders user search history. It is displayed when user clicks on empty search box.
HistoryElement renders clickable element that triggers search event with provided query.
Analytics
Autocomplete automatically tracks to Google Analytics & Nosto Analytics when using <AutocompleteElement /> component.
Querying Recommendations
You can generic recommendations using the GraphQL orders endpoint. The recommendations offered here don't use sessions so they aren't personalized but still offer enough flexibility to support a multitude of use-cases.
Fetching toplists recommendations
The endpoint can be used to fetch toplist recommendations i.e. best-sellers. Toplists recommendations are either sorted by views or buys.
The endpoint can be used to fetch random recommendations i.e. previews. Random recommendations are a totally randomized selection of products and often used for testing purposes.
Fetching related recommendations
The endpoint can be used to fetch related recommendations i.e. cross-sellers. Cross-sell recommendations allow you fetch related products to a given set of products.
Example: If you were to use this to add recommendations to a product page, the productIds parameter would be a single-item array containing the product identifiers of the product that is being viewed.
Example: If you were to use this to add recommendations to an order-follow email, the productIds parameter would be an array containing the product identifiers of the products that were purchased.
Fetching search recommendations
The endpoint can be used to fetch recommendations related to a search term.
Example: If you were to use this to add recommendations to a search page, the term parameter would be the entire search term as queries by the user.
Note: This endpoint cannot be used for building auto-complete style integrations.
Add inclusive or exclusive filters
In case some cases it is desired to filter products by their properties. include and exclude fields of primary should be used to achieve this. The former will filter only the products that match the specified attribute, the later will filter out the products that match the attribute.
include field expects a type of InputIncludeParams, whose attributes are
exclude field expect type InputFilterParams whose attributes are:
brands: [String]
The list of brand used for inclusion or exclusion
categories: [String]
The list of categories used for inclusion or exclusion
customFields: [InputAttributeParams]
The map of product attributes used for inclusion or exclusion
discounted: Boolean
A boolean indicating whether discounted products should be excluded
fresh: Boolean
A boolean value denoting the inclusion of new products
price: InputPriceParams
The price range used for inclusion
productIds: [String]
The list of product identifiers used for inclusion or exclusion
rating: Float
The minimum rating score for the inclusion
reviews: Int
The minimum amount of reviews for the inclusion
search: String
Search all products containing this text
stock: InputStockParams
The stock level range used for inclusion
tags1: [String]
The first set of tags used for inclusion or exclusion
tags2: [String]
The second set of tags used for inclusion or exclusion
tags3: [String]
The third set of tags used for inclusion or exclusion
brands: [String]
The list of brand used for inclusion or exclusion
categories: [String]
The list of categories used for inclusion or exclusion
customFields: [InputAttributeParams]
The map of product attributes used for inclusion or exclusion
discounted: Boolean
A boolean indicating whether discounted products should be excluded
productIds: [String]
The list of product identifiers used for inclusion or exclusion
search: String
Search all products containing this text
tags1: [String]
The first set of tags used for inclusion or exclusion
tags2: [String]
The second set of tags used for inclusion or exclusion
tags3: [String]
The third set of tags used for inclusion or exclusion
Not all of Nosto's functionality is available for pure GraphQL API integrations. The following features require :
Personalization
Debug toolbar
Both Search and Categories are built on the same technical foundation and use the same API and product data. For simplicity, we will just refer to Search API in the following documentation.
Playground and API reference
Use the to try out search queries and browse API reference.
It provides:
Search request schema - you can see field types and inspect what fields are needed for a search request.
- you can see return field types with descriptions.
Send requests to the search engine and preview the response.
Authentication
In the majority of cases, authentication is not a requirement for using search APIs. However in rare case may need to:
Access sensitive data- all sensitive data is restricted for public access (e.g. sorting by & returning sales).
Return all documents - public access require to specify search query, category ID or category path to avoid returning all documents.
Note: Keep your API key secret and do not expose it to the frontend!
HTTP Header
Value
Making requests
API endpoint
Search use different API endpoint than other Nosto queries: https://search.nosto.com/v1/graphql
Account ID
All requests require an account ID, which can be found in the top-right corner of the Admin dashboard, under the shop name.
Request example
Replace YOUR_ACCOUNT_ID with your account id retrieved from the Nosto dashboard.
Replace YOUR_ACCOUNT_ID with your account id retrieved from the Nosto dashboard.
JS API includes full-featured with tracking support.
Replace YOUR_ACCOUNT_ID with your account id retrieved from the Nosto dashboard.
Response example
Upon a successful request, the API will return a 200 status code response, which includes the search data:
Error handling
Error response
API returns a list of errors with explanations. These errors should be logged internally and not displayed to the end user. Instead, display a general message, such as Search is unavailable at the moment, please try again. This approach ensures that no sensitive information is leaked to the end user.
Partial response
The API may return some errors even when data is returned. This means that some parts of the response may be missing, but you should still display the available data instead of showing an error to the user. These errors should be logged internally for future reference and troubleshooting.
Session params
For features like personalized results and user segments to function effectively, the search function needs access to the user's session information from the front-end.
It's possible to get search session data using the :
The results of this function should be passed to search query parameter. In case search is called from backend, it should pass this data to backend (e.g. using ).
It's also possible to save session data to on page load:
Using variables
In the search application, you should use variables instead of hardcoded arguments to pass search data. This means that filters, sort, size, and 'from' options should be passed in the 'products' variable. For a full list of available options, please see the .
Query
Variables
Variables should encompass all dynamic query data because it is the most efficient method to pass data, and data is automatically escaped to prevent injection attacks. Avoid generating dynamic queries, as they can lead to security issues if user input is not properly escaped.
Analytics
To analyze user behavior you need to implement tracking. This can be achieved in two different ways, depending on the integration environment:
(recommended - more convenient, but requires a JavaScript environment).
(works anywhere).
Replace YOUR_ACCOUNT_ID with your account id retrieved from the Nosto dashboard.
Authorization
Bearer SEARCH_KEY
Authentication Token with API_SEARCH Role is available on dashboard settings page
When integrating Search you have the option to directly access the API, or you can use our existing Search JavaScript library that provides most of the required functionality out of the box.
To optimize search speed and reduce network load, select only the necessary data when performing a search query.
query (
$query: String,
$products: InputSearchProducts,
$sessionParams: InputSearchQuery
) {
search(
accountId: "YOUR_ACCOUNT_ID"
query: $query
products: $products,
sessionParams: $sessionParams
) {
query
products {
hits {
productId
url
name
imageUrl
thumbUrl
brand
availability
price
listPrice
customFields {
key
value
}
skus {
name
customFields {
key
value
}
}
}
facets {
... on SearchTermsFacet {
id
field
type
name
data {
value
count
selected
}
}
... on SearchStatsFacet {
id
field
type
name
min
max
}
}
total
size
from
fuzzy
}
}
}
is now available to help out with documentation and implementation of GraphQL onsite sessions
Creating a session
When a new user comes to the app, you can use this method to get a new session. It will return you a customer-id that can save on the device and use for future requests. This would be ideal.
During a user session two things will happen that are likely not tied to viewing a page. Use the following mutations to keep the user session up to date.
If you use by: BY_CID, pass a Nosto session ID (see above).
If you use by: BY_REF, pass an external
You will likely want to set skipEvents to true to prevent incrementing the page views. A common use case is to update the session after the "add to cart"-button on a product card has been clicked.
You also have the option to include the cart and customer information in the mutations per page type. You can explore details in the , the general structure of the updateSession mutation is:
Set the cart
The cart content must be updated whenever the cart contents change. The cart contents are the 1:1 representation of the user's cart.
Set the customer
When a customer logs in, you can update the existing customer with the their data and potentially an external . This would merge the online and mobile sessions. If not needed, you can omit this.
Working with recommendations
On the Product Page
In order to use the GraphQL session mutation to fetch recommendations for your product page, the event, in this case, must be VIEWED_PRODUCT and you should specify the product-identifier of the current product being viewed.
Tracking Product Variant Views
This optional event that can be sent to signal that a specific product variant (SKU in Nosto terms) is being viewed.
Typical use case for sending this event would be from product detail page when the user selects a product variant, such as some specific color and/or size.
The recommendations can then be configured in the Nosto admin UI to update and give preference for products that have similar variants available. For example "Other products also available in the same size", .
Product variant views are added with targetFragment=skuId in the event the updateSession.params.
Example for a product page after the SKU ID "589053" was selected by a user:
On the Category Page
In order to use the GraphQL session mutation to fetch recommendations for your category page, the event, in this case, must be VIEWED_CATEGORY and you should specify a fully qualified category path of the current category. For example, if you have a category called "Dresses" under the category "Women", the FQCN would be "/Women/Dresses".
On the Search Page
In order to use the GraphQL session mutation to fetch recommendations for your search page, the event, in this case, must be SEARCHED_FOR and you should specify the search term of the query.
On the Cart Page
In order to use the GraphQL session mutation to fetch recommendations for your cart or checkout page, the event, in this case, must be VIEWED_PAGE and you should specify a fully qualified URL of the page as the target.
On the Front Page
In order to use the GraphQL session mutation to fetch recommendations for your home or front page, the event, in this case, must be VIEWED_PAGE and you should specify a fully qualified URL of the page as the target
On additional page types
Please review the PageRequestEntity in the to ensure all page types are tracking the user behavior.
You can apply the same concept as in the examples above with e.g. forNotFoundPage() and forOtherPage().
Attribution of Recommendation Results
Recommendation results can be attributed to events by setting a session event's ref to the recommendation result's resultId.
Here is an example of some recommendations for a front page. You can see recommendation result's resultId is "frontpage-nosto-1".
If a customer selects to view the Cool Kicks product, you can generate the following request. Note that the event's ref is set to "frontpage-nosto-1".
Customer Group Pricing and Multi Currency
If your site uses Nosto variants for or , you must pass the variantId (e.g. USD, EUR or GENERAL, GUEST, WHOLESALE) to the params inside of pages and the respective forXXPage() field to retrieve the correct price and availability for the products.
Example for a product page to retrieve WHOLESALE prices and availability:
GraphQL from mobile applications
When making GraphQL queries from mobile applications, it's essential to define the user agent string in your HTTP headers. Ideally, the user agent should represent the mobile environment, including details such as the platform, device type, and application version. Avoid using terms like "bot" in the user agent string, as this might lead to unintended behavior or rejection of the query/session. Sending an empty user agent will also lead to be catch by the bot detection mechanism.
How to implement Product Recommendations, Dynamic Bundles and Onsite Content Personalization.
If you have custom requirements like customer group pricing/visibility or a highly complex product card, we recommend using one of the Nosto APIs to only retrieve the core product data via JSON and get prices and visibility from your platform instead of sending it to Nosto.
If you only have a complex product card but are using a Shopify theme, you can consider using our dynamic product cards
Prerequisites
Good to know before you start
Every Nosto account comes with a set of default product recommendation campaigns and "placements" (empty <div/> elements).
You can see the mapping of campaigns and placements in the Nosto Admin UI: Product Experience Cloud -> Recommendations.
These are sorted into the different page types like homepage (e.g. #nosto-frontpage-1), PLP, PDP, SERP, 404 page as well as general layout areas like the mini-cart drawer or search overlay/autocomplete.
Nosto campaigns need to be injected into the placements - automatically or manually, depending on your tech stack and implementation method.
Nosto offers you several helper methods to inject campaign into the DOM, you'll find details at the end of this page.
Templates for Recommendation campaigns can be hosted and maintained in Nosto or built within your own code base (API approach, recommended for headless and SPAs when using a custom code setup).
Depending on your implementation method and tech stack, different options to attribute clicks from Nosto campaigns are available (it might need a few lines of custom code, you'll find details below per implementation method).
Please note: If you have the Nosto preview enabled, attribution/references will not show in the Nosto debug toolbar. You can do QA via the ev1
How it works
After the Nosto script is loaded on a page, you can send a request to Nosto and will receive the campaigns for this specific page.
Your request to Nosto needs to include certain data like the current page type, what's on the page (e.g. product data, the current category or search term), what's in the cart, customer details if the customer is logged in and what placements are on the page.
You'll see in your network tab and will monitor it extensively while implementing Nosto.
Example :
Implementation Methods
Since OCP campaigns always return HTML content, this guide only compares product recommendations (Recommendations and Bundles). (Example response and type reference above.)
Client: Automatic Injection with Nosto Autoloading
This method is the fastest and works best for conventional builds where the templates are built within the Nosto backend with . This approach is not suitable for SPAs since interactions trigger a full page load.
By default, the Nosto autoloader is enabled and content will be automatically injected into the templates on the page.
Attribution is automatically handled by Nosto as it knows which HTML template was used in what campaign.
If you are on Shopify, we recommend to evaluate our which allow you to re-use your existing product cards.
Client: JS API: createRecommendationRequest()
In case you want more control about the campaign loading, you can disable autoloading and request the campaigns yourself. This approach is also suitable if you only want to request the product data in JSON per campaign and build the templates yourself. This approach is not suitable for SPAs or headless frontends, please see Session API: defaultSession() below.
The campaigns can return HTML (default, for templates hosted at Nosto) or JSON, depending on how you .
By default, the request does not know anything about the current page, placements on the current page, logged in customer, cart content etc. and you have two options of passing that data:
Including the HTML tagging with
Client: Session API: defaultSession()
In case you are running a SPA or headless frontend, you want more control about the campaign loading and need to disable autoloading to request the campaigns yourself.
You can also find a in the Nosto Partner Academy, just reach out to your Nosto contact if you don't have access yet. We also recommend to bookmark the .
The campaigns return JSON by default, but in comparison to the JS API, you incorporate requesting campaigns with your page tagging/tracking via defaultSession() ().
Page tagging refers to the JS API () and uses HTML and MUST NOT be mixed with the Session API.
Server: GraphQL API: updateSession()
In case you don't want follow one of the client-based approaches, you can manage the Nosto session and campaign rendering via GraphQL.
Please beware of the following limitations:
You request the campaigns for a specific product ID or category (without placements) and will receive the Recommendation campaign IDs directly.
Therefore, you can't use Nosto built-in A/B testing for campaign widgets.
You need an alternative, full page A/B testing like Omniconvert in this case.
The request/response concept is the same as with the Session API: specify data about the session (cart and customer, see above), and render the template while keeping attribution in mind. You will need to:
Set the params.event to match the current page type and specific e.g. the product ID, category path or search term for correct tracking and attribution.
The ref
DOM Injection and Click Attribution
Typical use case, options and adjustment depending on your implementation method:
A shopper is on a PDP (e.g. product ID 42), sees a Nosto product recommendation and clicks on a shown product (ID 200). You don't explicitly react to the click, you instead make sure the click listener for parameterless attribution is firing. See the for more details.
If you're using Nosto-hosted templates with autoloading, you don't need to do anything. Parameterless attribution is enabled and set up by default.
If you're manually requesting Nosto-hosted HTML templates via the JS API, you have two options:
Comparison Table
Using the JavaScript Library
Search
For client-side/frontend integrations, Nosto's JavaScript library can be used to simplify the integration. It provides a programming interface to access the Search & Categories API.
For the most basic search the fields parameter should be provided to specify what product/keyword fields should be returned. Both products and keywords can be used separately and together, depending on the use case. For all parameters, see the reference.
Note: The first parameter of api.search generally corresponds to the graphql schema accepted by the search backend. The second parameter includes more frontend-specific logic like tracking or following redirects.
The second parameter of the api.search function also accepts the following optional fields:
Option
Accepted values
Default
Description
The function automatically loads session parameters required for personalization & segments in the background.
In order to request custom fields, add the entries "customFields.key" and "customFields.value" to the requested product fields. This changes the example above like this
Search page
For a search page, the facets parameter should generally be provided. In many cases, * is sufficient as a wildcard to include all facets.
In order to automatically track search request to Nosto analytics, track parameter should be provided with the correct page type.
isKeyword should be set to true if search is triggered by selecting a keyword suggested in the autocomplete.
Redirects
The redirect parameter, if set to true, causes the JS library to automatically follow any redirects returned by the backend. These are triggered by the merchant's configuration, redirecting certain user queries to specific pages. For example, query "summer" may get redirected to the "summer sale" collection.
The default redirection mechanism simply updates the window location:
Note: Do mix up response.redirect with the query's redirect property. The former contains the redirected target URL, while the latter is a boolean parameter on the query.
You may want to set query.redirect to false when this redirection mechanism is insufficient and you want to use another method, such as your framework's routing library. You may obtain the redirect target from response.redirect field and act accordingly.
Autocomplete
track should be enabled to automatically track searches to Nosto analytics.
Category page
For category pages in most cases the facets parameter should be provided. Additionally (for Shopify) and should be also provided.
Furthermore redirect & track should be enabled to automatically track searches to Nosto analytics & redirect if API returns a redirect request.
Session parameters
For some of the search features to work properly, such as personalized results and segments, the search function needs to be able to access information about the user's session from the front-end.
To get all session data the following snippet can be used:
The results of this function should be passed to search query parameter. In case search is called from backend, it should pass this data to backend (e.g. using ).
The function accepts the following options:
Option
Default
Description
Analytics
Tracking search events to analytics can be divided into three parts: search, search submit, search product click. These are user behaviors that should be tracked:
search submit (type = serp)
faceting, paginating, sorting (type = serp) or (type = category)
JS API library provides tracking helpers for all of these cases.
Error Handling
On errors from api.search calls the error object contains a status field that has the HTTP response status which can be used to determine the cause of the error in addition to the error message. The ranges of the status codes used for errors are 400-499 and 500-599. For details on these error codes, go to
Search
User actions that lead to search results should be tracked with api.recordSearch() after search request is done:
search submit (type = serp) - user submits search query in autocomplete component and is landed to SERP
faceting, paginating, sorting (type = serp) or (type = category) - user adjusts current search results by filtering (e.g. brand), selecting search page, sorting results
Parameter
Description
Example:
Keyword click tracking
Example:
Category results tracking
Example:
The tracking metadata is primarily taken from the third parameter. The and objects must be provided in the api.recordSearch call instead of partials.
Search form submit
Search queries are categorised into two groups: organic and non-organic searches.
In order to mark a search query as an organic search you need to call api.recordSearchSubmit(query: string). You should call it on search input submit only, before search request is sent.
Search product click
Product clicks should be tracked in autocomplete component, SERP, category page with api.recordSearchClick() by providing component (type), where click occurred, and clicked product data:
Parameter
Example:
Search add to cart additions
When shopping cart additions happen directly as part of the search, category or autocomplete results without a navigation to the product page, the api.recordSearchAddToCart() method should be called with the component (type), where addition occurred and the product data:
Parameter
Example:
⚠️ Event Tracking Requirements ⚠️
When tracking events, adherence to the following criteria is essential for capturing detailed and valid data:
query parameter:
The query string is an essential component for event tracking.
💡Tip: In case of API integration, use this example GraphQL partial query to integrate with the API and retrieve the necessary response data for precise event tracking.
🚩 Search Form Submit
Bear in mind that search queries are split between organic and non-organic searches. To classify a search as organic, it is crucial to invoke api.recordSearchSubmit() upon the search input submission, before the actual search request is dispatched. This step is pivotal in ensuring the seamless tracking of organic searches through to the SERP.
🔍 Accurate Click Tracking
Tracking product clicks is fundamental for understanding user interaction. Use api.recordSearchClick() to monitor this actions correctly, specifying the type and relevant hit data.
In case of an SPA based integration the api.recordSearchClick calls should be complemented with Session API or api.createRecommendationRequest() usage to couple the search analytics events to generic Nosto events for accurate attribution.
Track the search query as coming from the provided page type
isKeyword
truefalse
false
(Not a keyword)
Indicates that the search is triggered by a keyword click in autocomplete
autocomplete input (type = autocomplete) - user sees partial results while typing in search input
category merchandising results (type = category) - user sees specific category results when category is selected (category merchandising must be implemented)
Record search options. Currently is accepts:
isKeyword: boolean - should be set when keyword in autocomplete is clicked (search is submitted via keyword)
If present, include
products.sort
to track sorting behavior.
If applicable, incorporate products.filter.
searchResults parameter:
products.hits array containing objects with a productId is mandatory.
products.total number to identify if the search has results.
For accurate pagination tracking, products.from and product.size must be included.
For identifying if the request was autocorrected include products.fuzzy.
For category requests, either products.categoryId or products.categoryPathis mandatory.
redirect
true
false
false
(Ignore redirects)
Automatically follow page redirects if instructed by the backend response
Object containing productId and url, collected from clicked product
type
Search type: serp, autocomplete, category
hit
Object containing productId and url, collected from product
The search function of the JS API already includes session state automatically.
You don't need to execute api.recordSearch()if you call api.search(query, { track: 'serp'|'autocomplete'|'category'}) function from JS API, becauseapi.search()already calls api.recordSearch() when track option is provided.
Organic search - is a search query submitted through search input and which lead to SERP (search engine results page). Following faceting, paginating, sorting queries on organic query is also counted as organic.
Placements need to be set up in your store templates. On Shopify and Shopware, you can use our content blocks. For assistance in setting up placements on your store, please reach out to your Nosto POC or Nosto's support team.
request in your network tab (details below).
OCP and Recommendation campaigns are always associated with exactly one placement.
The placements are also used for A/B testing, e.g. testing campaign A vs. campaign B inside of placement #nosto-productpage-1.
Requesting campaigns via GraphQL is limited (no A/B testing, no dynamic filtering).
Product Recommendation campaigns can be returned as raw HTML or JSON (JSONResult with [JSONProduct]).
Depending on your tech stack and templating method, the campaigns get automatically injected into the page (conventional) or need to be explicitly rendered (advanced).
Interactions with Nosto campaigns (like clicking on a product, selecting a variant/color swatch or clicking on a banner) need a certain attribution that always follows the same pattern: "This event X (page/product/variant/… has been viewed/selected) after an interaction with the campaign Y (on page Z (optional)).":
Product ID 8 was viewed after a click in Recommendation campaign nosto-pdp-top on the PDP with product ID 4.
Product ID 6 was viewed after a click (quick view modal or PDP redirect) in Recommendation campaign nosto-frontpage-mid.
You can make use of several Nosto-variables inside of your template.
You will find a full reference and examples in the Nosto backend when you're building your template.
{includeTagging: true}
Setting the data manually via JS, e.g. setPageType("product").setProducts([product_id: "4"])
In most cases it will be sufficient to only include the page tagging since it reads the current product, cart content etc. and add a .setPlacements(api.placements.getPlacements()) call.
Advanced cases where you need to explicitly set data occur when e.g. a variant has been selected on a PDP or if products should be filtered by a certain tag (e.g. for cannabis state-specific regulation or for vehicle-specific parts).
You can overwrite parts of the page tagging and filter products in a recommendation request (can include one or more placements) using .
Attribution is automatically handled by Nosto when using the default response mode HTML.
This approach is recommended for custom frontend builds, we recommend looking into the Nosto Open Source packages.
Page tracking is similar to the page tagging but uses JavaScript calls to let Nosto know what is on the current page. For example:
The page tracking sends the same ev1 request which responds with the same campaign data and the same principles as the JS API.
Since requesting campaigns is tied to the defaultSession() for page tracking, you can run a very similar code block on the different page types (examples here and in the API reference).
The methods like viewFrontPage() or viewProduct("4") are the main indicator that campaigns will be returned.
Adding setPlacements(api.placements.getPlacements()) or passing the placement IDs explicitly as an array determines from where campaigns will be requested. We recommend the first approach, getting all campaigns for all placements instead of requesting them one by one.
Nosto provides you with ways to .
Calling load() sends the request to Nosto, the returned Promise can be handled async or by chaining a then() to the request.
You can filter products in a recommendation using which is the equivalent to (you MUST NOT mix these APIs).
If you are using the setRef() method (), pay close attention - the second parameter is the recommendation slot id (result_id of the response), not the placement div id.
because it increments the page view counter (pv in the ). On subsequent requests on the same page you must send the request with update() or ().
You can still setResponseMode("HTML") and request the Nosto-hosted templates if you're not running a SPA. The click attribution and template injection can be automated by calling enableCampaignInjection() (example).
(= Nosto recommendation campaign slot ID) from the response (
).
Set the correct page type (PageRequestEntity in the API reference) under pages to specify the context from which you want to receive Nosto campaign data.
Make sure you save the resultId and pass it to your next updateSession(params: { event: { type: VIEWED_PRODUCT } } ) as ref for attribution when a shopper clicks on one of the products inside of your template.
Since you don't use JavaScript, there is no event listener or helper function Nosto can provide. You will build the process yourself that is outlined in the (detailled example below).
Let Nosto inject the campaigns into the DOM via injectCampaigns(), this is recommended, attribution is set up automatically.
If you're manually requesting Nosto-hosted HTML templates via the Session API, we recommend to add enableCampaignInjection() to your defaultSession(). Nosto will automatically inject the campaigns into the DOM, parameterless attribution is enabled and set up by default.
If you're manually requesting only the product data via JSON from a Nosto campaign via the Session API, you have two options after you've built the HTML for your campaigns in your code base:
Let Nosto inject the campaigns into the DOM via injectCampaigns(), this is recommended, attribution is set up automatically.
Inject the campaigns into the DOM yourself and set up attribution manually via attributeProductClicksInCampaign after rendering the campaign.
When a user then clicks on a product link within a Nosto recommendation (e.g. slot ID "productpage-nosto-2-fallback"), Nosto's event listener (previously set up via enableCampaignInjection() for HTML templates and injectCampaigns() or attributeProductClicksInCampaign() for JSON-based templates) captures and stores the current URL and reference of the result_id in the shopper's browser local storage.
The browser then navigates to the product URL.
The Nosto client script reads the previous URL and reference from the local storage and sets it as ref parameter for the ev1 request, which results in the attribution of the current product view to the previously shown recommendation campaign.
How it Works
Content is automatically injected into page templates.
Manually request campaigns after disabling autoloading.
Request campaigns as part of the page tracking/tagging flow.
Request campaigns as part of the page tracking/tagging flow.
Campaign Response Type
HTML (for Nosto-hosted templates)
HTML (default) or JSON
JSON (default), but can be set to HTML
Recommendation campaign slot IDs (no placements, OCP campaigns are not available)
Campaign Injection and Click Attribution
Handled automatically by Nosto.
Automatic for HTML mode with enableCampaignInjection(). For JSON mode, use injectCampaigns() or inject campaigns yourself and add api.attributeProductClicksInCampaign().
For JSON mode, use injectCampaigns() or inject campaigns yourself and add api.attributeProductClicksInCampaign(). Automatic for HTML mode.
Manual. Requires careful use of the event params in updateSession() mutation.
SPA Suitable
No (triggers a full page load)
No (recommended for custom builds, but not SPAs)
Yes (designed for SPAs and Headless)
Yes
Headless compatible
No
No
Yes
Yes
Fully customizable frontend
Yes
Yes
Yes
Yes
Suitable for complex use cases
Sometimes
Yes
Yes
Yes
Customized and managed only in Nosto dashboard
Yes (templates are in Nosto backend)
Depends on (can build templates in Nosto or own code base, injection needs to be triggered manually via JS)
Unlikely (you can build templates in Nosto but will likely build them in the own code base, injection needs to be triggered manually via JS)
No (can build templates in own code base via server-side rendering)
A/B Testing
Yes (via placements)
Yes (via placements)
Yes (via placements)
No (Nosto built-in A/B testing is not available, needs full page testing like OmniConvert)
Drawbacks
Not suitable for SPAs or Headless.
Not suitable for SPAs or Headless.
Requires a bit more planning because page tracking and campaign injection are combined
No Nosto A/B testing.No Dynamic Filtering.No OCP (HTML content/banners).
Template and JavaScript integrations come with tracking- and A/B testing support out of the box. For pure API integrations, some extra steps need to be performed on the integration side to ensure that user interactions are tracked and attributed appropriately.
The workflow for search and categories is generally the same. This article describes the necessary steps mostly from a search perspective but provides additional information where deviation for category support is necessary.
Limitations
Individual personalization with user-specific affinities is currently not available with a pure API approach to search. If this is a critical requirement, consider using the JavaScript library for a client-side integration or a hybrid-integration by passing the sessionParams.
An API_APPS authentication token is necessary to implement API requests related to session management and tracking.
General workflow
The search request lifecycle looks like this:
The key points are:
Track impression event including found products and A/B variations (if applicable) when displaying search results.
Track click event including clicked product and A/B variations (if applicable) when clicking on a search result.
Store A/B variations received from the search API and include them in all following search requests for the duration of the session.
Storing the session ID for the duration of the session (30 minutes) is essential to ensure that the experience is personalized using the segments associated with the session.
Keeping track of assigned A/B test variations
When requesting search results subject to an A/B test without supplying any A/B testing parameters, the search API assigns a random A/B variation and includes it in the search result. It is vital to include the returned A/B variations in following search requests within the same session to ensure a consistent experience. Failing to do so results in the user being assigned a new A/B variation for equivalent search requests, potentially leading to the user seeing different results, corresponding to the different A/B variations, for the same search.
The following graphic uses a fictional scenario to illustrate which A/B testing information needs to be stored, sent to search, and tracked.
In search 1, the session starts without any A/B tests, so no A/B testing information is included in the search request. The request is affected by an A/B test, so the test ID and affected variation are returned. It must be tracked and stored.
In search 2, all known A/B assignments are included in the search request. This request is affected by a different A/B test, so the response contains information about this A/B test. Now, both of these A/B test's information should be stored for future searches within the session, but only the A/B test(s) affecting the latest search request should be included in the corresponding tracking requests.
In search 3, all known A/B assignments (now two) are included in the search request. The search isn't affected by any A/B tests, so the response doesn't contain any, and none should be tracked.
Search API
Search is handled by the . Its use is documented in great detail.
This is a minimal example search request that contains all fields relevant for tracking and A/B testing purposes:
Session management and tracking API
Session creation, segment retrieval, and analytics tracking is handled by the .
Using external session IDs instead of Nosto-generated session IDs
Examples on this page use explicit session creation using the newSession mutation, and other API requests reference this session using the session ID and the parameter by: BY_CID.
If some form of session ID is already available, creating a new session with the newSession mutation can be skipped. Use the already available session ID and replace by: BY_CID with by: BY_REF.
Example for what segment retrieval looks like with an externally provided session ID:
Mutation newSession
Creates a new session and returns that session's ID, which should be used in further interactions with this API. This step can be skipped if .
Request example
Response example
Store the value of the newSession property for 30 minutes and include it in the following API interactions for the duration of the session.
Learn more about session handling .
Query session
Retrieves segments that have been assigned to this session. Segments must be included in search requests to leverage segmentation in merchandising rules.
Request example
Response example
Request segments before searching. Note that segments can change during the course of the session based on user interactions.
Learn more about session handling .
Mutation recordAnalyticsEvent
Tracks search impressions (immediately upon displaying search results) and search clicks (upon clicking a product). The exact structure varies between impressions and clicks, but search metadata is the same for both.
The specific structure of metadata depends on whether the user is searching or visiting a category.
Search tracking metadata
Here is an example of what metadata looks like for search requests:
Properties:
hasResults: true if the search response total is greater than zero.
autoComplete: false for regular search, true for search requests used for providing autocomplete-style functionality. This distinguishes interactions in the Nosto search analytics dashboard.
Category tracking metadata
Here is an example of what the (much simpler) category tracking metadata looks like:
Properties:
category: Human-readable category name. This should be the same as the categoryPath parameter in category requests sent to the search API.
categoryId: Machine-readable category ID. This should be the same as the categoryId parameter in category requests sent to the search API.
At least one of these parameter is required. Provide the same one(s) that are included in category requests sent to the search API.
A/B testing properties
A/B test properties are the same for both impression and click tracking for both search and categories. They should contain all A/B variations that applied to the search request this tracking request is associated with.
If the search API returns A/B test data like this:
The corresponding tracking properties should look like:
The object above is referred to in the following examples as $properties.
Impression tracking request example
This request must be sent immediately upon displaying search or category results.
Example for search using previous examples for as $metadata and as $properties:
Example for categories using previous examples for as $metadata and as $properties:
Properties:
type: SEARCH for search events, CATEGORY for category events.
timestamp: Time of event must be formatted as ISO 8601 date.
The response contains a generic success message that is not necessary for further processing.
Click tracking request example
This request must be sent when a search result is clicked. The request uses the same search metadata and A/B testing properties as impression tracking, so make sure to store them.
Search example using previous examples for as $metadata and as $properties.
Category example using previous examples for as $metadata and as $properties.
Properties:
type: SEARCH for search events, CATEGORY for category events.
timestamp: Time of event must be formatted as ISO 8601 date.
The response contains a generic success message that is not necessary for further processing.
Putting it all together
The JavaScript program below implements the complete workflow of session maintenance, segment retrieval, search, and tracking with support for A/B testing. The general flow and data structures can be translated to any language.
Error handling is largely omitted to focus on the more interesting bits.
In search 4, the same known A/B tests are included in the search request. The request is affected by Test 1, and includes the known assignment for Test 1 in the request, ensuring that the assignment remains the same as before in the same session.
The session ends after search 4. Search 5 represents a search in a new session, which starts with fresh A/B variation assignments and fresh storage.
autoCorrect: Set to the fuzzy value returned in the search response to indicate searches that required error-tolerant search.
keyword: Set to true if search keywords were requested (typically for autocomplete purposes).
organic: Set to true if the search was caused by a user action within the store. Searches caused by links to the store (e.g. from ads) are indicated by false.
refined: Set to true if the user searched before in this session, and searched again now with a different query.
refinedQuery: In case of refined search (see above), include the previously searched for query. Otherwise, this can be null or omitted entirely.
sorted: true when sorting by anything other than _score. Sorting by _score is default behavior if no sort parameter is supplied in the search request.
query: The current search query entered by the user into the search field.
resultId: Unique ID for this interaction. UUID4 is particularly useful for this.
page: 1-based page number.
productIds: The product IDs (productId property in search response) that are shown on this result page.
productId: The product ID (productId property in search response) of the product that was clicked.
This API requires authentication using an API token with scope API_APPS. Learn more about the authentication workflow here.
When using non-Nosto session IDs, it is no less important to maintain limited 30-minute session durations. This includes deleting stored A/B test variation assignments at the end of the session.
query {
search(
accountId: "your merchant ID"
query: "what the user typed"
# In case of a category request, include categoryPath or categoryId *instead* of query, like so:
# products: {
# categoryPath: "Tops and Shirts"
# categoryId: "AB1337"
#}
segments: ["array", "of", "segment", "IDs", "from", "session", "API"]
# For the first search in a session, this can be an empty array. All following searches should contain an array
# of all A/B variation assignments returned by search within the same session.
abTests: []
) {
products {
total
fuzzy
hits {
productId
}
}
abTests {
id
activeVariation {
id
}
}
}
}
// This object stores values that are invariant for a given integration.
const config = {
// This is your merchant ID.
merchantId: "<your merchant ID>",
// Nosto API key with scope API_APPS - ask support if you don't have one.
platformGraphqlApiKey: "<your token>",
// API URLs and session time are constant.
platformGraphqlUrl: "https://api.nosto.com/v1/graphql",
searchGraphqlUrl: "https://search.nosto.com/v1/graphql",
sessionTimeToLiveMilliseconds: 30 * 60 * 1000, // 30 minutes
}
// Simplistic placeholder for some sort of storage that survives individual
// page views and lasts for the duration of the session.
// In the backend, this could be a key-value store or database.
// In the frontend, this could be localStorage, or a cookie.
const store = {
// Session ID to attribute user actions to the same session.
sessionId: null,
// Remember the session start time to be able to invalidate it after 30 minutes.
sessionStart: null,
// Accumulate and store all A/B variation assignments received in search
// responses during the session, so they can be included in follow-up
// searches. This ensures that users receive a consistent experience for
// the duration of the session.
abTests: [],
// Store the most recent search metadata for tracking purposes.
mostRecentSearchMetadata: null,
// Store the most recent search request's A/B variations for tracking purposes.
mostRecentABVariations: []
}
async function graphql(url, query, variables) {
const authHeader = {
"Authorization": "Basic " + btoa(`:${config.platformGraphqlApiKey}`)
}
const response = await fetch(url, {
method: "POST",
headers: {
"Content-Type": "application/json",
// API key is only needed for platform API.
...(url === config.platformGraphqlUrl ? authHeader : {}),
},
body: JSON.stringify({ query, variables })
});
const json = await response.json();
// Don't fail on soft errors.
if (json.errors) {
console.warn("GraphQL errors:", json.errors);
if (!json.data) {
throw new Error(JSON.stringify(json.errors, null, 2));
}
}
// Definitely fail when the request fails completely.
if (response.status !== 200) {
throw new Error(JSON.stringify(response.status, null, 2));
}
return json.data;
}
async function createSessionIfMissingOrExpired() {
const now = new Date()
if (store.sessionStart && (now - store.sessionStart) < config.sessionTimeToLiveMilliseconds) {
// Session still valid - keep using it.
return
} else {
// Forget previous session assignments and metadata from past searches.
// This allows the new session to be assigned to new A/B variations.
clearSession()
}
// No active session or session expired - create a new one.
const response = await graphql(config.platformGraphqlUrl, `
mutation {
newSession
}`, {})
// Store session ID for tracking.
store.sessionId = response.newSession
// Store start of session to know when to invalidate the session ID.
store.sessionStart = now
}
function clearSession() {
store.sessionId = null
store.sessionStart = null
store.abTests = []
store.mostRecentSearchMetadata = null
store.mostRecentABVariations = []
}
async function track(event) {
await graphql(config.platformGraphqlUrl, `
mutation ($sessionId: String!, $eventParams: InputRecordAnalyticsEventParams!) {
recordAnalyticsEvent(id: $sessionId, by: BY_CID, params: $eventParams)
}`,
{
sessionId: store.sessionId,
eventParams: {
timestamp: new Date().toISOString(),
// Event type is the same for all search tracking.
type: SEARCH,
...event
}
})
}
async function fetchSegments() {
const result = await graphql(config.platformGraphqlUrl, `
query ($sessionId: String!) {
session(by: BY_CID, id: $sessionId) {
segments {
id
}
}
}`, { sessionId: store.sessionId })
return result.session.segments.map(segment => segment.id)
}
function transformSearchResultsToTrackingMetadata(query, searchResults, isAutoComplete, isOrganic) {
return {
hasResults: searchResults.search.products.total > 0,
autoComplete: isAutoComplete,
autoCorrect: searchResults.search.products.fuzzy,
keyword: false, // Use true if keywords were requested.
organic: isOrganic,
refined: !!store.mostRecentSearchMetadata?.query &&
store.mostRecentSearchMetadata?.query !== query,
sorted: false,
query,
refinedQuery: store.mostRecentSearchMetadata?.query ?? null,
resultId: crypto.randomUUID(),
}
}
async function search(query, isAutoComplete = false, isOrganic = true) {
// Before doing anything, ensure that the session is current. Create a new
// one if not.
await createSessionIfMissingOrExpired()
// Retrieve an up-to-date list of segments the user in this session belongs to.
// Segments are important to support segment-aware merchandising rules that might be
// associated with A/B tests.
// Keep in mind that user behavior changes segments during the session!
// If caching is used, use short lifetimes.
const segments = await fetchSegments()
const searchResults = await graphql(config.searchGraphqlUrl, `
query (
$accountId: String!,
$query: String!,
$segments: [String!],
$abTests: [InputSearchABTest!]
) {
search(accountId: $accountId, query: $query, segments: $segments, abTests: $abTests) {
products {
total
fuzzy
hits {
productId
name
}
}
abTests {
id
activeVariation {
id
}
}
}
}`,
{
accountId: config.merchantId,
query,
segments,
// Include previously stored A/B variation assignments in search
// requests to ensure consistent results within the session.
abTests: store.abTests
})
// Add returned A/B variations to memory for use in the next search request.
// Note that the search API only returns A/B variation assignments relevant
// to the current request, so the stored assignments need to be accumulated
// rather than being overwritten.
store.abTests.push(...searchResults.search.abTests)
// Store response metadata for impression- and click tracking.
store.mostRecentSearchMetadata = transformSearchResultsToTrackingMetadata(
query, searchResults, isAutoComplete, isOrganic)
// The most recent search request's A/B variations are used to attribute
// interactions with the result to that A/B test.
store.mostRecentABVariations = searchResults.search.abTests.map(
abTest => ({ key: abTest.id, value: abTest.activeVariation.id })
)
return searchResults.search
}
async function trackSearchImpression(productIds, page) {
await track({
searchImpression: {
metadata: store.mostRecentSearchMetadata,
page,
productIds,
properties: {
// This part ensures that the search impression is attributed
// to the currently active A/B test(s) for this session.
abTestAttribution: store.mostRecentABVariations
}
}
})
}
async function trackSearchClick(productId) {
await track({
searchClick: {
metadata: store.mostRecentSearchMetadata,
productId, // Clicked product's ID.
properties: {
// This part ensures that the search impression is attributed
// to the currently active A/B test(s) for this session.
abTestAttribution: store.mostRecentABVariations
}
}
})
}
// Session takes place in the following block.
(async () => {
// 1. Search for something (implicitly creates a new session if needed).
const searchResults = await search("<your search query>")
// 2. Display results.
console.log(searchResults.products.hits.map(hit => hit.name))
// 3. Track impression with current 1-based pagination information.
await trackSearchImpression(
searchResults.products.hits.map(hit => hit.productId),
1
)
// 4. User now looks at search results and may or may not interact.
// If a result is clicked, track the ID of the clicked product:
await trackSearchClick(searchResults.products.hits[0].productId)
await trackSearchClick(searchResults.products.hits[2].productId)
})()
Implement Search results page
API Requests
Searching
For a basic search, it’s enough to provide accountId, query, and select fields that should be returned. You can control which product attributes to select through products.hits field. See .
Query
For example, if you want to return only productId and name, the query would be:
Query parameters:
See all .
Pagination and size
Products offset parameter from is used for pagination functionality.
The default count of documents returned per page is size = 5, you can change it with products.size, and offset of products is controlled with products.from field:
The total value in the response is useful for pagination as well:
total / products.size is the number of available pages with the current page size.
products.from + products.size >= total is true when the last page has been reached. This is particularly useful for infinite scrolling/load more solutions.
Query
Sorting
By default results are sorted by products relevance score.
To change the sorting, use the sort parameter, where you would specify any indexed field which should be sorted by, and order: asc for ascending and desc for descending.
By default, you should always sort by relevance and merchandising rules, which is achieved by not specifying any sort parameter. Only if the user selects a different sort method, a sorting rule should be used.
Query
Faceting
Facets help the user to find products more easily. Faceted navigation is normally found in the sidebar of a website and contains filters only relevant to the current search query. Facets are configured in the Nosto dashboard.
Terms facet
One of the facet types is type = terms. It returns list if common terms from found documents.
Query
Assume that we have configured facets for customFields.brandname and categories:
Response
Response parameters:
Stats facet
Stats facet returns minimum and maximum number field value from found documents. The most common usage is to render slider filter (e.g. price)/
Query
Response
Response parameters:
Filter
Filtering by terms facet, for example by Adidas, Converse brands:
Query
When filtering by multiple same field items, filters will be joined with OR operator and different fields with AND.
If you wish to have more facets, you should configure it in the Nosto dashboard first.
Filtering by stats field, for example by price:
You can sort using these arguments: lt (less than), gt (greater than), lte (less than or equal to), gte (greater than or equal to).
Redirects
Redirects can be used to forward users to special pages depending on their search keywords. For example, users searching for shipping could be forwarded to https://example.com/shipping.html.
Query
Response
Price Formatting and Currency Display
You can request specific currency formatting settings for prices returned in the search results. This is done by specifying the currencyFormat parameter within the products input. The actual formatting details (like currency symbol, placement, decimal places) are then returned in the priceFormat field within the products object of the response.
Query
To select which pre-configured currency settings to retrieve, include the currencyFormat parameter within the products input. Additionally, ensure you request the priceFormat field in your query to receive these details.
Variables Example:
Behavior and Error Handling:
If currencyFormat is not provided in the products input, the default currency format configured for the account will be used for the priceFormat field.
If currencyFormat is provided but corresponds to a currency for which no settings are configured, an error will be returned.
Response Example:
priceFormat Response Parameters:
These parameters describe how the prices should be formatted on the frontend based on the selected currencyFormat.
Name
Description
Session params
For features like personalized results and user segments to function effectively, the search function needs access to the user's session information from the front-end.
It's possible to get search session data using the :
The results of this function should be passed to search query parameter. In case search is called from backend, it should pass this data to backend (e.g. using ).
Analytics
Nosto Analytics
To analyze user behavior you need to implement tracking. This can be achieved in two different ways, depending on the integration environment:
(recommended - more convenient, but requires a JavaScript environment).
(works anywhere).
Search engine configuration
Nosto Search engine is relevant out of the box and search API can be used without any initial setup. Nosto Dashboard can be used to further tune search engine configuration:
- manage which fields are used for search and their priorities,
- create facets (filtering options) for search results page,
Ranking and Personalization - manage how results are ranked,
For Headless
Nosto's GraphQL APIs can be used for simplified implementations for headless frontends. While we recommend using our JS API for use in headless environments, there are scenarios where a GraphQL based implementation might be more fruitful.
🚨Implementing Nosto over GraphQL will not allow you to leverage the entire Nosto suite. When Nosto is implemented over tagging and/or Javascript APIs it can modify web-pages automatically with Javascript, which means many things can work out of the box. For example inserting recommendations dynamically onto a webpage, rendering of templates, tracking of user behavior. GraphQL instead is only an API which can be called from anywhere, so it cannot directly run Javascript or modify web-pages, instead those need to be implemented by the caller of the API.
The following features are not available through GraphQL API:
original facet value, it should be displayed in the user interface
data.count
shows how many products will be returned if you select this facet, it should be displayed in the user interface
data.selected
indicates if there is an active filter on this value
minimum field value for documents that match provided query
max
maximum field value for documents that match provided query
If currencyFormat is not provided and no default currency format exists for the account, an error will be returned.
The character used to separate the decimal part of the price (e.g., ".", ",").
thousandSeparator
The character used to separate thousands in the price (e.g., ",", " ").
Synonyms, Redirects, and other search features are also managed through Nosto Dashboard (my.nosto.com).
Facebook Ads: As the pixel events aren't dispatched.
Content Personalization: As the GraphQL API only handles the personalization and not onsite experiences.
Popups: As the GraphQL API only handle the personalization and not onsite experiences.
AB-testing & dynamic placements: Because the current GraphQL API works with recommendation identifiers directly and not through placements.
Each customer who visits a site is uniquely identified with a session identifier. When a new customer comes to the site, a GraphQL session mutation call must be made to initiate a session. The resultant session identifier must be persisted and reused for all consecutive calls.
💡The session-duration is 30 minutes from the last activity.
We recommend using the following flow to creating and resuming sessions.
Read the session-identifier from the cookie.
If the session-identifier doesn't exist, initiate a new session and store the resultant session identifier in a cookie.
Read the session identifier from the cookie, and leverage the mutations for the outlined page types.
Starting a new session
In order to start a new session when a session-identifier doesn't exist, you'll need to use the newSession mutation
The newSession mutation will return a unique session-identifier that you must persist.
⚠️ How you persist the session-identifier is entirely dependant upon your implementation. For example, you can persist it into a cookie or even application storage.
Using a session
If you already have a session-identifier, you can pass that using the updateSession mutation.
The example below is a generic example of how you update a session and pass the appropriate event to Nosto but in practice, you'll be using one of the page-specific mutations as shown in the section "Implementing on pages".
Implementing on pages
In order to use Nosto the different pages, you'll need to make the appropriate mutations for the different page types.
Every page-specific mutation requires you to pass the event for the specific page. These events are used to pass signals to Nosto's intelligence engine. Each of the page-specific mutations also allows you to fetch the recommendations for the given page type.
Sending the cart
When you mutate a session, it is imperative that you send the full cart contents.
If the current shopping cart is empty, this can be omitted.
Adding to cart with attribution
If you want to add a new item to the cart, without any page changes you should pass a new parameter of skipEventsthis will prevent analytics to count new page view event while still adding product to the cart.
if the add to cart happens as a result of a click on a recommendation element, you must pass the attribution along with the event as the ref parameter.
Sending the customer
When you mutate a session, it is imperative that you send the details of the currently logged-in customer. If no customer if currently logged in, this can be omitted.
Sending attribution parameters
When navigating between pages, if the navigation happens as a result of a click on a recommendation element, you must pass the identifier as part of the route and on the next page load, read the attribution parameter and pass it along with the event as the ref parameter.
⚠️ If you do not pass the attribution parameter, the recommendations statistics will be inaccurate but will not affect the quality of the recommendations.
Previewing the recommendations
All default the recommendation results are returned when the recommendations are enabled and the account is a live account. If you would like to preview the recommendations, all the recommendation fields accept a boolean isPreview parameter.
⚠️ Any recommendation requests when the preview mode is enabled do not accrue towards the statistics or skew the product relations.
On your home page
Sending the event
In order to use the GraphQL session mutation to fetch recommendations for your home or front page, the event, in this case, must be VIEWED_PAGE and you should specify a fully qualified URL of the home page as the target.
The pages query for home page also supports filtering recommendation for a specific Slot ID using the slotIds parameter in forFrontPage request, as shown below:
Note: slotIds accepts an array of String parameters
Fetching Recommendations
The forFrontPage field will return the result of all the recommendations that are configured for the front page. When slotIds filtering is used, the result will only contain the recommendations for the specified Slot Ids.
On your Category pages
Sending the event
In order to use the GraphQL session mutation to fetch recommendations for your category page, the event, in this case, must be VIEWED_CATEGORY and you should specify a fully qualified category path of the current category. For example, if you have a category called "Dresses" under the category "Women", the FQCN would be "/Women/Dresses".
The pages query for category page also supports filtering recommendation for a specific Slot ID using the slotIds parameter in forCategoryPage request, as shown below:
Note: slotIds accepts an array of String parameters
Fetching Recommendations
The forCategoryPage field will return the result of all the recommendations that are configured for the category page. When slotIds filtering is used, the result will only contain the recommendations for the specified Slot Ids.
On your Product pages
Sending the event
In order to use the GraphQL session mutation to fetch recommendations for your search page, the event, in this case, must be VIEWED_PRODUCT and you should specify the product-identifier of the current product being viewed.
The pages query for product page also supports filtering recommendation for a specific Slot ID using the slotIds parameter in forProductPage request, as shown below:
Fetching Recommendations
The forProductPage field will return the result of all the recommendations that are configured for the product page. When slotIds filtering is used, the result will only contain the recommendations for the specified Slot Ids.
On your search page
Sending the event
In order to use the GraphQL session mutation to fetch recommendations for your search page, the event, in this case, must be SEARCHED_FOR and you should specify the search term of the query.
The pages query for search page also supports filtering recommendation for a specific Slot ID using the slotIds parameter in forSearchPage request, as shown below:
Fetching Recommendations
The forSearchPage field will return the result of all the recommendations that are configured for the search page. When slotIds filtering is used, the result will only contain the recommendations for the specified Slot Ids.
On your cart/checkout page
Sending the event
In order to use the GraphQL session mutation to fetch recommendations for your cart or checkout page, the event, in this case, must be VIEWED_PAGE and you should specify a fully qualified URL of the cart page as the target.
The pages query for cart page also supports filtering recommendation for a specific Slot ID using the slotIds parameter in forCartPage request, as shown below:
Fetching Recommendations
The forCartPage field will return the result of all the recommendations that are configured for the front page. When slotIds filtering is used, the result will only contain the recommendations for the specified Slot Ids.
On the order page
Sending the event
In order to use the GraphQL session mutation to fetch recommendations for your cart or checkout page, you must use a different mutation as compared to the rest of the pages.
⚠️ The customer, in this case, is the details of the customer making the purchase.
The pages query for order page also supports filtering recommendation for a specific Slot ID using the slotIds parameter in forOrderPage request, as shown below:
Fetching Recommendations
The forOrderPage field will return the result of all the recommendations that are configured for the order-confirmation page. When slotIds filtering is used, the result will only contain the recommendations for the specified Slot Ids.
query {
search(
accountId: "YOUR_ACCOUNT_ID"
query: "green"
) {
products {
facets {
... on SearchTermsFacet {
id
field
type
name
data {
value
count
selected
}
}
}
}
}
}
To create a search application, call the init function with your configuration. This will create a new Preact application that renders on the specified contentCssSelector. It will also bind to the input element identified by the provided inputCssSelector and execute a search upon form submission.
In the example above, we supply serp query parameters as an object. Additionally, the serpQuery parameter can also be supplied as a function. The function flavor can be used for building complex query parameters and provides access to other pre-defined configuration parameters.
Using variationId for price variations
When you have in use, provide the product variation ID by accessing the pre-defined variationId method from the default configuration:
Using currency for exchange rates
When you use exchange rates for multi-currency support, use the currency parameter instead:
The full list of Configuration options is documented
Search page redirect
When serpPathRedirect parameter is set to true, the application after search submission will redirect the browser to the search page specified in serpPath. Default behavior will only rewrite browser history to the specified path, without reloading the page.
In many cases, the search/autocomplete input is located on a different page from the search results. For example, on the landing or home page; or it may be always visible in the store's header. For those cases, it may be desired to redirect the user to the search results when a search request is submitted. If search page redirect is not configured, Nosto integration assumes that the search results should be rendered on the current page.
The redirect is controlled by two configuration variables:
serpPath (string) - specifies the path to the search page (follows the browser's location.pathname).
serpPathRedirect - (boolean or function) - combined variable that controls whether or not the redirect is enabled, and also provides a custom navigation mechanism if necessary.
When serpPathRedirect is omitted or set to false, the default behaviour is to update the browser's history (i.e. rewrite the current URL) to add the search query parameter.
When serpPathRedirect is set to true, the browser will redirect to the search page indicated by serpPath upon search submission. The default mechanism is location.href = {targetUrl} . If the current page already matches the search path, the search query parameter will be added instead.
When serpPathRedirect is set to a function, it will be called instead of setting location.href . This is useful to, for example, interact with your frontend framework, inject custom logic before redirect or handle special cases for redirect. For example:
In function form, serpPathRedirect exposes the main query object that holds the data which would instead be send to Nosto. The second object simply holds information about the click.
Unbinding existing search input
To prevent events from firing on an existing input, you need to provide the CSS selector of the form that the input is in to the initialization configuration. When optional fromCssSelector is passed, it will unbind the form and the elements inside from existing events. Additionally, formUnbindDelay in milliseconds as value can be passed to delay the unbinding functionality.
Serp component
The search results page component should render a full search page using the provided app state. A minimal example might look like this:
Automatic URL Parameter Compression
When the compressUrlParameters flag is set to true, it automatically applies the URL parameter compression functions for filters, sort and pagination.
@nosto/preact library has pre-built functions for changing search url format:
Description
Example
Product thumbnails
Product thumbnails are supported via decorators that augment the product data returned by the Nosto Search service.
The following example shows modifications to the init call to make product thumbnails available in the result data:
The thumbnailDecorator takes a size argument and requires the following additional fields to be made available in the result set for accurate thumbnails:
imageHash for imageUrl thumbnails
thumbHash for thumbUrl thumbnails
The supported sizes are
Code
Description
The same mapping will also be attempted for SKU level data
Currency formatting
Currency formatting is implemented via the priceDecorator decorator function.
The priceDecorator utilizes the currency formatting definitions of the Nosto account to format prices into priceText and listPriceText fields, covering both product and SKU level data.
Include Required Fields
The fields required for this mapping are:
price will be formatted to priceText
A complete example of the Search-templates configuration for price variations:
For exchange rates, use currency instead:
Multi-Currency
To enable multi-currency functionality in search templates, follow these steps:
Enable Multi-Currency in Nosto Admin -
Choose the appropriate parameter based on your setup:
Use variationId: this.variationId() when you have price variations in use
Price variations example
When using price variations, include the variationId parameter in your search query:
Exchange rates example
When using exchange rates, include the currency parameter in your search query:
Query parameter mapping
In addition to the compressUrlParameters flag the serpUrlMapping should be used to control the mapping from URL parameter keys to paths in the internal query object. The default looks like this:
The key is the internal path in the query model and the value is the query parameter name that should be used in the URL.
Features
Faceted navigation
Stats facet
The returns the minimum and maximum values of numerical fields from search results. This functionality is especially useful when creating interactive elements such as sliders and range selectors. For instance, a price slider can use these min-max values to define its adjustable range, providing a simple way for users to filter products within a specific price range. Similarly, these values are utilized in the RangeSelector to define the overall scope of range selections, allowing for the configuration of selection precision through the range size parameter.
Range Slider
Utilize the useRange ( or previously useRangeSlider ) hook to generate useful context for rendering range inputs. Additionally, employ the component to generate the interactive slider itself. These tools together facilitate the creation of dynamic and interactive range sliders for your application.
Example #1:
with useRange
Example #2
with useRangeSlider (legacy)
Range Selector
If you require an alternative method where values are selected through radio buttons rather than a slider, consider using useRangeSelector hook. This tool allows users to choose from predefined range intervals with radio buttons, offering a different interaction style.
The range size parameter in the useRangeSelector hook specifies the size of each interval in the range and determines the total number of range items displayed. Additionally, it automatically rounds the minimum value down to ensure intervals are aligned with the specified range size.
For example, if the minimum product price in the current catalog is 230, and the maximum product price is 1000, the range size of 200 will adjust the starting point to 200 and create intervals displayed under the "Price" filter as follows:
200 - 400
400 - 600
600 - 800
800 - 1000
Terms facet
The returns field terms for all products found in the search. This feature analyzes the content of each product and extracts meaningful terms. These terms can then be used to filter or refine search results, providing users with a more accurate and targeted product search.
You can use the toggleProductFilter function to toggle any filter value. This function will either add the filter value if it's not already applied or remove it if it's currently active, thus providing an efficient way to manipulate product filters in your application.
Pagination
Use the usePagination hook to generate useful context for rendering any desired pagination. Utilize the width parameter to adjust how many page options should be visible. Also, remember to scroll to the top on each page change to ensure a seamless navigation experience for users.
Infinite Scroll
Nosto search-templates library provides a simple out-of-the-box solution to implement infinite scroll functionality. Simply wrapping your product rendering with the <InfiniteScroll> component is generally enough.
As the user scrolls the page down, the wrapper will detect it using the IntersectionObserver. If it is not supported by the user's browser, a 'load more' button will be shown instead.
Observer options
To achieve a smoother scrolling experience, the InfiniteScroll component accepts an optional prop called observerOptions. This prop allows you to customize the behavior of the , which is used to detect when the scroll trigger comes into view.
The observerOptions prop accepts the same parameters as the IntersectionObserver .
Persistent Search Cache
When using infinite scroll, consider enabling persistent search cache as well. When this feature is enabled, the latest search API response will be automatically cached and stored in the browser's session storage.
This improves the user experience significantly when the user navigates from a product details page back into the search results using the browser's 'back' function. The data necessary to display the products is already available, and the user will see the products immediately, without waiting for them to load again.
This feature is useful for both paginated and infinite scroll, but the benefits are significantly more visible with the latter.
Product actions
Since the code editor utilizes the Preact framework, it offers significant flexibility in customizing behavior or integrating the search page with existing elements on your site. For instance, you can implement actions such as 'Add to Cart', 'Wishlist', or 'Quick View'.
Handling native results
Nosto will attempt to display the original search results in case Nosto service is unavailable or can't be reached. In addition, the original products are made available for the SEO crawlers, improving the page's ranking in the search engines. To make it possible, it's recommended to hide the original search results instead of removing or blocking them.
The best approach is to add ns-content-hidden class name to the same element you are targeting with contentCssSelector or categoryCssSelector. This class name will be stripped away by Nosto automatically as soon as the script is initialized.
In addition, you should define CSS to hide the target element:
Analytics
Search automatically tracks to Google Analytics & Nosto Analytics when using SerpElement component.
Component parameters:
Fallback Functionality
The search page incorporates built-in fallback functionality, allowing users to customize the behavior in case the search service encounters issues. To activate this feature, modify the initialization configuration to include the fallback: true key-value pair.
Enabling Fallback
To enable fallback functionality, include the following code in the initialization configuration:
Once fallback is enabled, if the search request fails to retrieve data, the search functionality will be temporarily disabled for 10 minutes, and the original content Nosto has overridden will be restored.
Alternative Fallback Behavior
If the behavior described above is undesirable, the configuration supports an alternative option. Fallback mode can be set to fallback: 'legacy', in which case the user will see a page reload if the search request fails. After that, Nosto will not attempt to override the original search results or category pages for 10 minutes.
Customizing Fallback Location
Additionally, it's possible to customize the location to which users are redirected when the search functionality is unavailable. This customization involves specifying functions for both the search engine results page (SERP) and category pages.
SERP Fallback
To redirect users to a specific location when the search engine is down, define a function for serpFallback. This function accepts one parameter containing information about the current search query, including the query itself.
Category Fallback
Similarly, for category pages, define a function for categoryFallback. This function also accepts one parameter containing information about the current query, including the category ID or Path.
By customizing these fallback locations, you can enhance the user experience by providing them with alternative navigation options if the search functionality is temporarily unavailable.
Search engine configuration
Nosto Search engine is relevant out of the box and search API can be used without any initial setup. Nosto Dashboard can be used to further tune search engine configuration:
- manage which fields are used for search and their priorities,
- create facets (filtering options) for search results page,
Ranking and Personalization - manage how results are ranked,
Compresses filter parameters. Multiple filter values are separated by a comma, which is encoded. This is because filter values can contain non-alphanumeric letters themselves.
The fallback: true setting only works out of the box if the path is the same for both the dedicated Nosto search page and the native search page, as well as for category pages.
If the paths differ, you must configure the serpFallback or categoryFallback function to ensure proper redirection. See: Customizing Fallback Location
This behavior has been the default fallback behavior before August 20, 2024.
import { SerpElement } from '@nosto/preact'
import { useState } from 'preact/hooks'
export default ({ product }) => {
const [addedToCart, setAddedToCart] = useState(false)
return (
<SerpElement
as="a"
hit={product}
>
<img src={product.imageUrl} />
<div>
{product.name}
</div>
<button
// Allow the button to be clicked only once
disabled={addedToCart}
// Add the product to the cart when the button is clicked
onClick={(event) => {
// Don't navigate to the product page
event.preventDefault()
// Update the button text and disable it
setAddedToCart(true)
// Add the product to the cart, this depends on the cart implementation
jQuery.post('/cart/add.js', {
quantity: 1,
id: product.productId,
})
}}
>
// Show different text if product was added to the cart
{addedToCart ? 'Added to cart' : 'Add to cart'}
</button>
</SerpElement>
)
}
css
.ns-content-hidden {
display: none;
/* Or other styles as needed */
}